• Skip to primary navigation
  • Skip to main content
  • Skip to primary sidebar
  • About
  • Recipe
    • Listicle
    • Kitchen Staples
    • Drinks
      • Cocktails
      • Non-Alcoholic
      • Smoothies
    • Breakfast
      • Eggs
      • Muffins and Baking
      • Pancakes and Waffles
    • Sweet
      • Brownies and Bars
      • Cakes and Frostings
        • Beginner Cake Recipes
        • Intermediate Cake Recipes
        • Advanced Cake Recipes
      • Cheesecake
      • Cobblers & Fruit Desserts
      • Cookies and Candies
      • Custards & Trifles
      • Pies & Tarts
    • Savory
      • Appetizers
      • Easy Weeknight Meals
      • Beef and Pork
      • Chicken and Turkey
      • Fish and Shellfish
      • Grains and Beans
      • Pasta and Rice
      • Potatoes
      • Quinoa
      • Soups & Stews
      • Vegetables
    • On The Lighter Side
  • Resources
  • Contact
  • Work With Me
  • Privacy Policy

The Cake Chica

menu icon
go to homepage
  • Recipe Index
  • About
  • Work With Me
  • Contact

subscribe
search icon
Homepage link
  • Recipe Index
  • About
  • Work With Me
  • Contact

×
Home

Homemade Bacon-Ranch Tator Tots

June 12, 2017


Homemade Bacon-Ranch Tator Tots

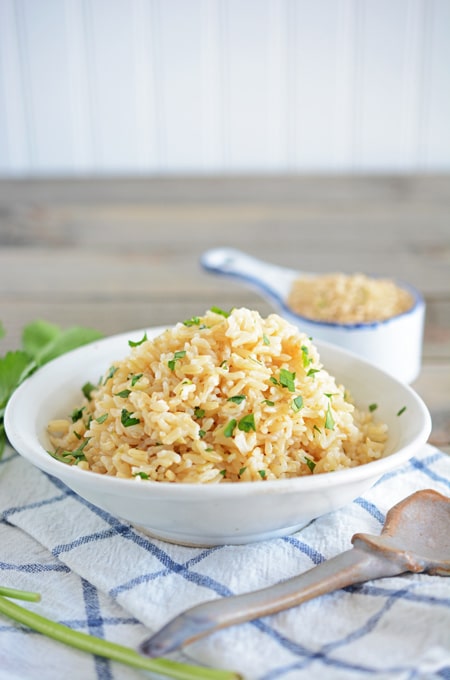
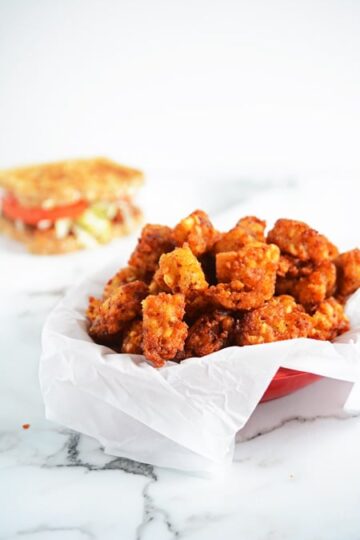
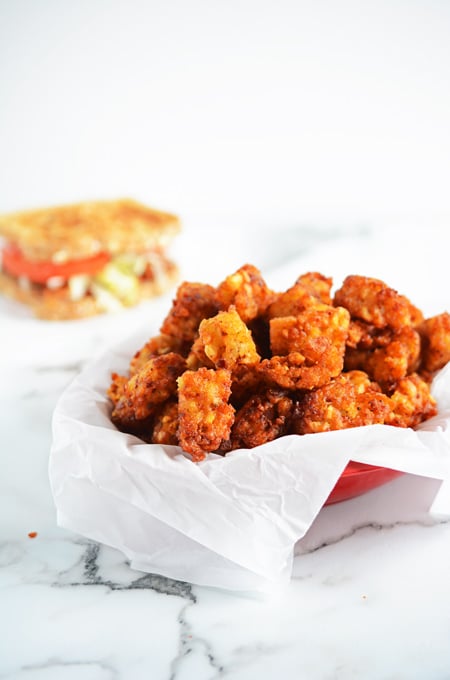
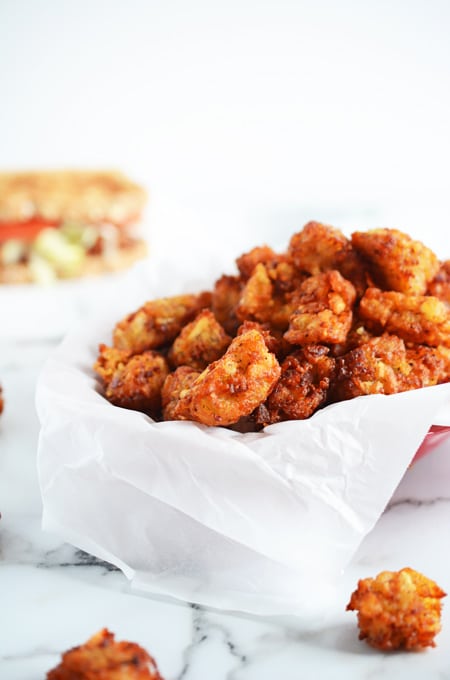
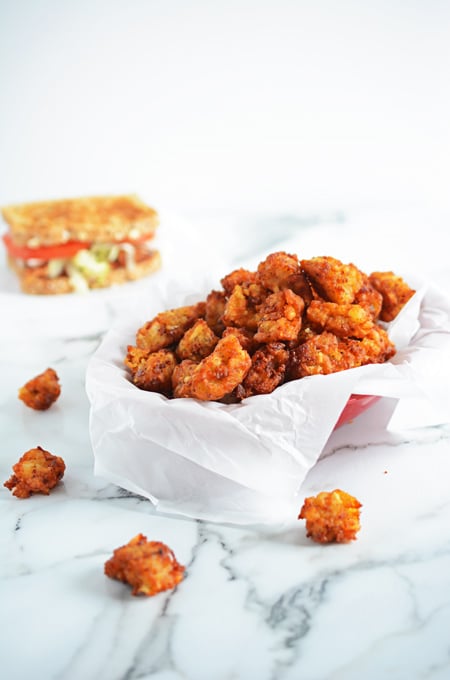
No store bought frozen tator tots can compare to these Homemade Bacon-Ranch Tator Tots!

Homemade Bacon-Ranch Tator Tots

Sure there is a little work involved but it's worth it! They're flavorful and super crispy! You won't get that from the frozen kind.

Homemade Bacon-Ranch Tator Tots

These Homemade Bacon-Ranch Tator Tots are perfect for a special dinner. You can make them ahead of time which is always a plus. Once the tator tots are done, let them cool, then place in a freezer bag and freeze for up to 1 month. To reheat, place an oven rack in the middle position and heat your oven to 400 degrees. Place the tator tots on a rimmed baking sheet and bake until heated through, about 12 to 15 minutes.

Homemade Bacon-Ranch Tator Tots

Here are a few tips when making this recipe:

  1. If you have a few large pieces of potato that remain after processing, chop them coarsely by hand.
  2. To make handling the uncooked tots easier, use a wet knife blade and wet hands. This will help you shape the tots.
  3. When you drop the tots into the hot oil they may stick together. Be sure not to stir them until they have browned and set.
  4. You may end up with a few tots that have fried together. Once they are cool enough to handle, gently pull them apart.

Homemade Bacon-Ranch Tator Tots

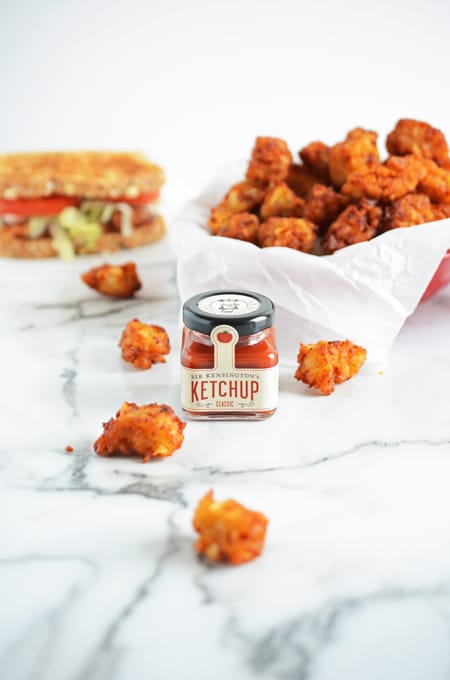
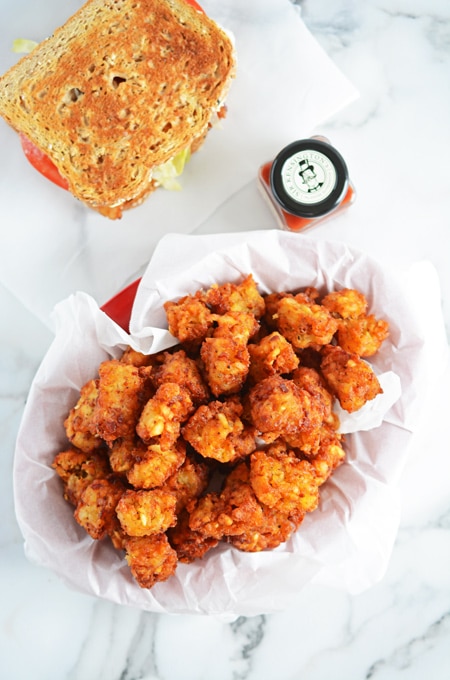
Now you've gone through all the work of making homemade tator tots from scratch, and let me tell you these probably don't really need any sort of condiments; but if you simply must have something like ketchup to dip these little nuggets of fried crispy-ness in, then be sure you choose a high quality ketchup like Sir Kensington's ketchup.

Don't forget to like and follow The Cake Chica on social media: Facebook, Instagram, and Pinterest. 

You May Also Like:

Beer Battered Onion Rings

Classic Hash Browns

Cheesy Roasted Potatoes with Bacon

Adapted by Mary from Cook's Country

...

Read More

Strawberry Shortcake

June 5, 2017

Strawberry Shortcake

Strawberry Shortcake

This one took a few tries to get it just right, but I'm happy to report it's finally perfected.

Strawberry Shortcake

Well at least in my opinion. Why don't you give it a try and tell me what you think?

Strawberry Shortcake

Strawberry Shortcake is perfect during the Summer months when strawberries are in season. This cake bakes up a wonderful sponge cake, that's soaked in a sugar syrup to give the cake a little extra moistness. Then top those moist cake layers with homemade whipped cream! Next, you'll top the whipped cream with fresh sliced strawberries. Yum! I think your gonna love this light and fluffy Strawberry Shortcake.

Strawberry Shortcake

And because this cake is so fluffy and light, if you're planning on taking it somewhere, I strongly recommend setting up this cake when you get to the event location. I brought this cake to a family gathering at my mom's house just a few weeks ago. I sliced the cake layers and wrapped them up in plastic wrap and stuck them in my cake storage container. Next I packed a wooden skewer, strawberries, a container of soaking syrup and another container of whipped cream. Once I got to my mom's house I assembled the cake there. Don't forget to pack a pastry brush for your soaking syrup and an offset cake spatula to spread on your whipped cream.

Strawberry Shortcake

I'd love to hear from you on social media. You can find me on Facebook, Instagram, and Pinterest.

I hope you enjoy this Strawberry Shortcake as much as I did. I'll talk with you guys next week!!!

Strawberry Shortcake

Adapted from Layered: Baking, Building, and Styling Spectacular Cakes by Tessa Huff.

You May Also Like:

Mixed Berry Sponge Cake

White Almond Cake

Lemon Layer Cake

...

Read More

Degustabox Giveaway

May 28, 2017

Degustabox Giveaway

Degustabox Giveaway

Hello everyone! I'm excited to host my very first giveaway in partnership with Degustabox.  All you have to do to enter is scroll down to the bottom of this post and answer one question! And while your here, check out some of the yummy treats I've made with the surprises I've received from Degustabox. Chocolate Orange Spice Cake, Caesar Salad with Anchovies, Chocolate Chip Monster Milkshake, Pumpkin Pie Ice Cream Float, Gluten-Free Veggie Pasta in Olive Oil, Homemade Graham Crackers, Moscow Mule, and Chocolate Cupcakes with Caramel Espresso Buttercream.

Degustabox Giveaway

This giveaway is only available to those living in The Contiguous United States. We are unable to ship to Alaska and Hawaii at this time.

a Rafflecopter giveaway

Homemade Graham Crackers

May 22, 2017

Homemade Graham Crackers

Homemade Graham Crackers

You may never buy those store bought graham crackers again after having these Homemade Graham Crackers!

Homemade Graham Crackers

These are great if you're looking for a bit of a cleaned up version of a graham cracker. I love graham crackers and I used to eat them as a "healthy" snack, that was until I read the ingredients list. I was a shocked at all the chemicals used to make a cracker. I mean its just a cracker right?

Homemade Graham Crackers

Thankfully I came across this homemade version with simple ingredients you can pick up at your local grocery store.

Homemade Graham Crackers

To keep up with new recipes from The Cake Chica, be sure to follow on Facebook, Instagram and Pinterest!

You May Also Like:

Homemade Magic Shell

Homemade Whipped Cream

Homemade Cheddar Cheese Crackers

Adapted from Martha Stewart's Cookies

...

Read More

Rocky Road Bars

May 9, 2017

Rocky Road Bars

Rocky Road Bars

Here is an easy homemade recipe for Rocky Road Bars, that is sure to impress your friends and family. I love baking cakes and decorating them, but they usually take a little more time in the kitchen. For those of you that don't want to spend that much time in the kitchen but want to create a dessert that's sure to impress with looks and taste, then this one is for you!

Rocky Road Bars

You don't even have to turn on your mixer for this one. If you don't want to melt the chocolate over a double boiler you can microwave the chocolate at 30 second intervals, being sure to stir between each interval so the chocolate doesn't burn.

Rocky Road Bars

If your marshmallows aren't getting that nice golden brown color to them by the last few minutes of baking, turn on your broiler and watch very closely for them to brown. Be careful, the broiler will turn your marshmallows brown fast but within seconds can also burn them, so keep a close eye on them.

 Follow The Cake Chica Facebook, Instagram, and Pinterest.

Rocky Road Bars

You May Also Like:

Espresso Rocky Road Oatmeal Cookies

Rocky Road Sundae Pie

Chewy Brownies

Adapted from Diner Desserts

Rocky Road Bars

Rocky Road Bars

Yield: 16 bars
Prep Time: 15 minutes
Cook Time: 35 minutes
Additional Time: 30 minutes
Total Time: 1 hour 20 minutes

A rich dark chocolate brownie base, topped with toasted marshmallows, almonds, toffee bits and chocolate chips!

Ingredients

BROWNIE

  • 5 ounces unsweetened chocolate
  • 1 cup (2 sticks) unsalted butter, cut into tablespoons
  • 2 cups granulated sugar
  • ½ teaspoon salt
  • 2 teaspoons vanilla extract
  • 3 large eggs
  • 1 cup all-purpose flour
  • 1 ½ cups coarsely chopped almonds

TOPPING

  • 1 cup coarsely chopped almonds
  • 1 cup milk chocolate-covered English toffee bits, such as Heath bits
  • 1 cup semisweet chocolate chips
  • 2 cups miniature marshmallows

Instructions

BROWNIE

  1. Preheat the oven to 350 degrees. Line a 13x9-inch baking pan with 2 pieces of foil (one horizontal and one perpendicular) creating handles at the edge of the pan to lift the brownies out after baking. Spray the bottom and sides of the foil-lined baking pan with non-stick bakers spray and set aside.
  2. Place the chocolate and butter on top of a double boiler over simmering water. Heat, stirring constantly, until the chocolate melts and the mixture is smooth. Remove the pan from the heat and let the mixture cool for about 10 minutes.
  3. Stir the sugar, salt and vanilla into the chocolate mixture. Stir in the eggs, one at a time, stirring well after each addition and no egg yolk remains. Stir in the flour and mix until just combined. Fold in the nuts and pour batter into the prepared baking pan and smooth the top with a rubber spatula.
  4. Bake for 30 minutes, or until a wooden skewer inserted in the center comes out clean or with a few moist crumbs attached. Remove from the oven and leave the oven on.

TOPPING

  1. Sprinkle half of the chopped almonds evenly over the hot brownie base. Sprinkle half of the toffee bits, half of the semisweet chocolate chips and half of the miniature marshmallows evenly over the almonds. Repeat this process with remaining almonds, toffee, chocolate chips and marshmallows, being sure to press each layer into the brownie base to adhere.
  2. Return the pan to the oven and bake for 5 to 7 minutes, or until the chocolate is partially melted and the marshmallows are soft and lightly browned. Place the pan on a wire rack and let cool for 20 minutes. Lift the bars out of the pan with the foil overhang and using a serrated knife, cut into 16 squares. Serve bars at room temperature.

Notes

Store in an airtight container in the refrigerator for up to 5 days. Bring to room temperature before serving.

Nutrition Information:
Yield: 16 Serving Size: 1
Amount Per Serving: Calories: 462Total Fat: 24gSaturated Fat: 9gTrans Fat: 0gUnsaturated Fat: 13gCholesterol: 42mgSodium: 205mgCarbohydrates: 58gFiber: 5gSugar: 43gProtein: 9g

*Nutrition information is an estimate and will vary.*

Did you make this recipe?

Tag @thecakechica1 on Instagram and hashtag #thecakechica1

© Mary | The Cake Chica
Cuisine: American / Category: Dessert


Old-Fashioned Sour Cream Doughnuts with Chocolate Glaze

May 1, 2017

Old-Fashioned Sour Cream Dougnuts with Chocolate Glaze

Old-Fashioned Sour Cream Dougnuts with Chocolate Glaze

If I didn't have so much cake experience, then I might have had a doughnut focused blog! Doughnuts are my jam! I love them even more than cake. But not just any doughnut, it's got to be the Old-Fashioned kind with chocolate glaze. No matter what kind of day I've had, or whatever is going on in life, when I have an Old-Fashioned Sour Cream Doughnut with Chocolate Glaze I'm in food heaven!

Old-Fashioned Sour Cream Dougnuts with Chocolate Glaze
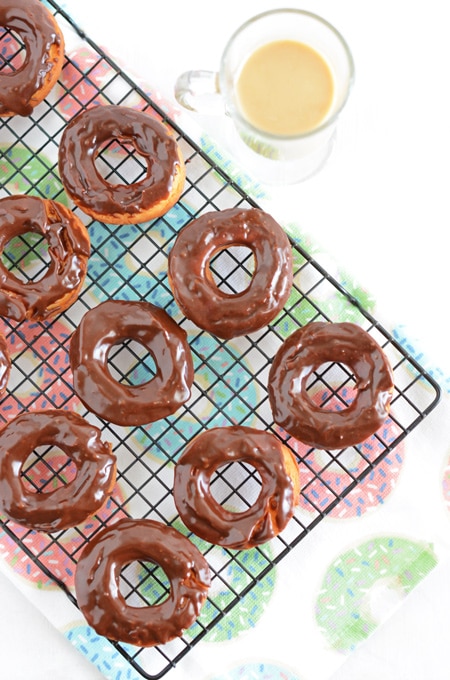
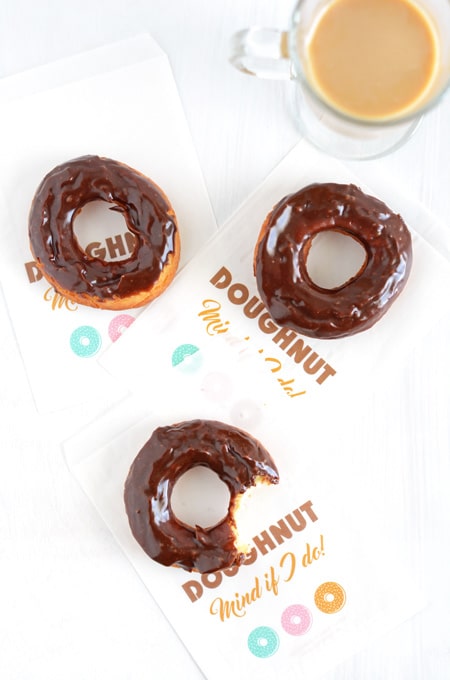
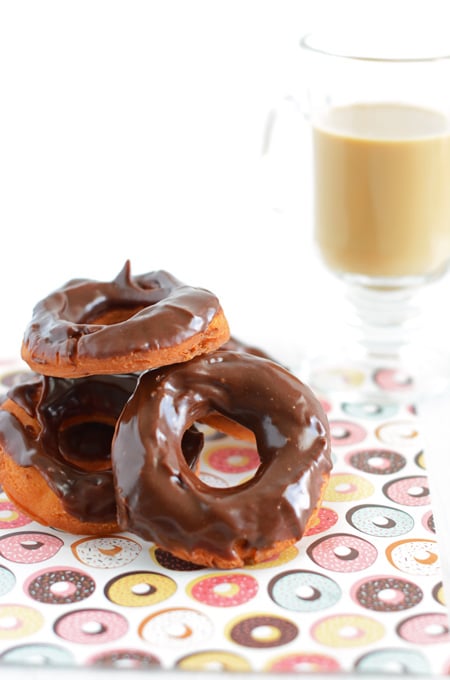
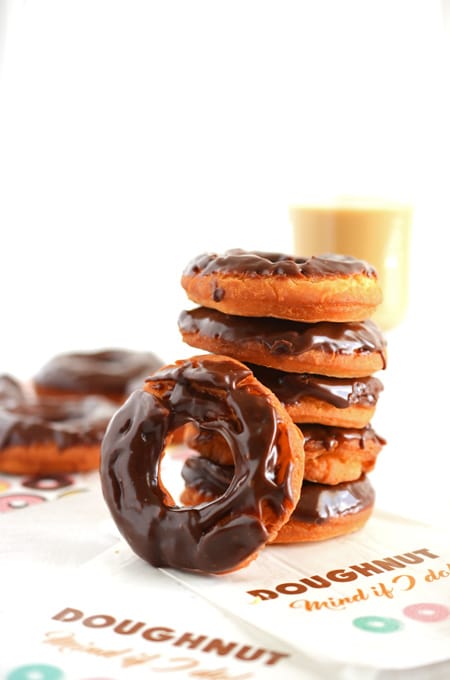
And don't forget the coffee. Dipping these doughnuts in coffee is the best way to eat them. It took me a little while to get this recipe down. I strive for perfection, especially with something I love so much, and I wanted to do this recipe justice, and make it worth while to make these doughnuts at home instead of buying them.

Old-Fashioned Sour Cream Dougnuts with Chocolate Glaze

Old-fashioned doughnuts should have a golden brown color and a crispy texture on the exterior. The interior should be light in color and fluffy. Luckily these doughnuts keep well for about 1 or 2 days. So you can make them the night before and have breakfast ready to go when you wake up the next morning!

Old-Fashioned Sour Cream Dougnuts with Chocolate Glaze

Yes you can easily get your doughnuts at the doughnut shop but the satisfaction you'll feel knowing you can make your own doughnuts at home is an amazing feeling! These doughnuts require a little more attention, they're made with sour cream and extra leavening and turned twice during frying.

But those beautiful ridges that form during frying are perfect for the glaze to sink into. I did roll mine out a little on the thin side. Next time I'll be sure to use my ruler to measure to exactly 1/2-inch thickness to make them even more fluffed up.

Old-Fashioned Sour Cream Dougnuts with Chocolate Glaze
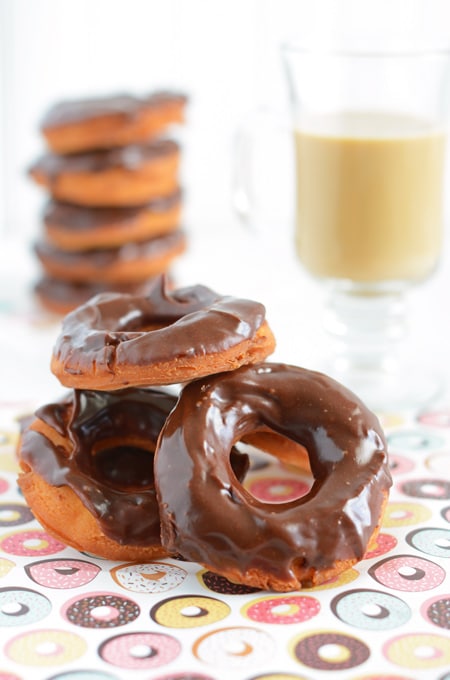
Don't forget to follow The Cake Chica on social media: Facebook, Instagram, and Pinterest. 

You May Also Like:

Banana Pecan Muffins

Blueberry Swirl Muffins

Sopaipillas

Adapted from Top Pot Hand-Forged Doughnuts and Joy of Cooking

...

Read More

Chocolate Cupcakes with Caramel-Espresso Buttercream

April 24, 2017

Chocolate Cupcakes with Caramel-Espresso Frosting

Chocolate Cupcakes with Caramel-Espresso Frosting


These Chocolate Cupcakes with Caramel-Espresso Buttercream are absolutely AMAZING! The base of these cupcakes is almost like a light and fluffy brownie that's full of chocolatey flavor, but not over powering. 

Chocolate Cupcakes with Caramel-Espresso Frosting

And the Caramel-Espresso Buttercream is the perfect topping. It's light and creamy and the caramel-espresso flavor pairs well with the chocolate cupcake. I truly am in love with this recipe.

Chocolate Cupcakes with Caramel-Espresso Frosting

This is a French-style buttercream made with brown sugar instead of white, which turns into caramel giving this buttercream its flavor. Plus, the addition of espresso powder compliments the caramel perfectly! The Caramel Espresso Buttercream is truly heavenly, but can be a bit tricky to make. Scroll down to read some tips I've learned while making the buttercream for these Chocolate Cupcakes with Caramel-Espresso Buttercream.

Chocolate Cupcakes with Caramel-Espresso Frosting

French-Style Caramel Espresso Buttercream Tips:

  1. Before adding the butter to the egg mixture, be sure the egg mixture is room temperature! Many, many times this is where I made my mistakes. I would follow a recipe that stated the time frame at which you are to whisk, but so many times my eggs were still too hot and when I added the butter it just deflated my buttercream and melted the butter. 🙁 This time I was determined not to let that happen. I beat mine until the egg mixture was anywhere from 75-80 degrees. I used a digital thermometer to test for this.
  2. The above tip is really the main problem I ran into previously, but I've read you can also wet a kitchen towel and freeze it and use that around the bottom of your mixing bowl to help cool the egg mixture to room temperature while it's beating.
  3. This buttercream almost started to separate on me because I added the flavoring a little too late! (My fault, but always learning) I was a little worried at first when the buttercream started sloshing around the bowl but it quickly came together. 🙂
  4. And if all else fails, (I've never tried this method) I've heard if your buttercream breaks or separates, just whip that buttercream up and eventually it will come together. Luckily I didn't have to resort to this. Buttercream can be a tricky beast, but once you learn how to trouble shoot it a bit, you'll be glad you made it.

Chocolate Cupcakes with Caramel-Espresso Frosting

And last but not least, top your cupcakes off with a candy caramel. I usually like to make everything, down to the cupcake garnishes homemade, especially if I've gone through the trouble of making homemade cupcakes, however I find Lovely's candy very worthy.

They are made with real butter, sweetened condensed milk and molasses. No high fructose corn syrup or artificial colors. Just pure and simple ingredients. And that is something I can stand behind. 

Chocolate Cupcakes with Caramel-Espresso Buttercream

That's all I have for you this week!  You can follow me on social media: Facebook, Instagram, and Pinterest.

You May Also Like:

Cookies and Cream Cupcakes

Confetti Cupcakes with Confetti Buttercream

Cherry Almond Cupcakes

Adapted from The Cake Book and Food & Wine: Best of Best Cookbook

...

Read More

Beef Picadillo Over Brown Rice

April 18, 2017

Beef Picadillo Over Brown Rice

Beef Picadillo Over Brown Rice

Beef Picadillo Over Brown Rice is one of my favorite comfort foods. Picadillo is similar to hash made with ground beef and tomatoes. There are a lot of variations to this dish depending on where you're from. I have seen people put raisins and olives in it, but I like to keep mine pretty simple.

Just some potatoes (a must in my opinion), tomatoes, garlic, onion and some salt and pepper. It's really all you need.

Beef Picadillo Over Brown Rice

A few of the things I love about this recipe are:

  1. It's so easy to make.
  2. It's cheap.
  3. It's versatile. I've made this recipe using ground turkey to lighten it up a little.
  4. And it reminds me of growing up with my grandmothers in the kitchen making Mexican food when I was little. The aroma takes me back to that time. It's a beautiful thing.

Beef Picadillo Over Brown Rice

And the Picadillo isn't the only star in this recipe. The Brown Rice is pretty tasty too. I have a separate post all about this Easy Baked Brown Rice so be sure to check it out! I've also got a Picadillo Taco recipe you might also like.

Beef Picadillo Over Brown Rice

Follow me on social media: Facebook, Instagram, and Pinterest. 

You May Also Like:

Weeknight Ground Beef Stroganoff

Ground Beef Taco Bowl

Porcini Ravioli with Meat Sauce

...

Read More

Chocolate-Peanut Butter Cream Pie

April 10, 2017

Chocolate Peanut Butter Cream Pie

Chocolate Peanut Butter Cream Pie

Chocolate and peanut butter! Who can deny this match made in heaven? Not me that's for sure. Take this Chocolate-Peanut Butter Cream Pie for example, made on top of an Oreo cookie crust, then topped with a chocolate-peanut butter filling.

Chocolate Peanut Butter Cream Pie

But we're not finished, next comes the peanut butter-whipped cream layer and then whipped cream layer on top.

Sprinkle with a few chopped peanuts and voila! Time to enjoy this little piece of chocolate-peanut butter heaven.

Chocolate Peanut Butter Cream Pie

This Chocolate-Peanut Butter Cream Pie is perfect for the up coming summer months. You do have to bake the crust in the oven, however it's only for a short amount of time and totally worth turning on your oven for about 10 to 15 minutes.

I mean come on the crust is made with Oreos! And not just the cookie part, the cream part is included in the recipe too! I could probably do a post on this cookie crust alone, it's a favorite of mine! My advice, skip the pre-made Oreo crust in the store. You'll love this homemade version.

I used chunky peanut butter in this recipe but you could also use creamy if that fits your taste, I like a little texture in mine though. For the whipped cream design I used a star tip and made simple circular swirl designs in different sizes and piped some stars to fill in the blank spaces. You don't have to be perfect with this. I kinda like that rustic look for this pie anyway.

Chocolate Peanut Butter Cream Pie

Don't forget to catch me on social media: Facebook, Instagram, Pinterest.

You May Also Like:

Chocolate Cream Pie

Chocolate Chunk Pecan Pie

Key Lime Pie

Adapted from Diner Desserts by Tish Boyle

...

Read More

Easy Baked Brown Rice

April 3, 2017

Easy Baked Brown Rice

Here is one for those that like to meal prep. This Easy Baked Brown Rice may not be as quick as the 5 minute versions, but it's definitely worth the baking time.

Easy Baked Brown Rice

I won't make brown rice any other way from now on. Easy Baked Brown Rice always comes out light and fluffy everytime!

Easy Baked Brown Rice

I usually make this on a Sunday and use it throughout the week for my egg white breakfast bowls.

Easy Baked Brown Rice

Perfect Brown Rice

Brown rice should have nutty flavor with more texture that's slightly sticky and a bit more chewy than white rice. Here are some benefits to baking your rice:

  1. Baking allows the rice to cook more gently and evenly, reducing the risk of burning your rice. Cooking rice on the stove top can sometimes lead to burned rice on the bottom of your pan.
  2. Baking your rice also allows you to use less water. Most stove top methods have you add more water to prevent scorching your rice but this just makes your rice soggy and over cooked.

Adding boiling water to your rice helps to keep the cooking time to 1 hour, versus using cold tap water. Plus using a tight seal on top of the baking dish is super important.

Be sure to flavor your rice before it goes into the oven. A little bit of fat and salt will help keep the rice nice and fluffy! And lastly, once the rice comes out of the oven, be sure to fluff to separate the grains and then cover it with a clean dish towel to absorb the moisture. This keeps the moisture from going back into your rice.

Easy Baked Brown Rice

You can also follow me on social media: Facebook, Instagram,and Pinterest. Talk with you next week!

Adapted from Cook's Illustrated Cookbook.

Easy Baked Brown Rice

Easy Baked Brown Rice

Yield: 6 servings
Prep Time: 10 minutes
Cook Time: 1 hour
Additional Time: 10 minutes
Total Time: 1 hour 20 minutes

This fluffy baked brown rice has a earthy and nutty flavor and is easy to make.

Ingredients

  • 1 ½ cups brown rice
  • 2 1/3 cups water
  • 2 teaspoons unsalted butter or vegetable oil
  • ½ teaspoon salt

Instructions

  1. Adjust and oven rack to the center of the oven and heat oven to 375 degrees. Pour rice in an 8-inch square baking dish.
  2. Bring water and butter to a boil in a small covered saucepan. Once the water boils immediately stit in the sale and pour water into the baking dish. Cover tightly with a double layer of foil and bake for 1 hour, until the rice is tender.
  3. Remove the rice from the oven, uncover and fluff rice with a fork. Cover the dish with a clean kitchen towel to catch the moisture and let stand for 5 minutes. Uncover and let rice stand for another 5 minutes and serve.

Notes

*Nutrition information is an estimate and will vary.*

Nutrition Information:
Yield: 4 Serving Size: 1
Amount Per Serving: Calories: 129Total Fat: 6gSaturated Fat: 2gTrans Fat: 0gUnsaturated Fat: 4gCholesterol: 5mgSodium: 271mgCarbohydrates: 17gFiber: 1gSugar: 0gProtein: 2g

*Nutrition information is an estimate and will vary.*

Did you make this recipe?

Tag @thecakechica1 on Instagram and hashtag #thecakechica1

© Mary | The Cake Chica
Cuisine: American


You May Also Like:

Fiesta Turkey with Brown Rice

Easy Mexican Red Rice

Beef Picadillo Over Brown Rice


Easy Weeknight Chili

March 27, 2017

Easy Weeknight Chili

Here is one you can put on your weeknight recipe repertoire. This Easy Weeknight Chili is also a great option for lower-carb dieters since there are no beans in this recipe.

Easy Weeknight Chili

It's also under 500 calories for those calorie counters out there.

Frontera Enchilada Sauce

Enchilada Sauce

A typical beef chili needs quite a bit of simmering time to get those flavors to meld. But I have a secret ingredient to share with you..... and it's enchilada sauce!

Instead of simmering for hours you can use enchilada sauce to add some flavor. Now one very important TIP: Use an enchilada sauce you love!!! This is where this Easy Weeknight Chili gets most of it's flavor from.

I haven't found a canned enchilada sauce that I liked until I tried Frontera brand enchilada sauce. It's pretty new, but I've seen it at Kroger, and Sprouts. Or make your own enchilada sauce.

Easy Weeknight Chili

Not only does this recipe make a great chili but my husband actually made a sloppy joe out of it because it's nice and thick and does tend to have the consistency of a sloppy joe filling. He loved it!

So, I've got a very versatile one for you here this week. Top this with your favorite chili toppings, mine are smoked gouda and sour cream with a few saltine crackers. How do you top your chili? Let me know in the comments below.

Easy Weeknight Chili

You can find The Cake Chica on these social media platforms: Facebook, Instagram, and Pinterest.

Easy Weeknight Chili

You May Also Like:

Simple Turkey Chili with Kidney Beans

Ground Beef Taco Bowl

Beef Picadillo Over Brown Rice


Easy Weeknight Chili

Easy Weeknight Chili

Yield: 6 servings
Prep Time: 10 minutes
Cook Time: 20 minutes
Total Time: 30 minutes

A flavorful and easy ground beef chili you can prepare on a weeknight.

Ingredients

  • 1 tablespoon organic olive oil
  • 2 organic onions, chopped
  • 4 organic red bell peppers, chopped
  • 2 pounds organic, grass-fed ground beef
  • 4 teaspoons cumin
  • 2 tablespoons organic garlic powder
  • 1 tablespoon kosher salt
  • 1 tablespoon organic olive oil
  • 4 teaspoons fennel seed
  • 2 cups good quality enchilada sauce
  • 2 chipotle peppers in adobo sauce, chopped
  • 6 ounces organic tomato paste
  • 1 bunch organic cilantro for garnish
  • Lime juice for garnish
  • Chives for garnish
  • Sour cream for garnish
  • Smoked Gouda cheese for garnish
  • Chopped or sliced jalapeno for garnish

Instructions

  1. In a Dutch oven over medium-high heat add 1 tablespoon olive oil and cook the onions and bell pepper, about 8 to 10 minutes. Remove the veggies from the Dutch oven and set aside.
  2. Add beef to the Dutch oven and cook. Drain fat. Season beef with cumin, garlic, and salt and stir to combine.  
  3. In a small saute pan over medium-high heat, add 1 tablespoon olive oil and fennel seeds and toast until browned. 
  4. Add the toasted fennel seeds and veggies to the meat and stir to combine. Cook until beef is cooked through. 
  5. Add enchilada sauce, chipotle peppers and tomato paste, stirring well.
  6. Bring chili to a simmer and taste for seasoning. Top with your favorite garnishes and serve.

Notes

*Nutrition information is an estimate and will vary.*

Nutrition Information:
Yield: 6 Serving Size: 1
Amount Per Serving: Calories: 387Total Fat: 16gSaturated Fat: 6gTrans Fat: 0gUnsaturated Fat: 9gCholesterol: 81mgSodium: 1923mgCarbohydrates: 25gFiber: 5gSugar: 14gProtein: 38g

*Nutrition information is an estimate and will vary.*

Did you make this recipe?

Tag @thecakechica1 on Instagram and hashtag #thecakechica1

© Mary | The Cake Chica
Cuisine: American / Category: Beef and Pork


Gluten Free Veggie Pasta in Olive Oil Sauce

March 20, 2017

Gluten Free Veggie Pasta in Olive Oil Sauce

This Gluten Free Veggie Pasta in Olive Oil sauce would be perfect for your Meatless Monday meal or a great side dish to your main coarse.

Gluten Free Veggie Pasta in Olive Oil Sauce

My husband has been making this pasta for years with pasta such as angel hair or spaghetti.

Gluten Free Veggie Pasta in Olive Oil Sauce

And since he had never actually written the recipe down for his olive oil sauce pasta, I thought this would be the perfect time to get that recipe down.

Gluten Free Veggie Pasta in Olive Oil Sauce

Pasta

You can also use regular pasta but if you are using Tolerant's pasta there are a couple of things you should know:

  1. When you put the pasta in the boiling water keep an eye on it or it could boil over quickly.
  2. The water will be cloudy and foamy but that's normal when cooking with this type of pasta so be sure to use plenty of water.

Gluten Free Veggie Pasta in Olive Oil Sauce

Something else you should know, I really like this pasta. And I can see myself using this pasta to lighten things up a little when I want to take in more plant based proteins and nutrients. I love that it's certified organic, vegan, gluten-free and non-gmo. If you can get past the cloudy water then I would definitely recommend this pasta!

Gluten Free Veggie Pasta in Olive Oil Sauce

Don't forget to catch me on Facebook, Instagram, Pinterest!

You May Also Like:

Slow Cooker Turkey Tortellini

Porcini Ravioli with Meat Sauce

Fideo

Gluten Free Veggie Pasta in Olive Oil Sauce

Gluten Free Veggie Pasta in Olive Oil Sauce

Yield: 4 side servings
Prep Time: 15 minutes
Cook Time: 10 minutes
Total Time: 25 minutes

Veggies pasta with olive oil sauce made with gluten free pasta.

Ingredients

  • 8 ounces Tolerant Organic Green Lentil and Kale Pasta
  • 2 tablespoons kosher salt for pasta water
  • ¼ cup extra-virgin olive oil
  • 3 organic garlic cloves, sliced
  • 1/2 cup sliced black olives
  • 1/2 cup jarred artichoke hearts, sliced
  • ¼ cup white wine
  • 2 tablespoons capers, drained and rinsed
  • ¼ teaspoon red pepper flakes
  • 1 organic Roma tomato (about ¼ cup), diced
  • Grated Parmesan cheese, for garnish
  • Chopped organic Italian parsley, for garnish
  • Salt and pepper to taste

Instructions

  1. In a large saucepan, bring 6 quarts of water to a boil. Add kosher salt and pasta to boiling water and stir. Continue to cook according to package instructions.
  2. Meanwhile, in a large saute pan add olive oil and heat over medium heat. Add sliced garlic, black olives and artichokes to pan and saute for about 5 minutes. Add wine and saute for 2 to 3 minutes. Add capers and red pepper flakes. Remove the pan from the heat and add cooked pasta to the pan and mix with tongs to coat the pasta in the olive oil sauce. Top with fresh tomatoes, grated Parmesan cheese and parsley.

Notes

*Nutrition information is an estimate and will vary.*

Nutrition Information:
Yield: 4 Serving Size: 1
Amount Per Serving: Calories: 348Total Fat: 17gSaturated Fat: 2gTrans Fat: 0gUnsaturated Fat: 13gCholesterol: 1mgSodium: 3521mgCarbohydrates: 38gFiber: 8gSugar: 3gProtein: 11g

*Nutrition information is an estimate and will vary.*

Did you make this recipe?

Tag @thecakechica1 on Instagram and hashtag #thecakechica1

© Mary | The Cake Chica
Cuisine: Italian / Category: Dinner


  • « Go to Previous Page
  • Page 1
  • Interim pages omitted …
  • Page 19
  • Page 20
  • Page 21
  • Page 22
  • Page 23
  • Interim pages omitted …
  • Page 39
  • Go to Next Page »

Primary Sidebar

Welcome!

Hi, I’m Mary. The self-taught baker, food stylist, and photographer behind The Cake Chica. If you love creating bakery-style desserts from scratch and want a peek behind the scenes of how they’re styled and captured, you’re in the right place.

More about me

Popular

  • Toasted Coconut Caramel Layer Cake on marble cake pedestal.
    Toasted Coconut Caramel Layer Cake
  • Best Big Fat Chewy Chocolate Chip Cookie
  • Key Lime Pie Layer Cake cover photo.
    Key Lime Pie Layer Cake
  • White Cake with Strawberry Filling
    White Cake with Strawberry Filling

Seasonal

  • Banana Cream Pie
  • Chocolate Root Beer Float Cake
  • Cotton Candy Layer Cake
  • Strawberry Ice Cream Pop Cake

Footer

↑ back to top

About

  • The Cake Chica
  • Recipe Index
  • Work With Me

Legal

  • Privacy Policy

Contact

  • Contact

As an Amazon Associate I earn from qualifying purchases.

Copyright © 2025 The Cake Chica