• Skip to primary navigation
  • Skip to main content
  • Skip to primary sidebar
  • About
  • Recipe
    • Listicle
    • Kitchen Staples
    • Drinks
      • Cocktails
      • Non-Alcoholic
      • Smoothies
    • Breakfast
      • Eggs
      • Muffins and Baking
      • Pancakes and Waffles
    • Sweet
      • Brownies and Bars
      • Cakes and Frostings
        • Beginner Cake Recipes
        • Intermediate Cake Recipes
        • Advanced Cake Recipes
      • Cheesecake
      • Cobblers & Fruit Desserts
      • Cookies and Candies
      • Custards & Trifles
      • Pies & Tarts
    • Savory
      • Appetizers
      • Easy Weeknight Meals
      • Beef and Pork
      • Chicken and Turkey
      • Fish and Shellfish
      • Grains and Beans
      • Pasta and Rice
      • Potatoes
      • Quinoa
      • Soups & Stews
      • Vegetables
    • On The Lighter Side
  • Resources
  • Contact
  • Work With Me
  • Privacy Policy

The Cake Chica

menu icon
go to homepage
  • Recipe Index
  • About
  • Work With Me
  • Contact

subscribe
search icon
Homepage link
  • Recipe Index
  • About
  • Work With Me
  • Contact

×
Home

Key Lime Pie

April 13, 2026

Key Lime Pie cover image.

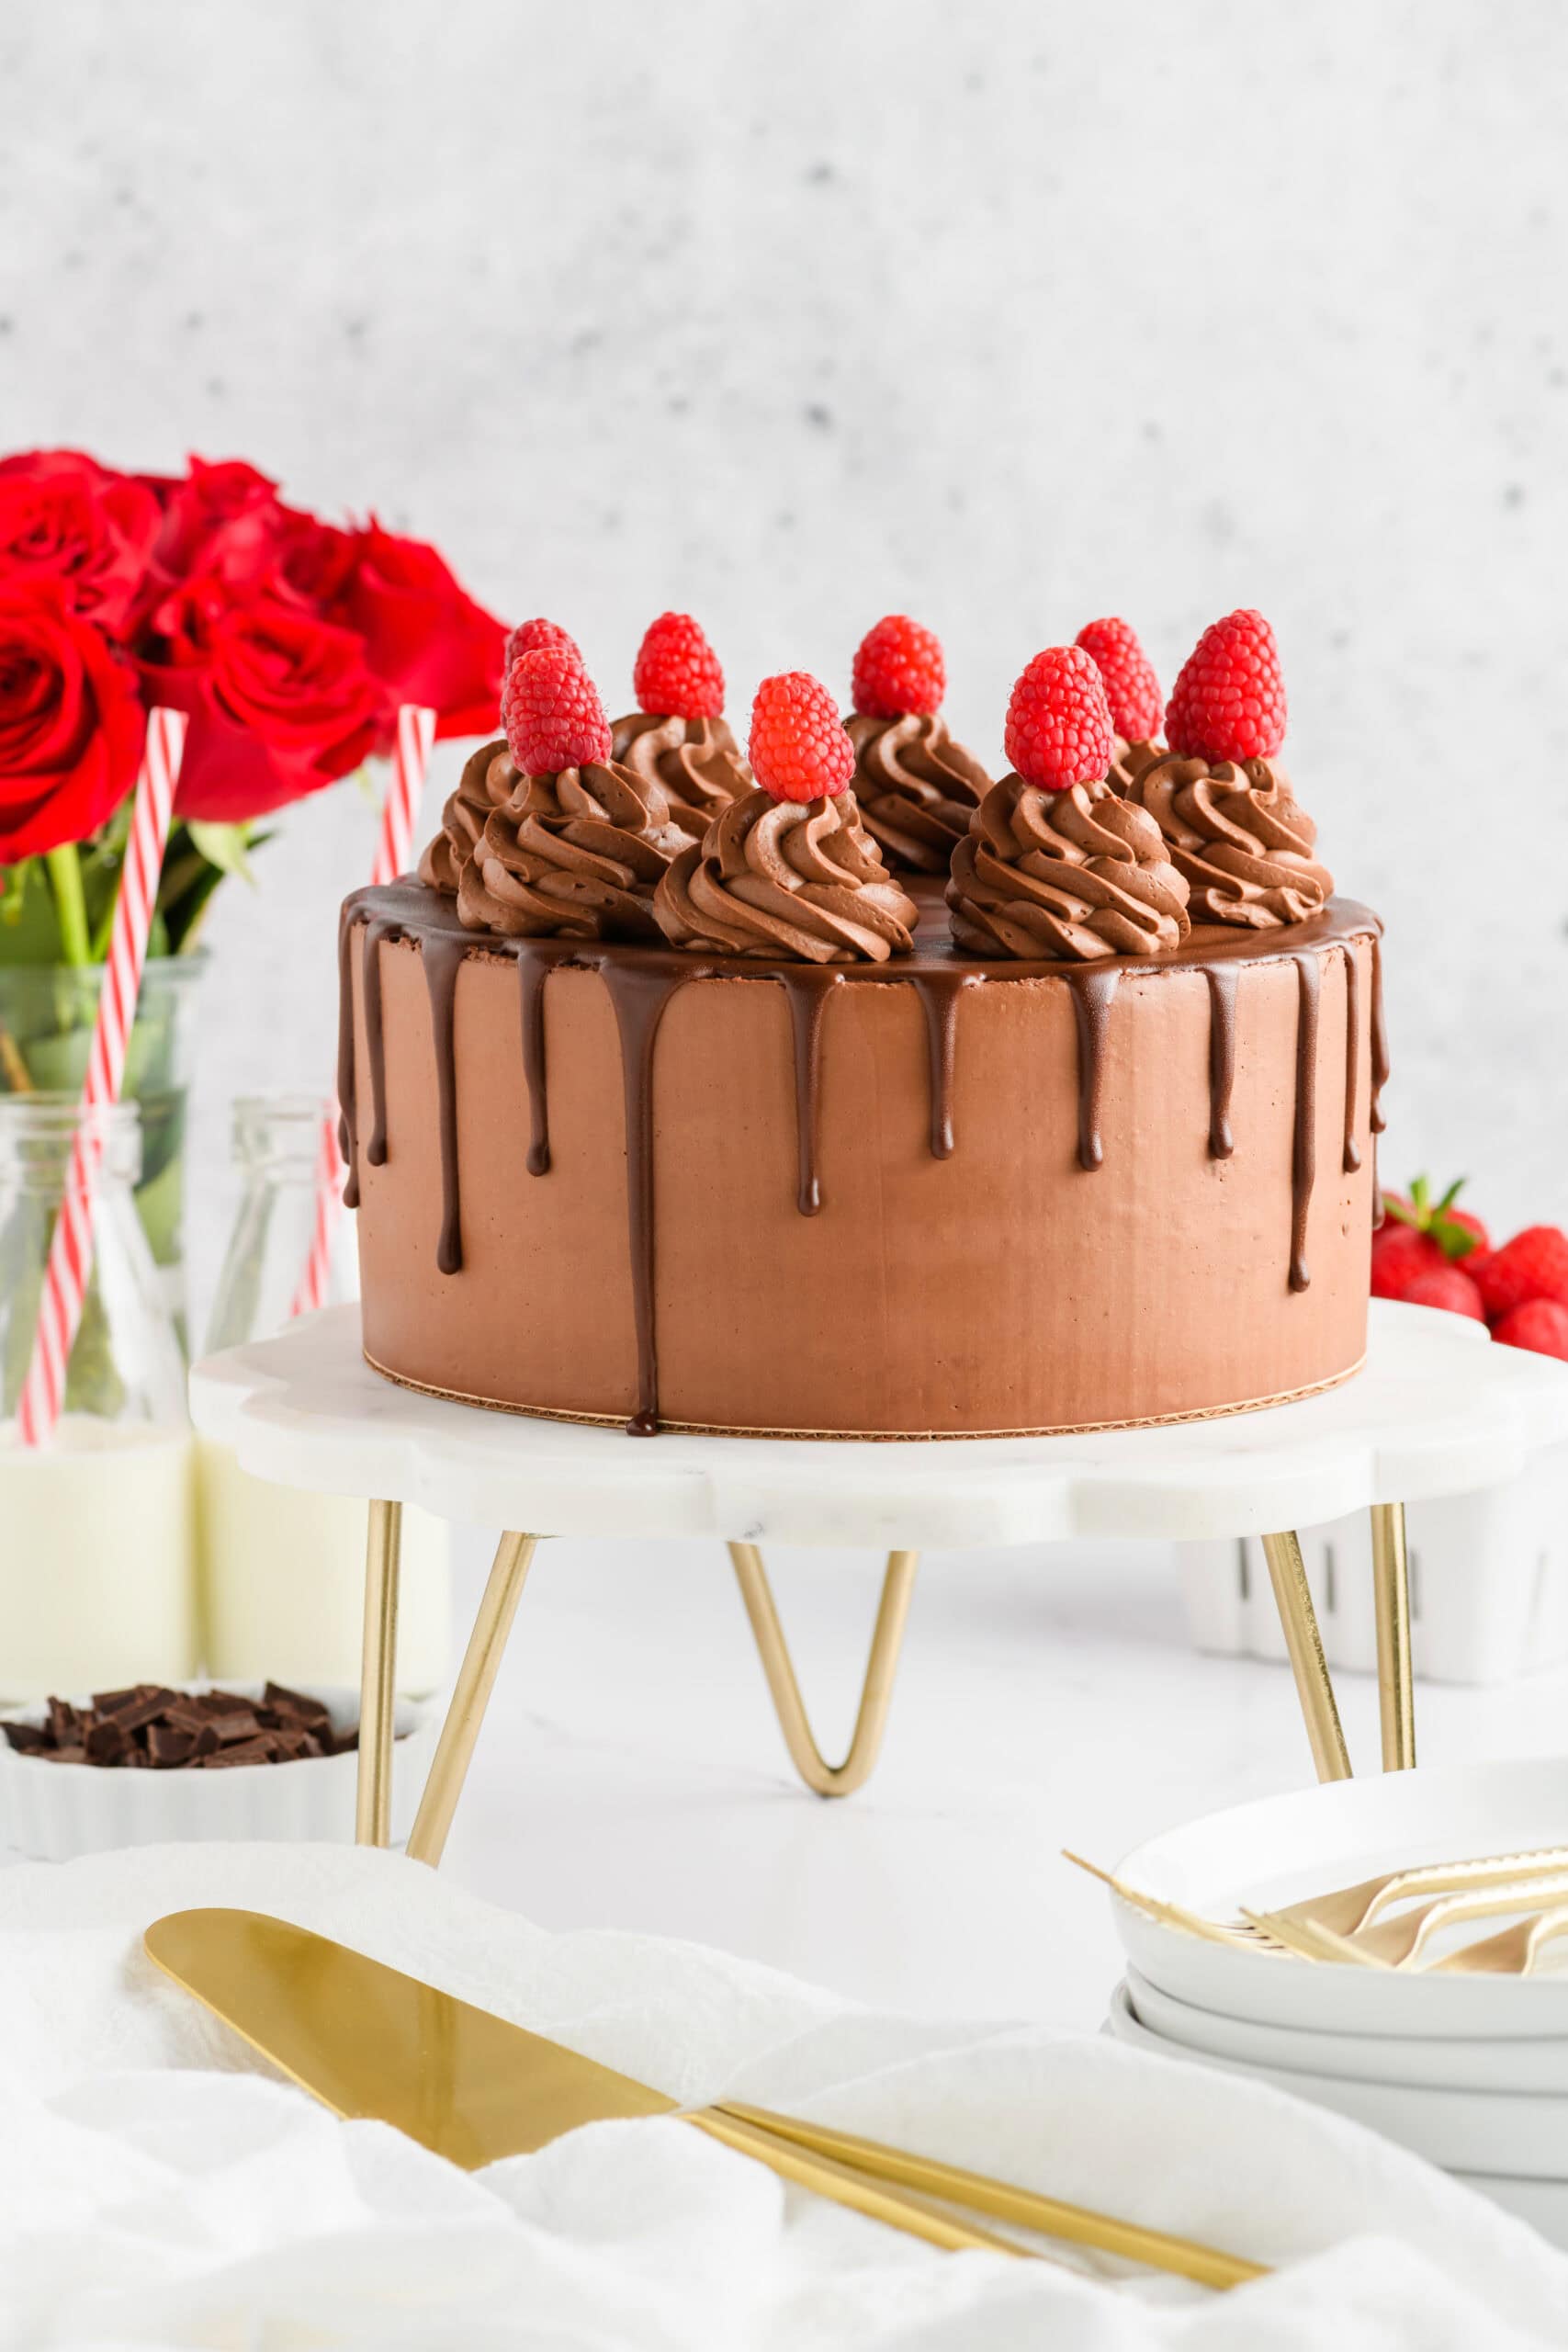
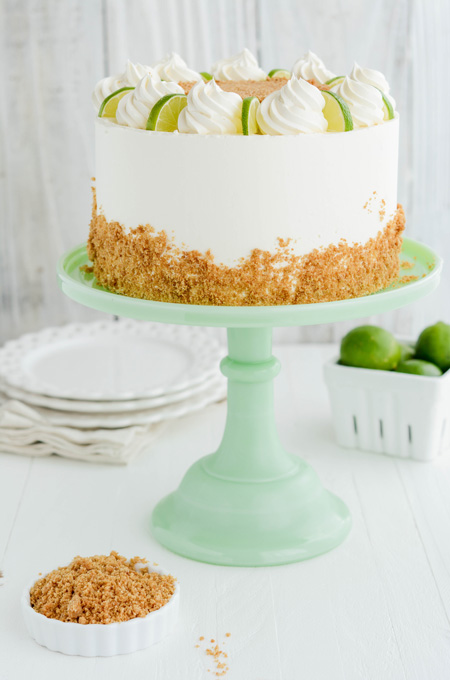
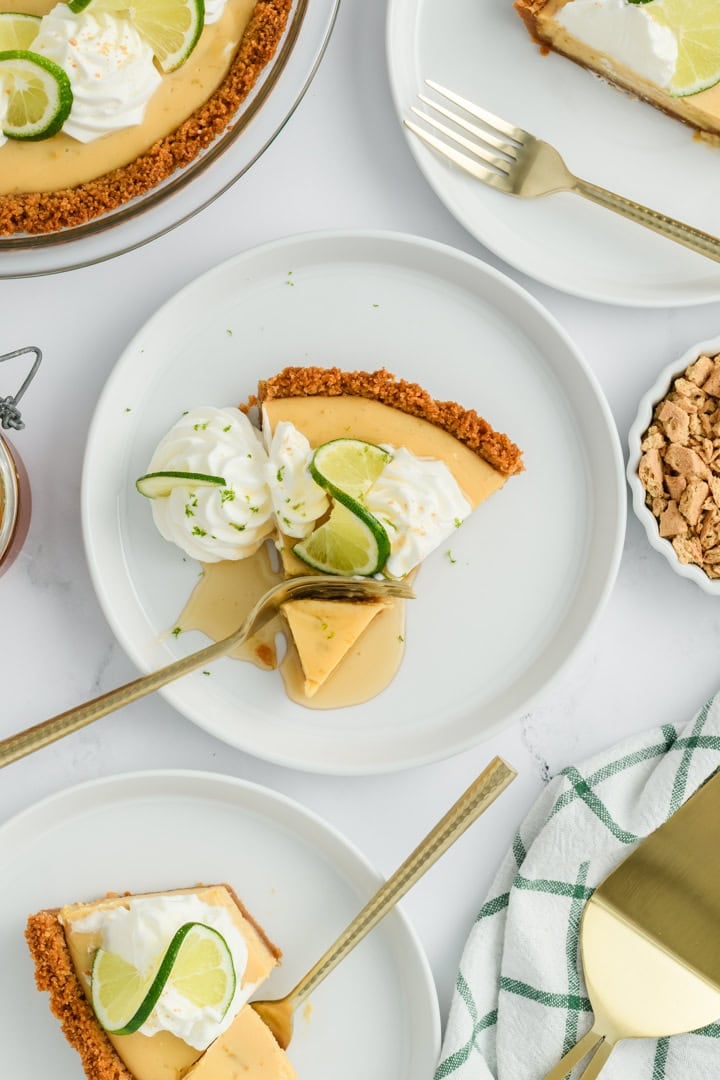
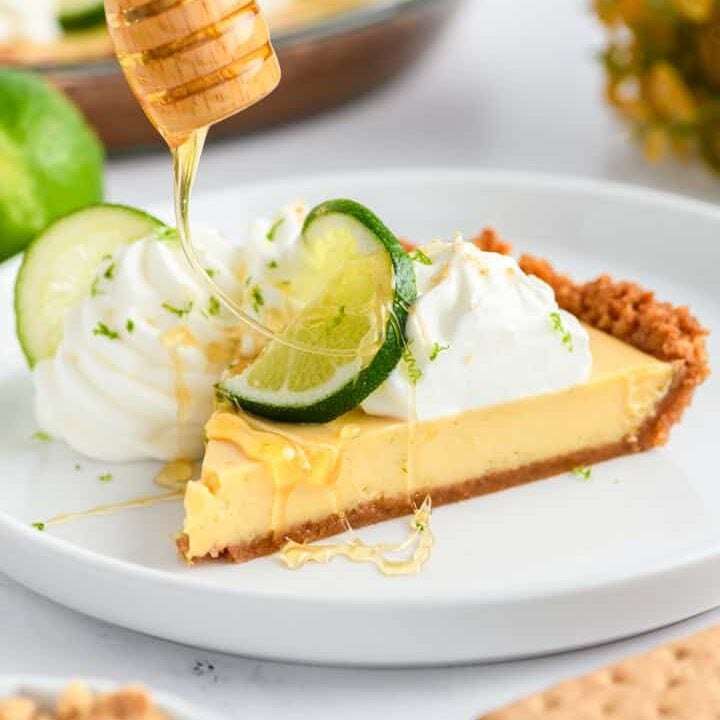
If there’s one dessert that perfectly balances sweet, tart, creamy, and crunchy, it’s Key Lime Pie. And this version? It takes everything you love and elevates it just enough to feel extra special without adding complexity.

We’re talking about a silky, citrusy filling made with an infused lime zest technique (trust me, it makes a difference), paired with a buttery graham cracker crust that’s been upgraded with honey and a touch of salt. And to finish? Soft and fluffy whipped cream that ties everything together.

Angled landscape shot of  complete Key Lime Pie.
[feast_advanced_jump_to]

Why You'll Love This Recipe

  • Ultra creamy filling with a bold, fresh lime flavor
  • Infused zest technique for deeper citrus flavor
  • Salted honey graham cracker crust for the perfect sweet-salty balance
  • Simple ingredients with bakery-level results
  • Make-ahead friendly (actually better after chilling!)
Landscape overhead shot of sliced Key Lime Pie on plate with honey and fork cutting through it.

What Makes This Key Lime Pie Special

The secret to this pie’s flavor is in the zest infusion step. Instead of just mixing everything together, the lime zest is whisked into the egg yolks and given time to sit. This allows the natural oils in the zest to release, creating a more vibrant, layered citrus flavor throughout the filling.

And let’s talk about the crust. Adding honey and salt to the graham cracker base gives it a subtle depth that perfectly complements the tangy filling. It’s not overly sweet, and that balance is what makes each bite so irresistible.

Overhead ingredient shot for Key Lime Pie.
Overhead shot of egg yolk and lime zest mixture for Key Lime Pie.
Overhead shot of completed pie filling for Key Lime Pie.
Overhead shot of graham cracker mixture in processor bowl for Key Lime Pie.
Overhead shot of cookie crust in pie plate for Key Lime Pie.
Overhead shot of filled Key Lime Pie in pie crust.

Baking Tips for Success

Don’t skip the zest infusion
It may seem like a small step, but it adds big flavor.

Use fresh lime juice
Bottled juice just won’t give you the same brightness.

Bake until just set
The center should still have a slight jiggle. This ensures a creamy texture.

Chill completely before serving
This pie needs time to set properly, so plan ahead.

Use a measuring cup to press the crust
This helps create an even, compact layer on the bottom and sides.

Overhead shot of complete Key Lime Pie in pie plate.

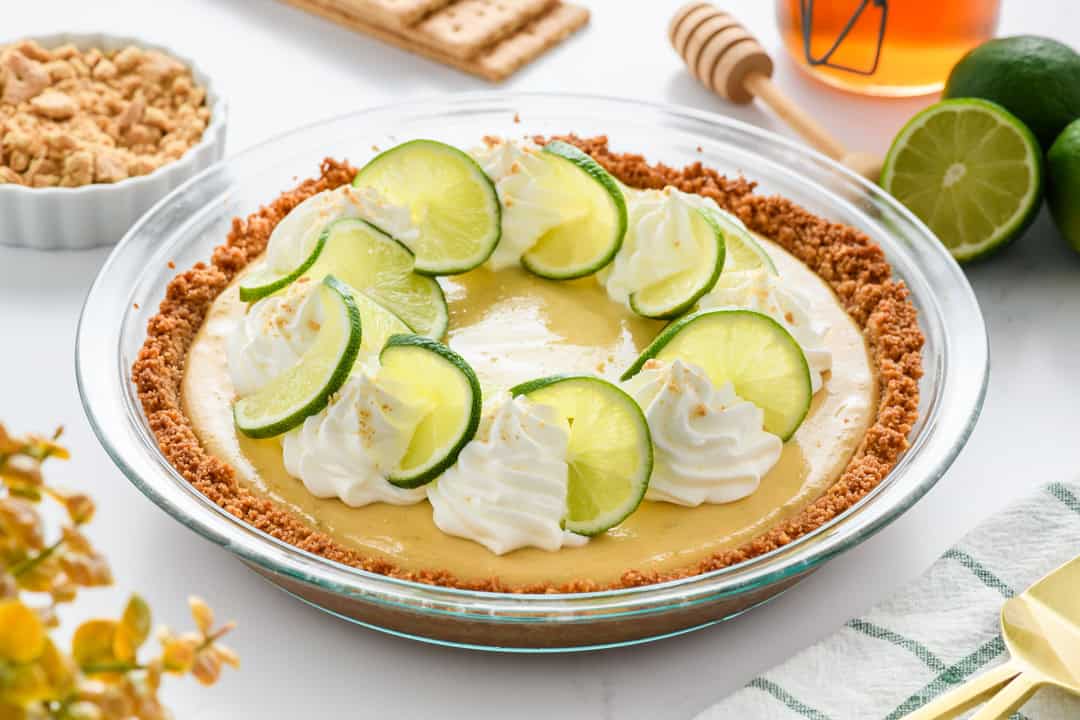
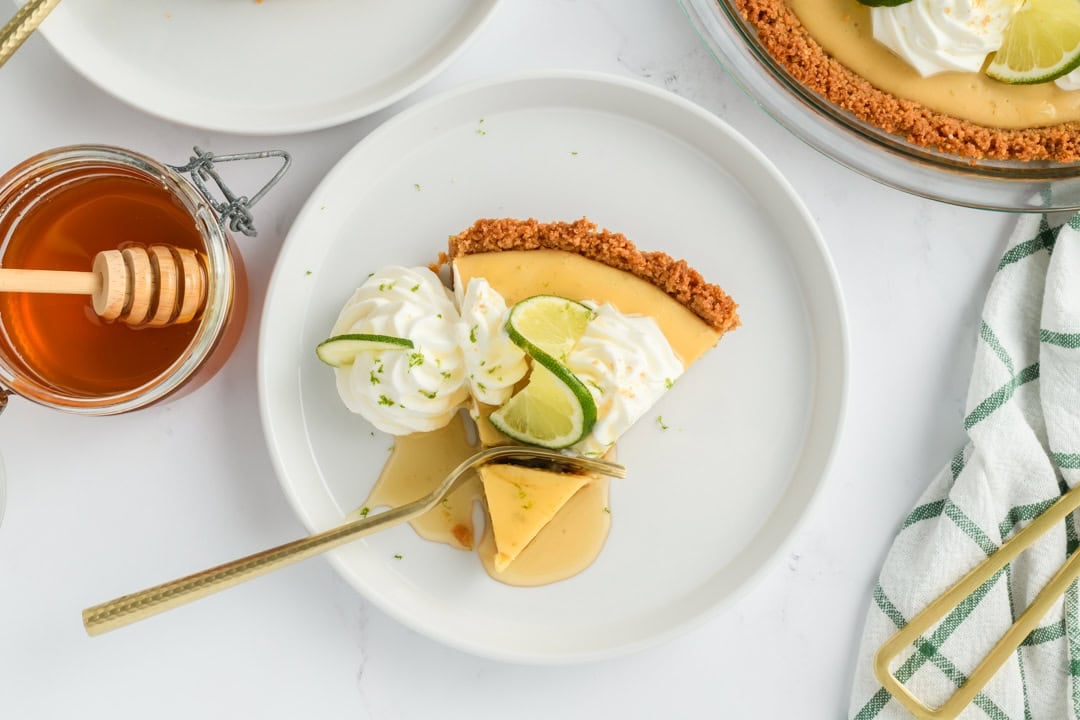
Serving & Styling Ideas

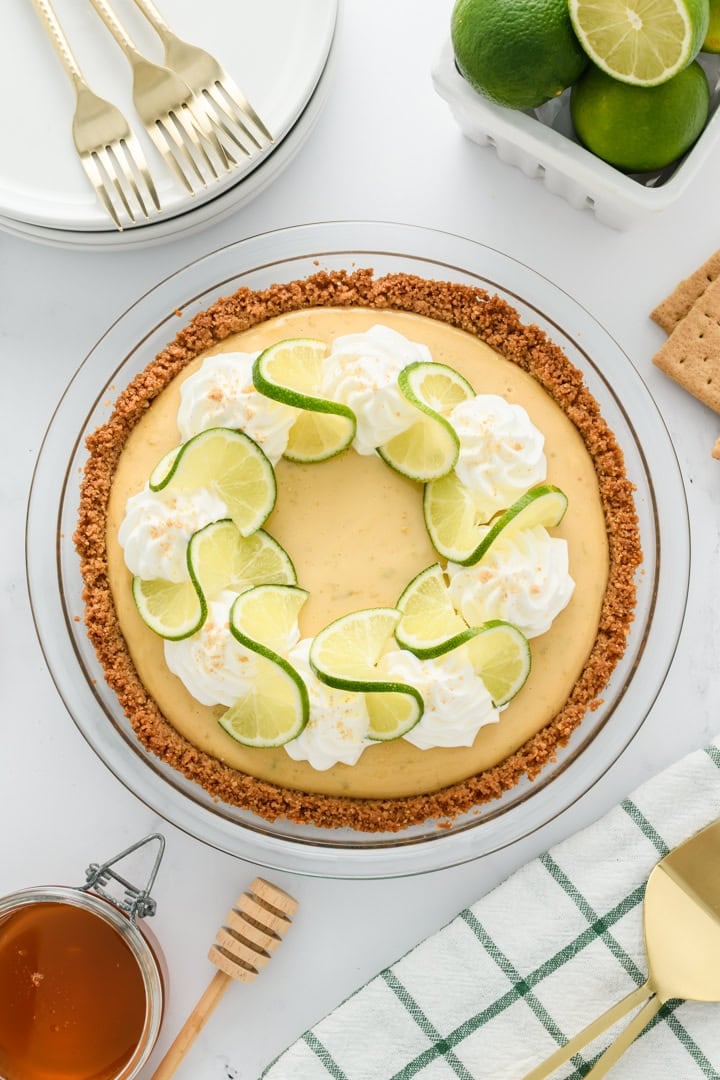
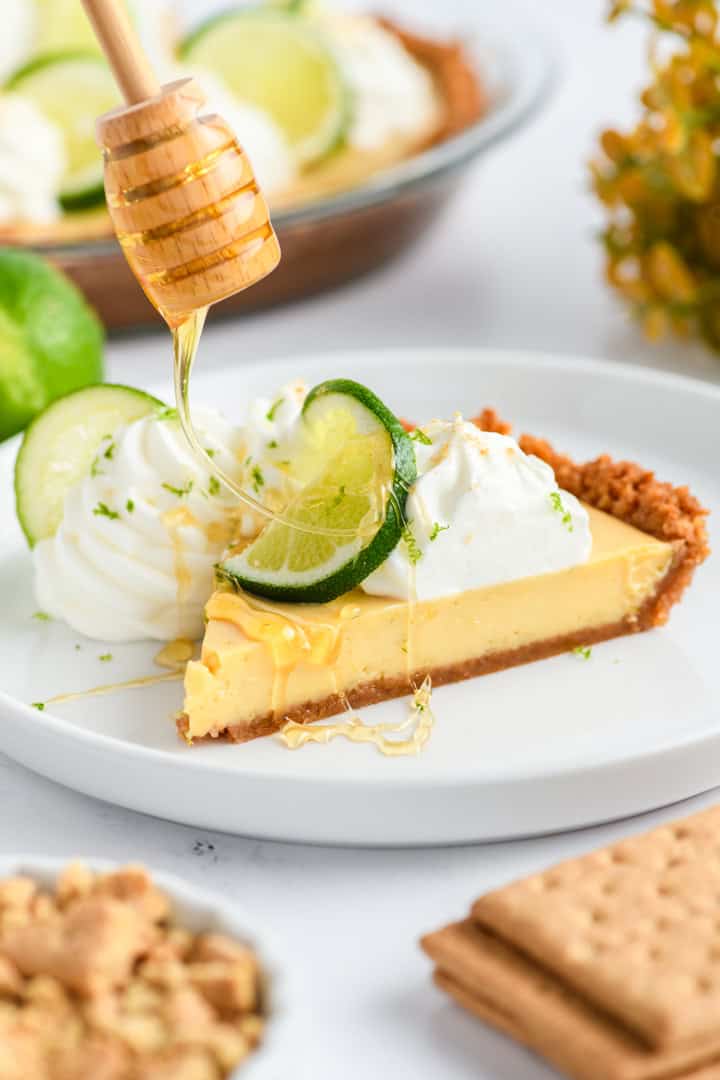
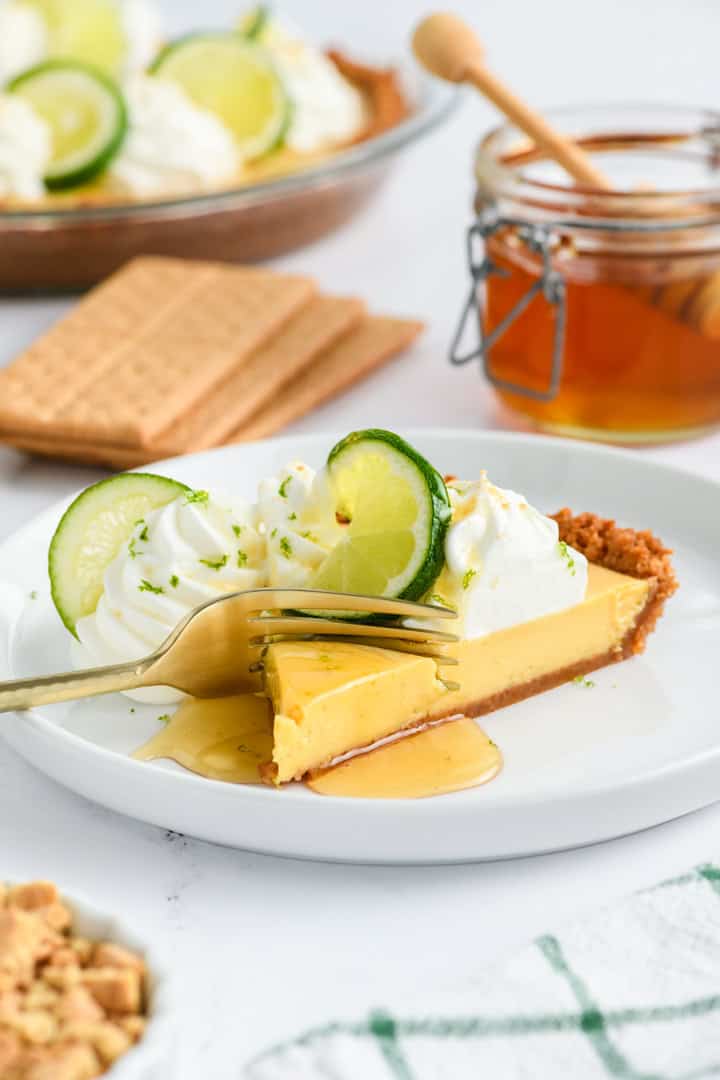
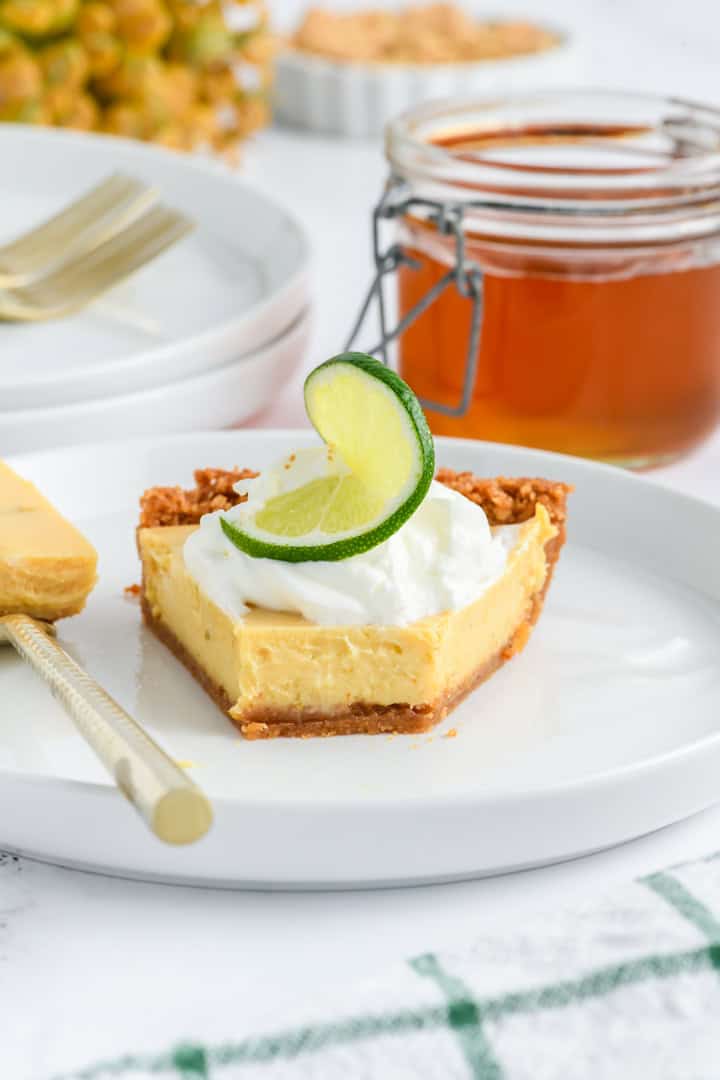
  • Pipe or spread whipped cream over the top for a classic finish
  • Garnish with fresh lime zest, thin lime slices, or flaky sea salt
  • Serve slices with a clean, sharp knife for those beautiful layers
  • Keep styling simple and bright for that classic bakery-style look
Angled shot of inside texture of sliced Key Lime Pie.

Storage Instructions

Store the pie covered in the refrigerator for up to 3 days. For best texture, add whipped cream just before serving, or store it separately and garnish fresh.

Sliced Key Lime Pie with honey being drizzled on top.

Freezing Instructions

You can freeze Key Lime Pie (without whipped cream) for up to 1 month.
Wrap tightly in plastic wrap and foil. Thaw overnight in the refrigerator before serving.
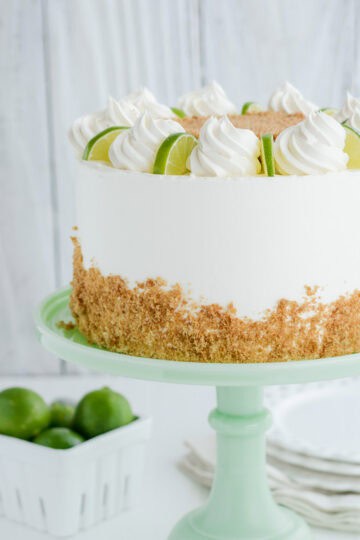
Key Lime Pie slice on plate with honey with a fork cutting through it.

Variations

Classic Graham Cracker Crust
Skip the honey and salt for a more traditional flavor.

Extra Tart Version
Add an extra tablespoon or two of lime juice for a more pronounced tang.

Coconut Twist
Add a bit of toasted coconut to the crust or as a garnish.

Close up shot of cut Key Lime Pie slice.

FAQ's

Do I have to use Key limes?

Regular limes work perfectly well and are much easier to find. That's also what I used here. The flavor will still be bright and delicious.

Can I use bottled lime juice?

Fresh lime juice is highly recommended. It gives the pie its bright, clean flavor that bottled juice just can’t replicate.

How do I know when the pie is done baking?

The edges should be set, but the center should still jiggle slightly when you gently shake the pan. It will continue to firm up as it cools.

Why do I need to let the filling sit before baking?

This allows the lime juice to react with the sweetened condensed milk and thicken slightly, which helps create that classic creamy texture.

Can I make this pie ahead of time?

Yes! This is actually the perfect make-ahead dessert. It needs several hours to chill, so making it the day before is ideal.

Overhead shot of Key Lime Pie slice with honey and fork cutting through it.

Let's Connect

Want more behind-the-scenes peeks, recipe drops, and food photography inspo? Come hang out with me on Instagram, Pinterest, Facebook and more. I’d love to connect with you there!

Suggested Recipe

  • Key Lime Pie Layer Cake cover photo.
    Key Lime Pie Layer Cake
  • Key Lime Pie Cupcakes on white cake stand with cinnamon sticks.
    Sweet and Tangy Key Lime Pie Cupcakes
  • Banana Cream Pie with Vanilla Wafer Crust at three quarter angle.
    Banana Cream Pie with Vanilla Wafer Crust
  • Lime and Coconut Layer Cake
    Lime and Coconut Layer Cake
Sliced Key Lime Pie with honey being drizzled on top.

Key Lime Pie

Yield: 8 slices
Prep Time: 1 hour
Cook Time: 30 minutes
Additional Time: 4 hours
Total Time: 5 hours 30 minutes

An easy Key Lime Pie recipe with a smooth, tangy lime filling, a salted honey graham cracker crust, and fluffy whipped cream topping. Made with fresh lime juice for bold citrus flavor and a perfectly creamy texture.
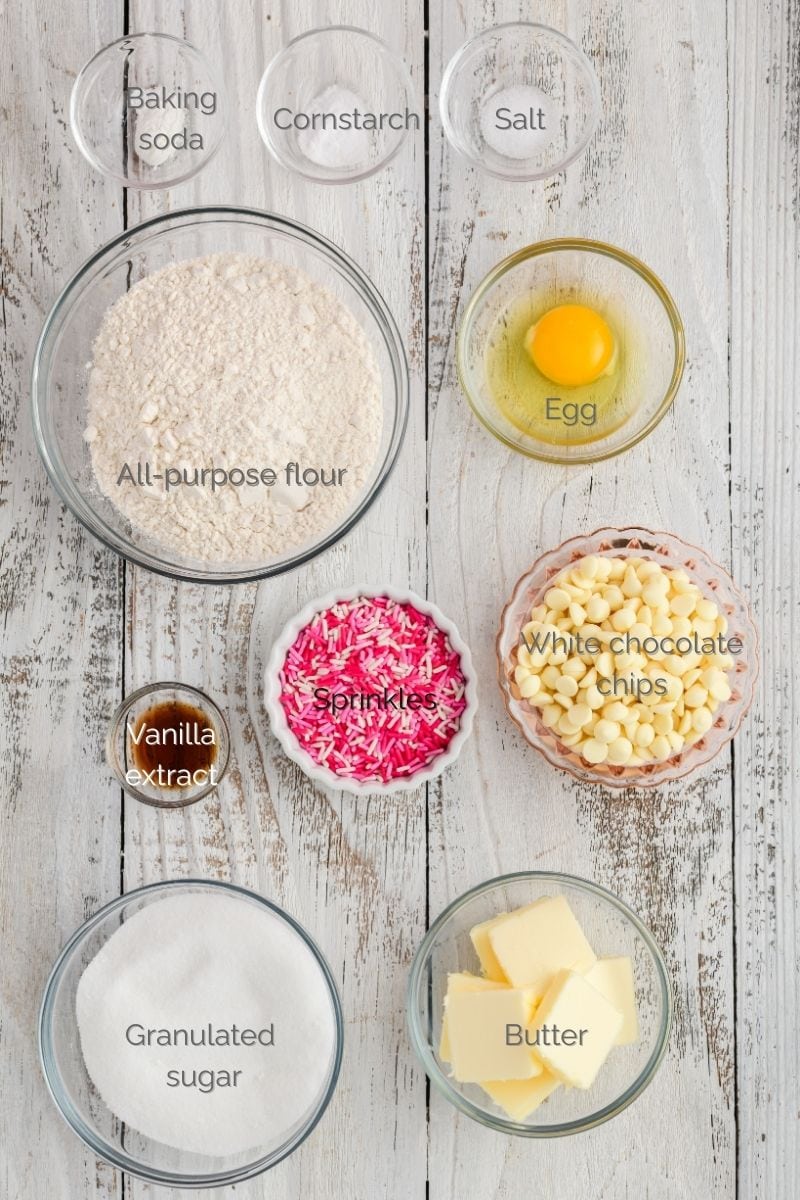
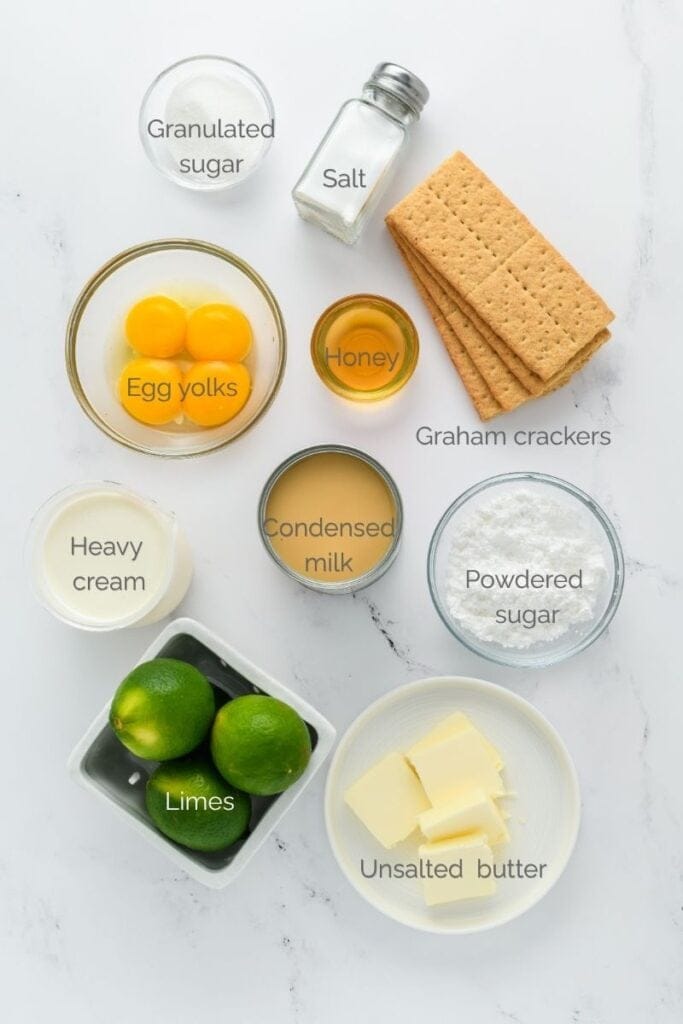
Ingredients

SPECIAL TOOLS

  • 9-inch pie plate
  • Food processor

FILLING

  • 4 large egg yolks
  • 4 teaspoons grated lime zest
  • ½ cup fresh lime juice (about 5 limes)
  • 1 (14-ounce) can sweetened condensed milk
  • ⅛ teaspoon salt

CRUST

  • 8 whole graham crackers, broken into 1-inch pieces
  • 5 tablespoons unsalted butter, melted and cooled
  • 2 tablespoons granulated sugar
  • 1 tablespoon honey
  • ¼ teaspoon kosher salt

WHIPPED CREAM

  • 1 cup heavy cream, chilled
  • ¼ cup powdered sugar

Instructions

FILLING

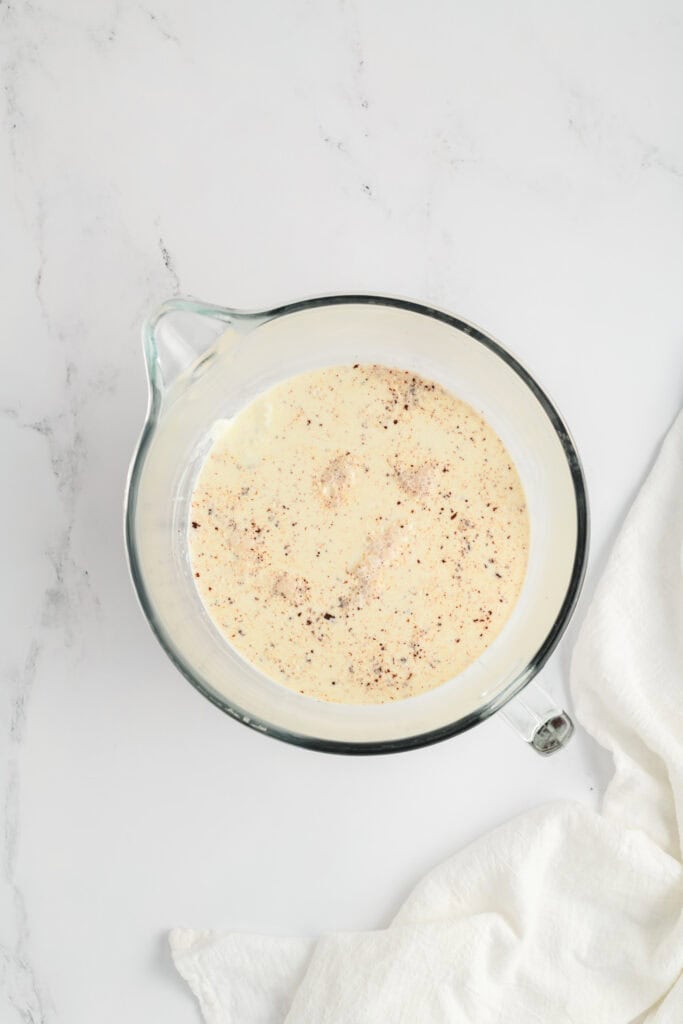
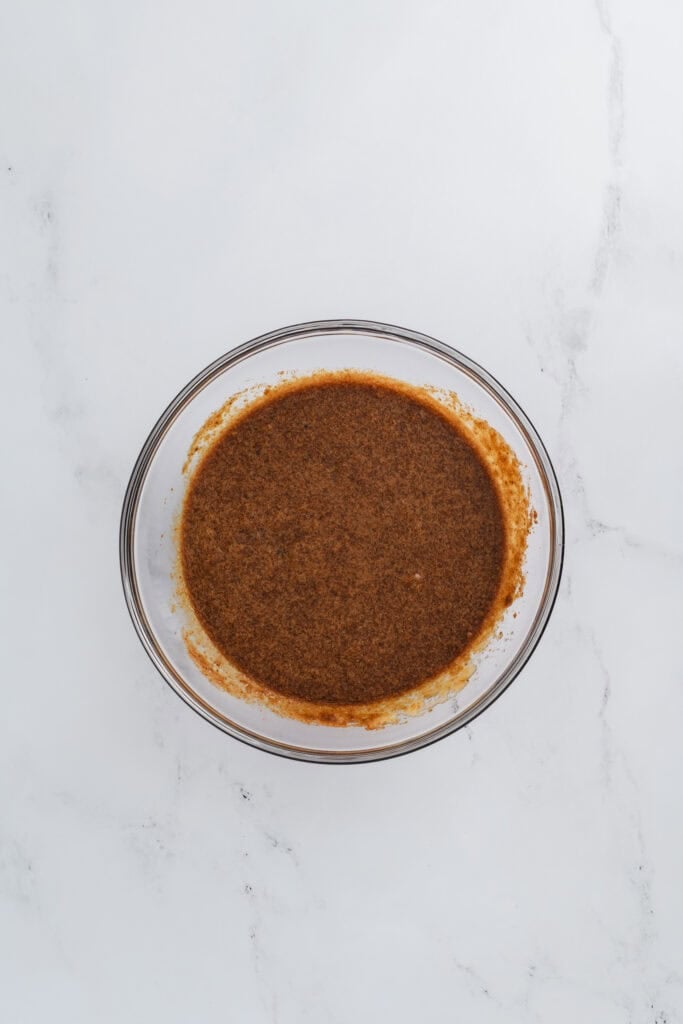
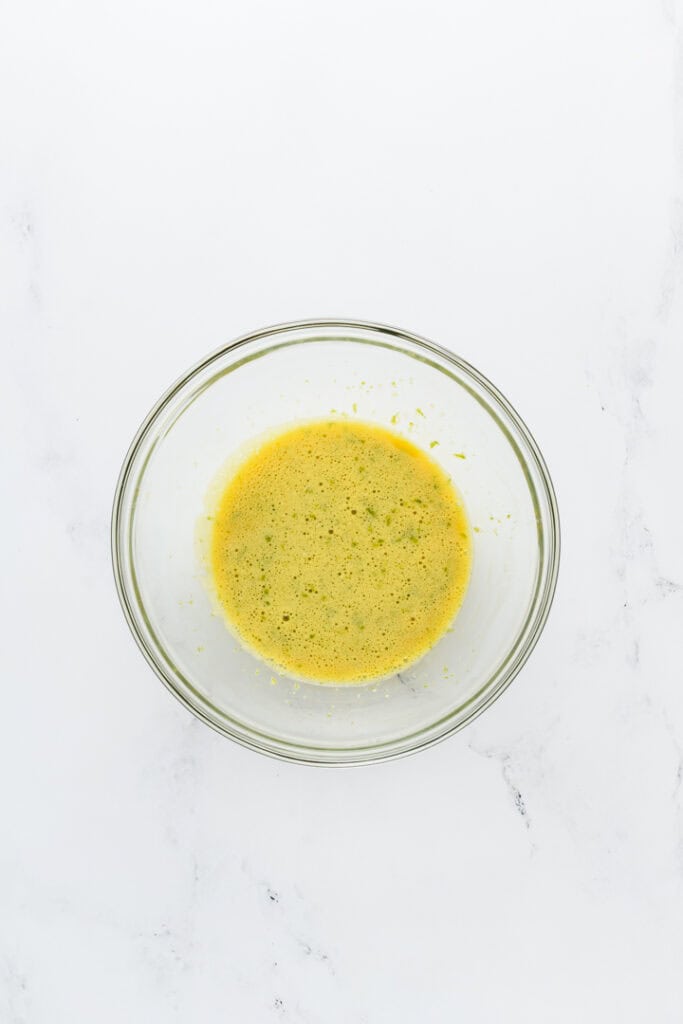
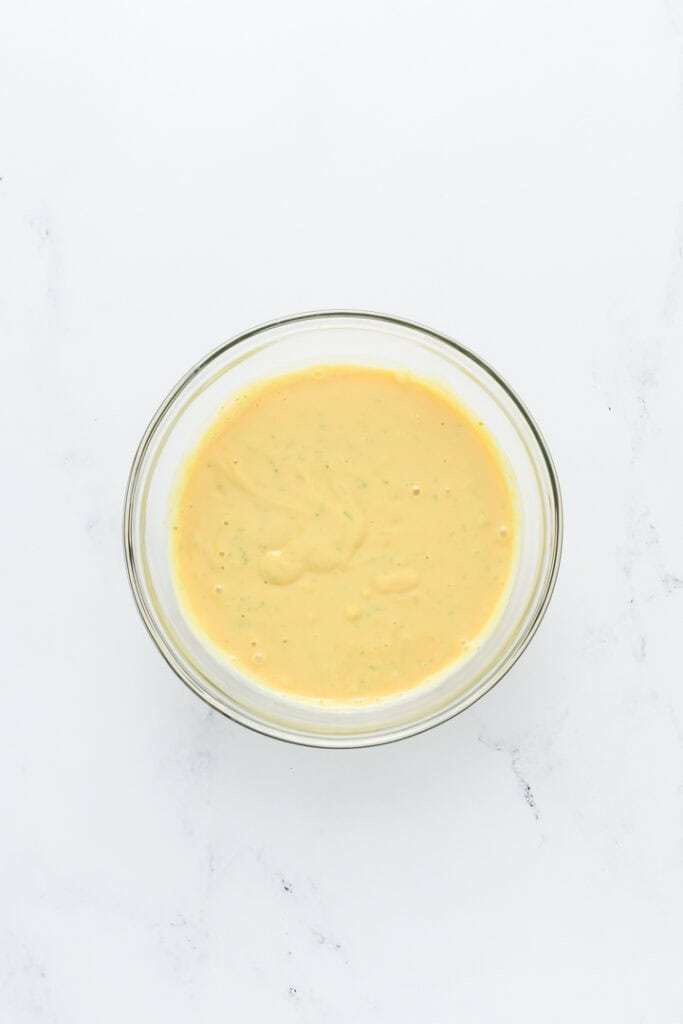
  1. In a medium bowl, whisk together the egg yolks and lime zest. Continue whisking for about 2 minutes until the mixture slightly thickens and the zest is well incorporated. Let the mixture sit for 5 to 10 minutes to allow the lime zest to infuse the egg yolks.
  2. Whisk in the sweetened condensed milk until smooth. Add the lime juice and salt and whisk until fully combined. Cover the mixture and let it sit at room temperature for 30 minutes until slightly thickened.

CRUST

  1. While the filling thickens, adjust an oven rack to the middle position and preheat the oven to 325°F.
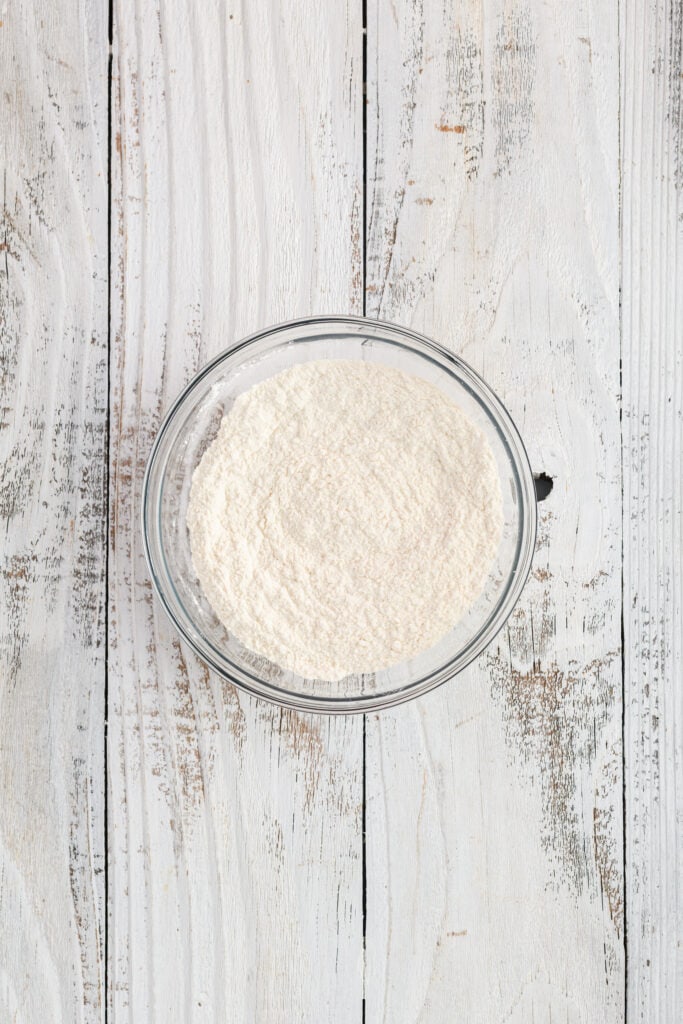
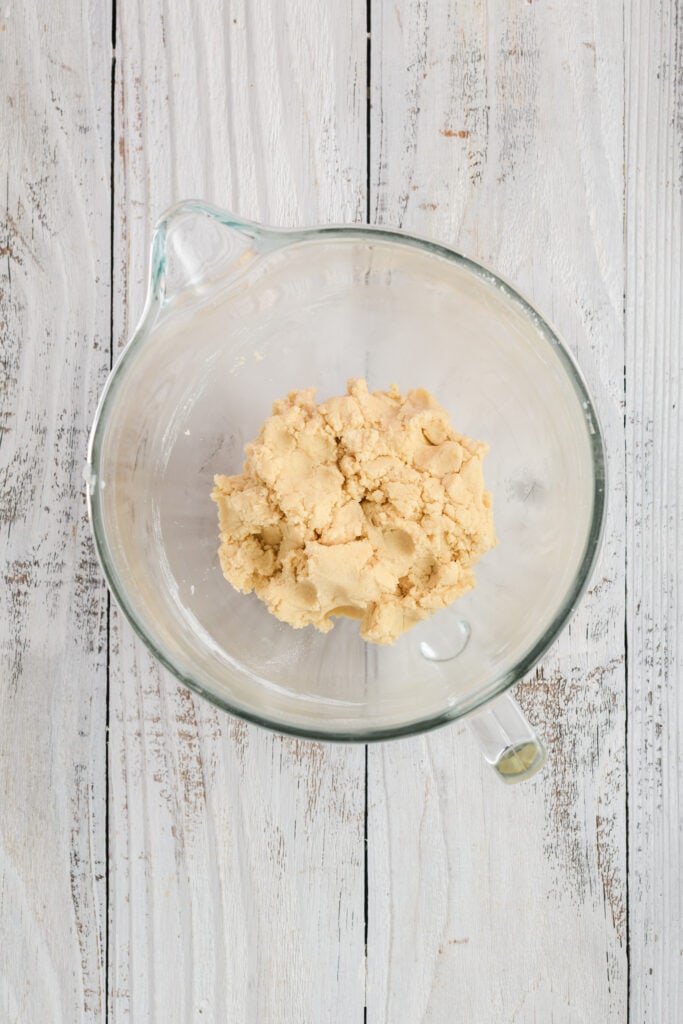
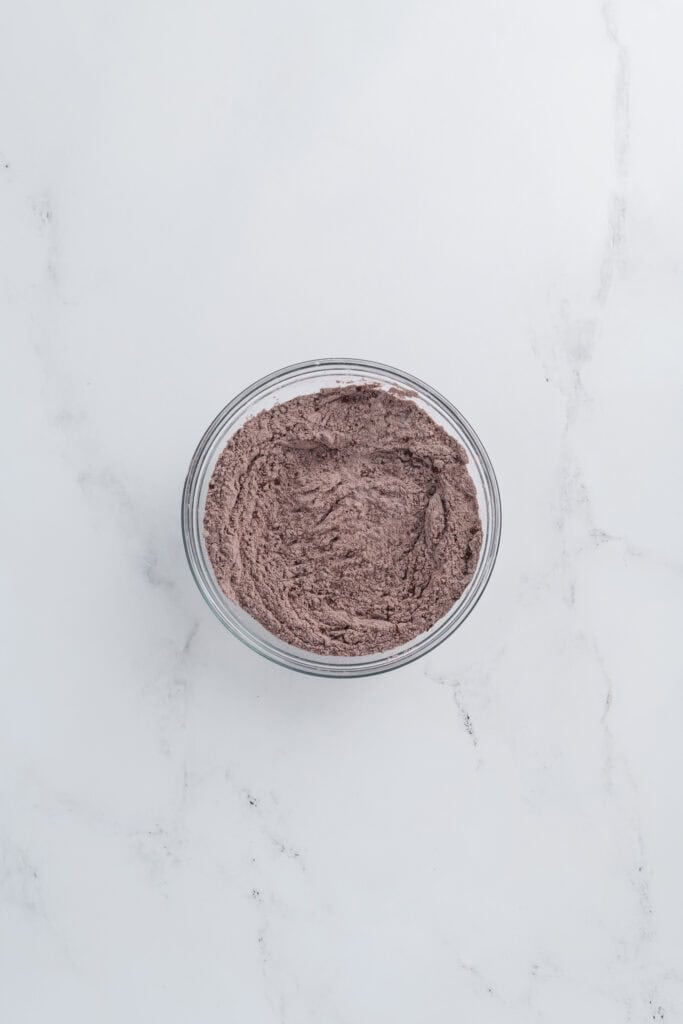
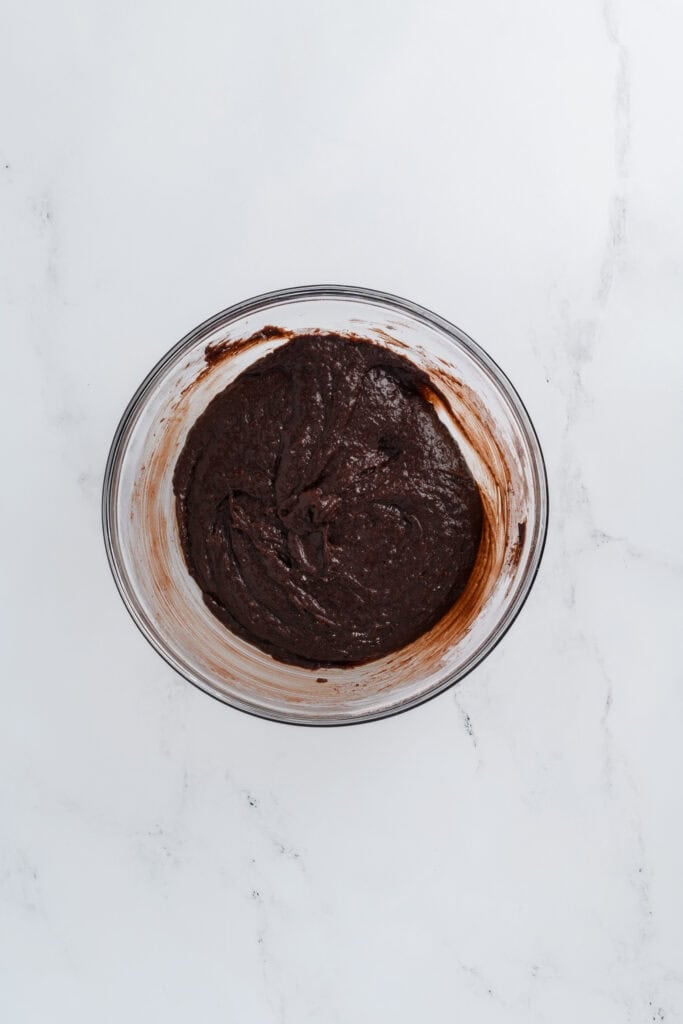
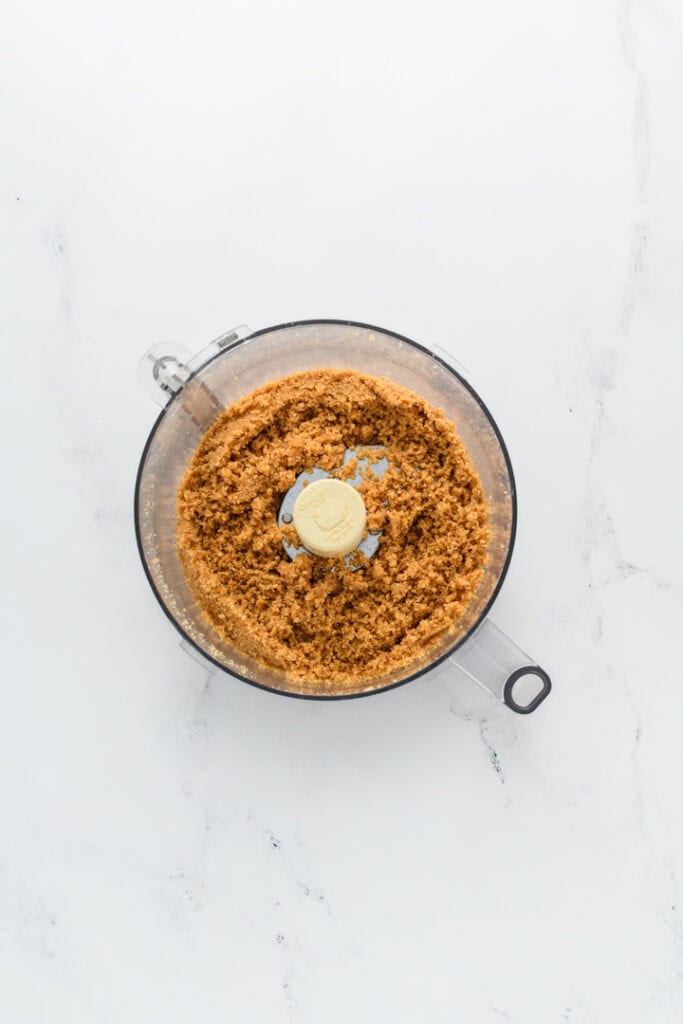
  2. Process the graham crackers in a food processor until fine crumbs form, about 30 seconds. Add the melted butter, sugar, honey, and salt and pulse until combined.
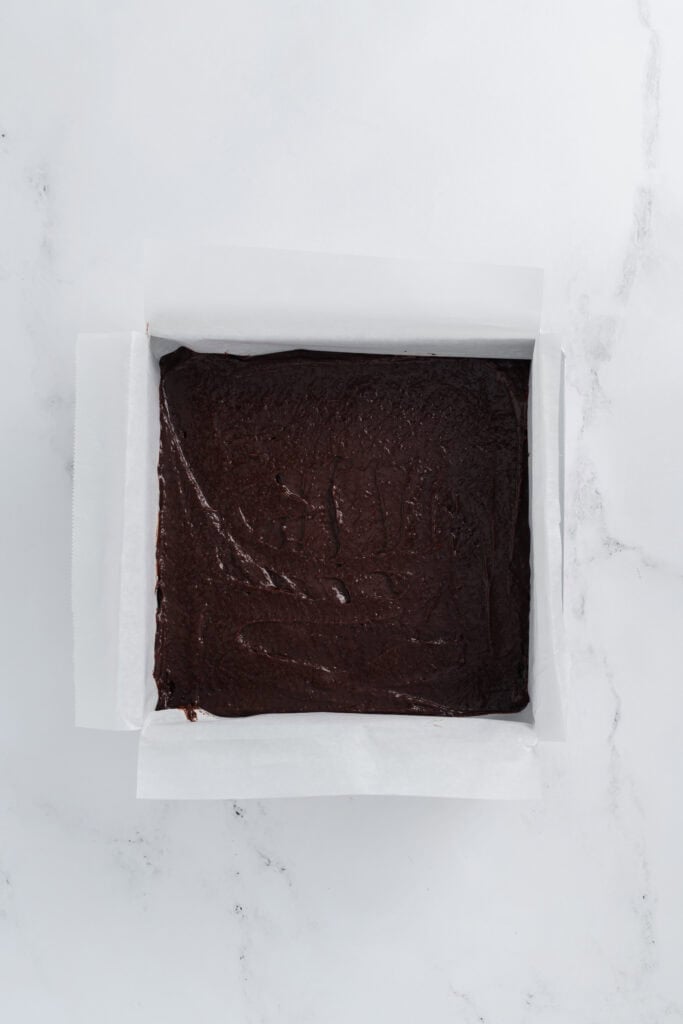
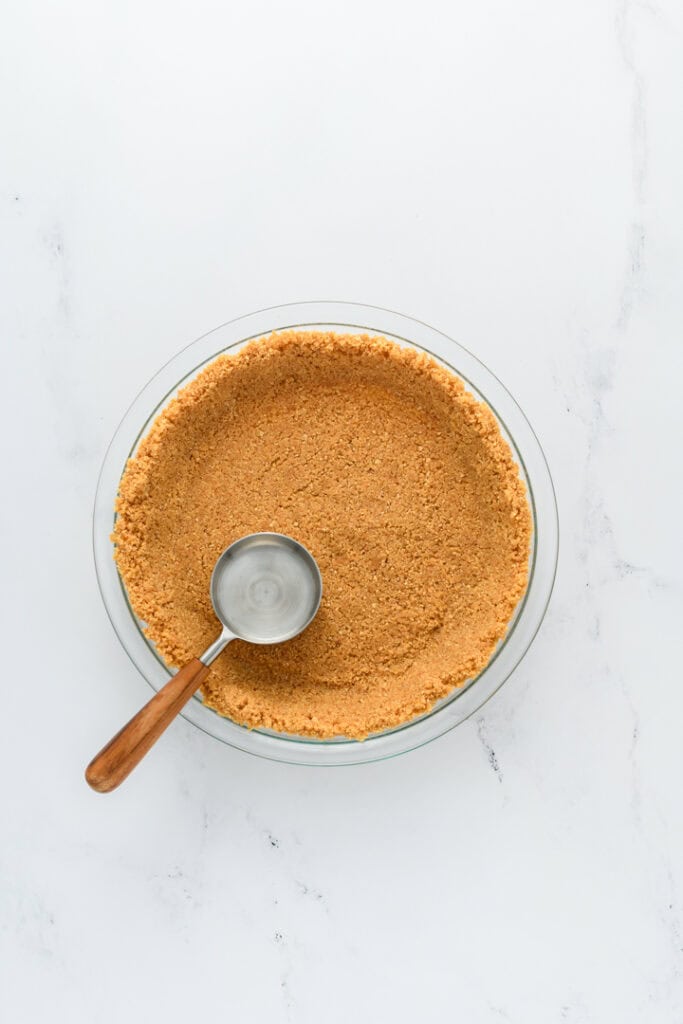
  3. Pour the crumb mixture into a 9-inch pie plate. Using the bottom of a measuring cup, press the crumbs into an even layer on the bottom and up the sides of the pie plate. Bake until the crust is fragrant and lightly browned, about 13 to 18 minutes.

ASSEMBLE

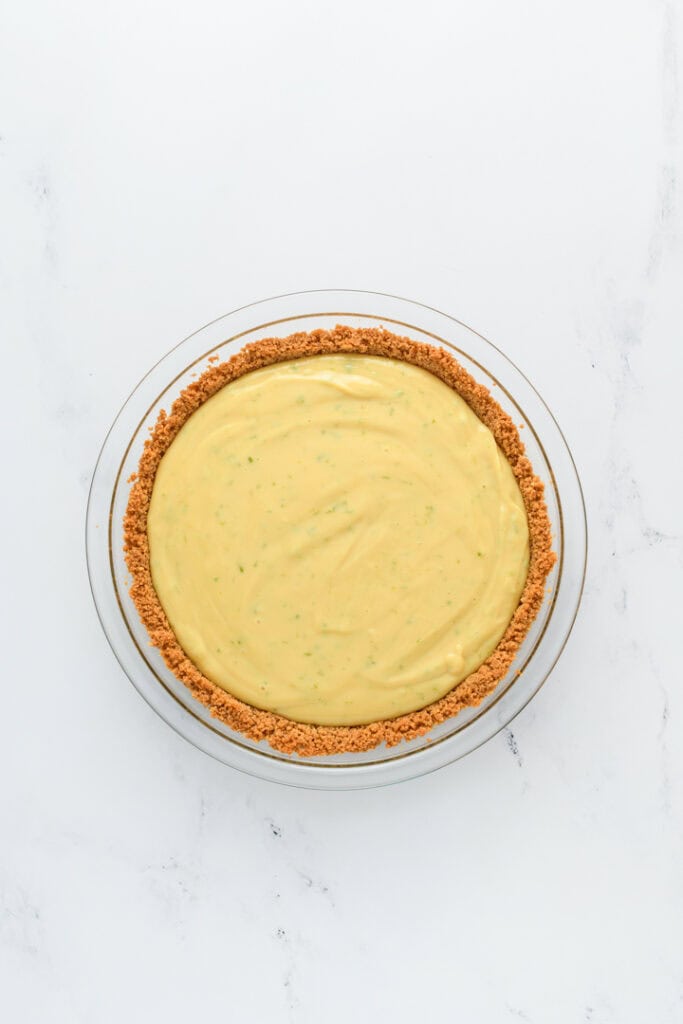
  1. Pour the filling into the warm crust and smooth the top. Bake the pie until the center is set but still jiggles slightly when shaken, about 15 to 20 minutes.
  2. Let the pie cool on a wire rack for about 1 hour, then cover loosely with plastic wrap and refrigerate until fully chilled and set, about 3 hours.

WHIPPED CREAM

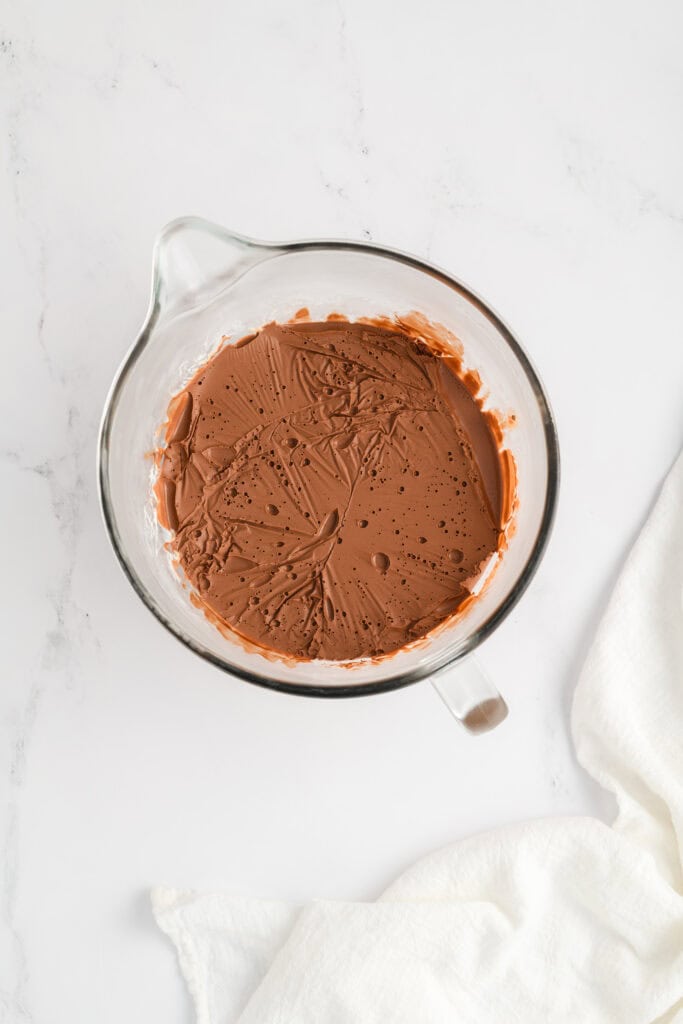
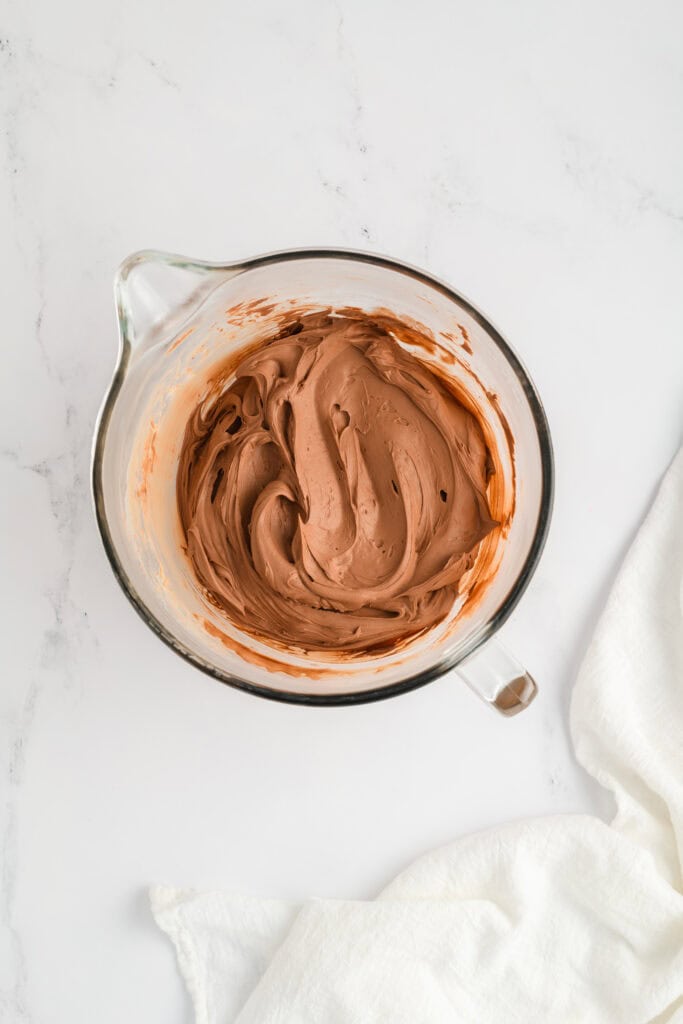
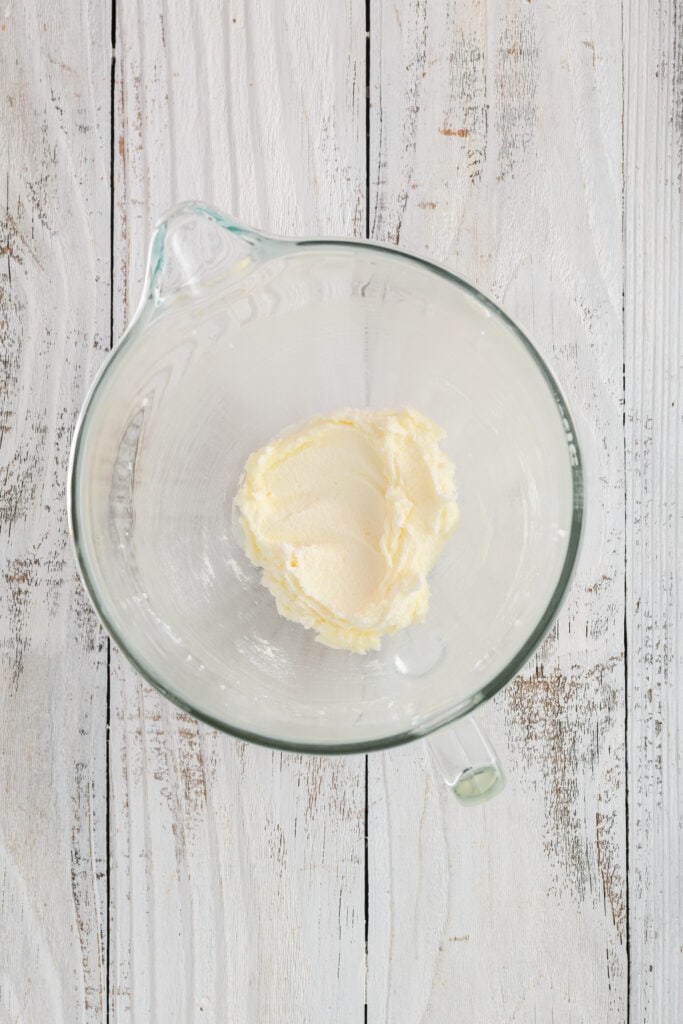
  1. Using a mixer fitted with the whisk attachment, whip the heavy cream and powdered sugar on medium-low speed until foamy, about 1 minute. Increase speed to high and whip until soft peaks form, about 1 to 3 minutes.
  2. Spread or pipe the whipped cream over the chilled pie before serving.
Nutrition Information:
Yield: 8 Serving Size: 1
Amount Per Serving: Calories: 288Total Fat: 22gSaturated Fat: 13gUnsaturated Fat: 9gCholesterol: 149mgSodium: 165mgCarbohydrates: 19gFiber: 0gSugar: 17gProtein: 5g

*Nutrition information is an estimate and will vary.*

Did you make this recipe?

Tag @thecakechica1 on Instagram and hashtag #thecakechica1

© Mary | The Cake Chica
Cuisine: American / Category: Dessert

Easy Easter Egg Chocolate Chip Cookies

April 6, 2026

Easy Easter Chocolate Chip Cookies cover image.

If you’re looking for a fun Easter baking recipe that everyone will love, these Easy Easter Chocolate Chip Cookies are soft, chewy, thick, and packed with chocolate in every bite. Chopped sugar-coated chocolate mini eggs add the perfect Easter touch and a little crunch that pairs perfectly with the soft cookie centers.

Macro shot of Easter Chocolate Chip Cookies

Why You'll Love This Recipe

  • This recipe is quick and easy to prepare, making it perfect for last minute Easter gatherings.
  • There are no fancy ingredients involved, except the seasonal Easter candy.
  • If you're in a time crunch, this recipe can be made in advance. In fact, I prefer to make the cookie dough in advance and bake the cookies the next day.
Head on shot of tall stack of Easy Easter Chocolate Chip Cookies on pink plate.

Tips for Success

  • Chill the dough for at least 3 hours. This is important for flavor and texture. I prefer to chill overnight.
  • Use a ¼ cup measuring cup to scoop the dough for large bakery-style cookies.
  • Do not overbake. The centers should look slightly underbaked when you remove them from the oven.
  • Chop the mini eggs so you get chocolate in every bite and the cookies spread evenly.
Easy Easter Chocolate Chip Cookie being dipped in milk.

Why Chill Cookie Dough?

Chilling cookie dough is one of the most important steps in this recipe. While it might be tempting to bake the cookies right away, chilling the dough makes a big difference in both flavor and texture.

Chilling the dough:

  • Prevents cookies from spreading too much
  • Creates thicker cookies
  • Improves flavor
  • Helps the flour fully hydrate
  • Results in a chewier texture

For best results, chill the dough for at least 3 hours, but overnight is even better.

Overhead process shot of wet ingredients combined for Easy Easter  Chocolate Chip Cookies.
Overhead shot of cookie dough for Easy Easter Chocolate Chip Cookies.
Overhead shot of chocolate chips and chocolate Easter candy on cookie dough for Easy Easter Chocolate Chip Cookies.
Overhead shot of chocolate chips and Easter candy combined in Easy Easter Chocolate Chip Cookie dough.

Decorating and Easter Cookie Ideas

These cookies are perfect for Easter because the mini eggs add color and texture. You can also customize these cookies in a few different ways:

  • Use pastel M&M’s instead of mini eggs
  • Add white chocolate chips
  • Sprinkle extra chopped mini eggs on top of the dough before baking
  • Add festive sprinkles before baking
  • Drizzle melted chocolate over cooled cookies
Overhead shot of Easy Easter Chocolate Chip Cookies on gold cooling rack with cookie spatula lifting up one cookie.

Storage Instructions

Store baked cookies in an airtight container at room temperature for up to 3 days. For best texture, place a small piece of bread in the container with the cookies. The cookies will absorb moisture from the bread and stay soft longer.

If stacking cookies, place parchment paper between layers to prevent them from sticking together.

Overhead shot of Easy Easter Chocolate Chip Cookies on pink plate.

Freezing Instructions

These cookies freeze very well both baked and unbaked.

To freeze cookie dough:

  1. Scoop the cookie dough into portions using a ¼ cup measuring cup.
  2. Place the dough balls on a baking sheet lined with parchment paper.
  3. Freeze until solid, about 1 to 2 hours.
  4. Transfer frozen dough to a freezer bag and freeze for up to 2 months.

When ready to bake, place frozen cookie dough on a parchment-lined baking sheet and bake as directed, adding 1 to 2 minutes to the baking time.

To freeze baked cookies:
Let cookies cool completely, then store in an airtight container or freezer bag and freeze for up to 2 months. Thaw at room temperature before serving.

Macro shot of Easy Easter Chocolate Chip Cookie in hand.

FAQ's

Do I really need to chill the cookie dough?

Yes. Chilling the dough helps the cookies bake thicker and improves the flavor and texture. For best results, chill for at least 3 hours.

Can I chill the dough overnight?

Yes. The dough can be chilled for up to 24 hours and will develop even more flavor.

Can I freeze the cookie dough?

Yes. Scoop the dough into portions and freeze on a baking sheet. Once frozen, transfer to a freezer bag and freeze for up to 2 months. Bake from frozen and add 1 to 2 minutes to the baking time.

Why are my cookies spreading too much?

This usually happens if the dough wasn’t chilled long enough or the butter was too warm when mixing.

How do I keep my cookies thick?

Chill the dough, and bake the cookies while the dough is still cold.

How should I store the cookies?

Store baked cookies in an airtight container at room temperature for up to 3 days.

Can I make smaller cookies?

Yes. Use a smaller cookie scoop instead of a ¼ cup measuring cup and reduce the baking time by a few minutes.

Overhead closeup of Easy Easter Chocolate Chip Cookies on cooling rack.

Let's Connect

Want more behind-the-scenes peeks, recipe drops, and food photography inspo? Come hang out with me on Instagram, Pinterest, Facebook and more. I’d love to connect with you there!

Macro shot of broken stacked  Easy Easter Chocolate Chip Cookies with melty chocolate chips.

Suggested Recipes

  • Toasted Coconut Easter Cake
  • Easter Confetti Cake
    Easter Confetti Cake
  • Spring Lemon Layer Cake
    Spring Lemon Layer Cake
  • Lucky Charms Layer Cake on white cake pedestal.
    Lucky Charms Layer Cake
Macro shot of broken stacked Easy Easter Chocolate Chip Cookies with melty chocolate chips.

Easy Easter Egg Chocolate Chip Cookies

Yield: 30
Prep Time: 30 minutes
Cook Time: 15 minutes
Additional Time: 2 minutes
Total Time: 47 minutes

Soft, chewy, and bursting with festive flavor, these Easy Easter Egg Chocolate Chip Cookies are the perfect treat for spring! Classic buttery cookie dough is packed with rich chocolate chips and colorful candy-coated chocolate eggs, adding a delightful crunch and pop of pastel hues.

Ingredients

TOOLS

  • Large rimmed baking sheet
  • Parchment paper
  • Stand mixer
  • 1/4 cup measuring cup
  • Cooling racks

COOKIES

  • 20 ounces (4 cups) all-purpose flour
  • 1 teaspoon baking soda
  • 1 teaspoon salt
  • 1 ½ cups unsalted butter, melted and cooled to about 75 degrees
  • 14 ounces (2 cups) packed light brown sugar
  • 7 ounces (1 cup) granulated sugar
  • 2 tablespoons vanilla extract
  • 2 large eggs
  • 2 large egg yolks
  • 12 ounces semi-sweet chocolate chips
  • 12 ounces sugar-coated chocolate mini eggs, chopped

Instructions

    1. Whisk together the flour, baking soda, and salt in a medium bowl. In the bowl of a stand mixer fitted with the paddle attachment, mix together the melted butter, brown sugar, and granulated sugar until well blended, about 3 minutes.
    2. Beat in the vanilla, eggs, and egg yolks until light and creamy. Mix in the dry ingredients until just combined. Stir in the chocolate chips and chopped chocolate mini eggs by hand using a wooden spoon. Cover and chill the cookie dough in the refrigerator for at least 3 hours or up to 24 hours.
    3. When ready to bake, preheat the oven to 325°F and line a baking sheet with parchment paper. Drop cookie dough ¼ cup at a time onto the prepared baking sheet, spacing cookies about 3 inches apart. Bake for 15 to 17 minutes, or until the edges are lightly toasted. Cool on the baking sheet for 2 minutes before transferring cookies to wire racks to cool completely.
Nutrition Information:
Yield: 30 Serving Size: 1
Amount Per Serving: Calories: 267Total Fat: 6gSaturated Fat: 4gUnsaturated Fat: 3gCholesterol: 27mgSodium: 147mgCarbohydrates: 51gFiber: 1gSugar: 32gProtein: 4g

*Nutrition information is an estimate and will vary.*

Did you make this recipe?

Tag @thecakechica1 on Instagram and hashtag #thecakechica1

© Mary | The Cake Chica
Cuisine: American / Category: Cookies and Candies

Jalapeno Margaritas

March 29, 2026

Jalapeno Margaritas cover image.

If you love margaritas with a little kick, these Jalapeño Margaritas are for you! This pitcher margarita recipe is fresh, citrusy, slightly spicy, and perfect for parties, taco night, or summer gatherings. The jalapeños infuse into the margarita mixture overnight, giving the drink a smooth heat that isn’t overpowering but adds the perfect spicy finish.

This recipe makes a large batch, which makes it perfect for entertaining. Just mix everything together, let the jalapeños infuse, and the margaritas are ready when you are.

Jalapeno Margaritas in pitcher, with glasses ready to serve nearby.
[feast_advanced_jump_to]

Why You’ll Love This Recipe

  • Made with fresh lime juice
  • Perfect balance of sweet, tart, and spicy
  • Great for parties and entertaining
  • Can be made ahead of time
  • Easy pitcher margarita recipe
  • Customizable spice level
Three Jalapeño Margaritas on wood serving tray with chips and guacamole nearby.

Ingredients

Margaritas

  • 21 ounces vodka or tequila
  • 14 ounces triple sec
  • 14 ounces fresh lime juice (about 20 limes)
  • 14 ounces water
  • 4 ounces simple syrup
  • 2 jalapeños
  • Fresh limes for serving
  • Kosher salt for glass rims

Simple Syrup

  • ½ cup water
  • ½ cup sugar
Ingredient shot for Jalapeño Margaritas.

How to Make Jalapeño Margaritas

In a large 3-quart pitcher, combine the vodka or tequila, triple sec, fresh lime juice, water, and simple syrup. Stir well to combine.

Slice the ends off the jalapeños and add them to the pitcher. Let the mixture sit for at least 24 hours in the refrigerator to allow the jalapeños to infuse the margaritas. The longer it sits, the stronger the jalapeño flavor will be.

When ready to serve, prepare your glasses by rubbing a lime wedge around the rim and dipping the rim into kosher salt or Tajín. Fill the glasses with ice, pour the margarita mixture over the ice, and garnish with lime slices or jalapeño slices.

Serve immediately and enjoy!

Process shot of tequila going in the pitcher for Jalapeño Margaritas.
Process shot of simple syrup going into the pitcher for Jalapeño Margaritas.
Process shot stirring Jalapeño Margaritas ingredients together.
Process shot of fresh jalapeño going into Jalapeño Margaritas pitcher.

Tips for Success

  • Use fresh lime juice for the best flavor.
  • Let the jalapeños infuse at least 24 hours for good flavor.
  • For a spicier margarita, slice the jalapeños instead of leaving them whole.
  • For a milder margarita, remove the jalapeños after 24 hours.
  • Chill the margarita mixture before serving so the ice doesn’t melt too quickly.
  • Tajín on the rim adds great flavor in addition to salt.
Angled shot of pouring Jalapeño Margarita into glass.

Variations

Spicy Jalapeño Margaritas
For extra heat, slice the jalapeños into rounds instead of leaving them whole. You can also add an extra jalapeño or let the mixture infuse for up to 48 hours for a stronger spicy flavor.

Mild Jalapeño Margaritas
For a milder drink, leave the jalapeños whole and remove them after 24 hours. This will give the margaritas a subtle jalapeño flavor without too much heat.

Sparkling Jalapeño Margaritas
Top each glass with a splash of club soda or sparkling water just before serving for a lighter, bubbly margarita.

Macro shot of a glass of Jalapeño Margaritas.

FAQ's

How spicy are jalapeño margaritas?

They are mildly spicy if you leave the jalapeños whole. For more heat, slice the jalapeños before adding them to the pitcher.

How long should jalapeños infuse in margaritas?

At least 24 hours, but 48 hours will give a stronger jalapeño flavor.

Can I make these margaritas ahead of time?

Yes! These are perfect for making ahead. In fact, they taste better after the jalapeños have had time to infuse.

How long do jalapeño margaritas last in the refrigerator?

They will keep well in the refrigerator for up to 3 days.

Can I use bottled lime juice?

Fresh lime juice is highly recommended for the best flavor, but bottled lime juice can be used if needed.

Should I remove the jalapeños after infusing?

If you don’t want the margaritas to become more spicy over time, remove the jalapeños after 24–48 hours.

Let's Connect

Want more behind-the-scenes peeks, recipe drops, and food photography inspo? Come hang out with me on Instagram, Pinterest, Facebook and more. I’d love to connect with you there!

Jalapeno Margarita served with hand grabbing glass.

Suggested Recipes

  • Hangover Cure cover image.
    Hangover Cure
  • Featured image for Simple Sangria recipe.
    Simple Sangria
  • Fresh Strawberry Margaritas
    Fresh Strawberry Margaritas
Jalapeno Margaritas

Jalapeno Margaritas

Yield: 8 cups
Prep Time: 10 minutes
Additional Time: 1 day
Total Time: 1 day 10 minutes

Perfect for any fiesta! These Jalapeno Margaritas are made with vodka, triple sec, fresh lime juice, simple syrup and infused with jalapeno flavor!

Ingredients

SPECIAL TOOLS

  • 3 quart pitcher

MARGARITAS

  • 21 ounces vodka or tequila
  • 14 ounces triple sec
  • 14 ounces fresh lime juice from about 20 limes
  • 14 ounces water
  • 4 ounces simple syrup
  • 2 jalapenos
  • Fresh limes, jalapeño slices and cilantro for serving
  • Tajin or kosher salt for glass

Instructions

  1. Combine all ingredients, except jalapenos in a large pitcher and stir to combine. Slice the ends off each jalapeno and place in the pitcher. Let mixture sit at least 24 hours before serving, the longer the better.
  2. Prepare margarita glasses with Tajin or. salt or rims and fill with ice. Pour Jalapeno Margarita over ice and garnish with lime, jalapeno slice and cilantro and serve.
Nutrition Information:
Yield: 8 Serving Size: 1 cup
Amount Per Serving: Calories: 349Total Fat: 0gUnsaturated Fat: 0gSodium: 4mgCarbohydrates: 25gFiber: 0gSugar: 22gProtein: 0g

*Nutrition information is an estimate and will vary.*

Did you make this recipe?

Tag @thecakechica1 on Instagram and hashtag #thecakechica1

© Mary | The Cake Chica
Cuisine: Mexican / Category: Beverage


Easy Cherry Pie

March 17, 2026

Cover image for Easy Cherry Pie

As an Amazon Associate, I earn from qualifying purchases.

If you’re looking for a classic cherry pie that’s simple, reliable, and full of flavor, this Easy Cherry Pie is it. Made with canned tart cherries, this recipe takes the guesswork out of seasonal baking while still delivering a beautifully balanced sweet-tart filling and a crisp, golden crust.

There’s no lattice to fuss with here, just a classic double crust that bakes up flaky and golden. With a few smart techniques, you’ll get a thick, sliceable filling and a bottom crust that stays crisp.

Overhead image of completed and baked Easy Cherry Pie.

Why This Recipe Works

This recipe is designed to give you consistent results every time.

  • Canned tart cherries provide reliable flavor and texture year-round
  • Draining the cherries after resting removes excess liquid, preventing a runny pie
  • Instant tapioca thickens the filling without making it cloudy
  • A simple moisture barrier helps keep the bottom crust from getting soggy
Angled image of knife cutting into Easy Cherry Pie.

Ingredients Overview

Here are a few key ingredients that make this pie stand out:

  • Canned tart cherries: Convenient and consistent, with the perfect balance of sweet and tart
  • Instant tapioca: Ground into a powder for a smooth, stable filling
  • Cherry liqueur (optional): Adds depth and enhances the cherry flavor
  • Almond extract: A small amount brings out the natural cherry notes
Overhead image of pie dough ingredients for Easy Cherry Pie.
Overhead image of ingredients for cherry filling for Easy Cherry Pie.

How to Make Easy Cherry Pie

Pie Dough

Start by preparing your pie dough and chilling it well.

Overhead image of pie dough process in food processor for Easy Cherry Pie.
Overhead image of completed pie dough for Easy Cherry Pie.

Cherry Filling

Combine the sugar, flour, tapioca, and cinnamon, then toss with the cherries, almond extract, and cherry liqueur if using. Let the mixture sit to draw out excess moisture, then drain the liquid. This step ensures your filling sets properly.

Overhead image of cherry mixture in a bowl for Easy Cherry Pie.
Overhead image of cherry filling in pie dough for Easy Cherry Pie.

Assemble the Pie

Roll out your bottom crust and fit it into your pie plate. Sprinkle a thin layer of breadcrumbs or almond flour over the base to absorb excess juices.

Add the filling, dot with butter, and top with the second crust. Seal, crimp, and freeze the assembled pie before baking.

Overhead image of prepped Easy Cherry Pie ready to go in the oven.

Bake

Start baking at a higher temperature, then reduce the heat to finish baking. This helps set the crust and cook the filling evenly.

Bake until the crust is deeply golden and the filling is bubbling thickly.

Pro Tips for Success

  • Dry the cherries well: Excess moisture leads to a runny filling
  • Don’t skip the draining step: This is key for a thick, sliceable pie
  • Keep your dough cold: Chill before rolling and before baking
  • Use a preheated baking sheet: Helps the bottom crust bake evenly and stay crisp
Close up shot of slice of Easy Cherry Pie being lifted from pie.

Storage

Store the fully cooled pie loosely covered at room temperature for up to 2 days, or refrigerate for up to 5 days. For longer storage, freeze the pie tightly wrapped for up to 3 months.

Reheat in a 350°F oven to warm through and re-crisp the crust.

Angled image of cut pie in dish showing texture of Easy Cherry Pie.

Baking Tools

  • Food processor
  • Plastic wrap
  • Rolling pin
  • 9-inch pie plate
  • Rimmed baking sheet(s)
  • Parchment paper
  • Foil
  • Spice grinder for tapioca 
Close up shot of sliced Easy Cherry Pie served on a white plate.

Frequently Asked Questions

Can I use fresh cherries?

This recipe is developed for canned cherries for consistency. Fresh cherries will require adjustments to the sugar and liquid.

Why is my cherry pie runny?

This usually happens if the cherries aren’t drained properly or the pie hasn’t cooled long enough before slicing.

Can I skip the cherry liqueur?

Yes, it’s optional. The pie will still have great flavor without it.

Can I make this pie ahead of time?

Yes. You can bake the pie a day in advance and store it at room temperature.

Angled shot of sliced Easy Cherry Pie served with ice cream.

Let's Connect

Want more behind-the-scenes peeks, recipe drops, and food photography inspo? Come hang out with me on Instagram, Pinterest, Facebook and more. I’d love to connect with you there!

  • Blueberry Pie Cover Image
    Blueberry Pie
  • Close up of sliced Classic Pecan Pie on white plate.
    Classic Pecan Pie
  • Pumpkin Pie with Gingersnap Crust cover photo.
    Pumpkin Pie with Gingersnap Crust
  • Banana Cream Pie
Angled shot of sliced Easy Cherry Pie served with ice cream.

Easy Cherry Pie

Yield: 8
Prep Time: 1 hour
Cook Time: 1 hour
Additional Time: 4 hours
Total Time: 6 hours

This Easy Cherry Pie is a timeless dessert made simple! With a buttery, flaky crust and a sweet-tart cherry filling, this pie comes together with minimal effort but delivers bakery-worthy results. Perfect for holidays, summer gatherings, or any time you’re craving a classic fruit pie, it’s as beautiful as it is delicious. Serve it warm with a scoop of vanilla ice cream for the ultimate treat!

Ingredients

SPECIAL TOOLS

  • Food processor
  • Plastic wrap
  • Rolling pin
  • 9-inch pie plate
  • Rimmed baking sheet(s)
  • Parchment paper
  • Foil
  • Spice grinder for tapioca

PIE DOUGH

  • 2 1/2 cups (12.5 ounces) all-purpose flour, divided
  • 2 tablespoons granulated sugar
  • 1 teaspoon salt
  • 12 tablespoons unsalted butter, cut into tablespoon-sized pieces and chilled
  • 8 tablespoons vegetable shortening, cut into 4 pieces and chilled
  • 1/4 cup cherry liqueur
  • 1/4 cup ice water

EGG WASH

  • 1 large egg
  • 1 tablespoon water

CHERRY FILLING

  • 1 1/3 cups (9.6 ounces) granulated sugar
  • 2 tablespoons all-purpose flour
  • 2 1/2 tablespoons instant tapioca, finely ground into a powder (use spice grinder)
  • 1/8 teaspoon ground cinnamon (optional)
  • 1/4 teaspoon almond extract
  • 2 tablespoons cherry liqueur (optional)
  • 3 (14.5-ounce) cans red tart cherries, well drained and gently dried with paper towels (do not rinse)
  • 2 tablespoons unsalted butter, cut into cubes
  • 1 tablespoon turbinado sugar
  • Moisture Barrier
  • 1 tablespoon fine breadcrumbs OR almond flour

Instructions

PIE DOUGH

  1. In the bowl of a food processor, process 1 1/2 cups flour, sugar, and salt until combined, about 5 seconds. Add the chilled butter and shortening and process until incorporated and the mixture forms uneven clumps with no floury bits remaining, about 15 seconds.
  2. Scrape down the bowl and redistribute the dough evenly. Sprinkle the remaining 1 cup flour over the mixture and pulse until the dough breaks into evenly distributed pieces, about 4 to 6 pulses.
  3. Transfer the mixture to a large bowl. Sprinkle the cherry liqueur and ice water over the dough. Stir and press the dough together with a stiff rubber spatula until the dough begins to stick together. The dough will be wetter than most pie doughs. If the dough feels too sticky to handle, sprinkle in additional flour 1 tablespoon at a time. It’s okay if your dough has a little color from the liqueur. It won’t show after baking, but you can also use a clear cherry liqueur in its place.
  4. Divide the dough into 2 equal portions. Flatten each into a 4-inch disk, wrap tightly in plastic wrap, and refrigerate for at least 1 hour. Roll one disk of dough on a lightly floured surface into a 12-inch circle. Transfer it to a 9-inch pie plate, easing the dough into the plate without stretching. Let the excess dough hang over the edge.
  5. Place the pie plate on a rimmed baking sheet, loosely cover with plastic wrap, and refrigerate for 30 minutes.
  6. Roll the second dough disk into a 12-inch circle and place on a parchment-lined baking sheet. Refrigerate until firm, about 30 minutes.

EGG WASH

  1. Whisk together the egg and water in a small bowl and set aside.

CHERRY PIE FILLING

  1. Adjust an oven rack to the lowest position. Place a foil-lined rimmed baking sheet on the rack and heat the oven to 400°F.
  2. In a large bowl, combine the sugar, flour, tapioca powder, and cinnamon.
  3. Add the almond extract, cherry liqueur (if using), and drained cherries. Toss gently until evenly coated.
  4. Let sit for 30 minutes to allow the sugar and tapioca to draw out excess moisture.
  5. Drain the cherries again through a sieve and discard the liquid (this step prevents a runny filling). Return cherries to the bowl.

Assemble the Pie

  1. Remove the chilled pie crust from the refrigerator.
  2. Sprinkle 1 tablespoon fine breadcrumbs (or almond flour) evenly over the bottom crust. This thin layer absorbs the first juices released by the cherries and helps keep the bottom crust crisp.
  3. Pour the cherry filling into the crust and scatter the butter cubes over the top.
  4. Roll the second dough round onto a rolling pin, then unroll it over the filling.
  5. Press the top and bottom crusts together and trim the overhang to 1/2 inch beyond the pie plate edge. Tuck the edges under and crimp.
  6. Freeze the assembled pie for 30 minutes.
  7. Cut several vent slits in the top crust. Brush with egg wash and sprinkle with turbinado sugar.

Bake

  1. Place the pie directly on the preheated baking sheet.
  2. Bake until the crust begins to turn light golden, about 30 minutes.
  3. Reduce the oven temperature to 350°F, rotate the pie, place foil loosely on top and continue baking until the crust is deep golden brown and the filling is thickly bubbling, about 30–40 minutes longer.

Cool

  1. Cool for at least 4 hours (or overnight) before slicing to allow the filling to fully set. Serve with whipped cream or vanilla ice cream.

Notes

Storage: At room temperature: Store the fully cooled pie loosely covered at room temperature for up to 2 days. This helps maintain a crisp crust.

Refrigerator: For longer storage, cover and refrigerate for up to 4–5 days. Note that the crust will soften slightly.

Freezer: Wrap the fully cooled pie tightly in plastic wrap and foil, then freeze for up to 3 months. Thaw overnight in the refrigerator before reheating.

Nutrition Information:
Yield: 8 Serving Size: 1
Amount Per Serving: Calories: 257Total Fat: 15gSaturated Fat: 6gTrans Fat: 0gUnsaturated Fat: 8gCholesterol: 45mgSodium: 179mgCarbohydrates: 25gFiber: 1gSugar: 4gProtein: 6g

*Nutrition information is an estimate and will vary.*

Did you make this recipe?

Tag @thecakechica1 on Instagram and hashtag #thecakechica1

© Mary | The Cake Chica
Cuisine: American / Category: Pies and Tarts

Chocolate Raspberry Cake with Whipped Ganache Frosting

March 9, 2026

Chocolate Raspberry Cake with Whipped Ganache Frosting cover image.

Chocolate and raspberry are a classic flavor pairing for a reason. The deep richness of chocolate combined with the bright, slightly tart flavor of raspberries creates a perfectly balanced dessert that feels both indulgent and elegant.

This Chocolate Raspberry Cake with Whipped Ganache Frosting features four delicious components: moist chocolate cake layers, a vibrant raspberry filling, light whipped chocolate ganache frosting, and a glossy chocolate drip. Each element brings its own texture and flavor, creating a layered cake that’s rich without being overly sweet.

AS AN AMAZON ASSOCIATE I EARN FROM QUALIFYING PURCHASES.

Chocolate raspberry cake with whipped ganache frosting and chocolate drip
[feast_advanced_jump_to]

Why You'll Love This Chocolate Raspberry Cake

Moist chocolate cake layers
A combination of butter, oil, sour cream, and cocoa powder creates a cake that is rich, tender, and deeply chocolatey.

Bright raspberry filling
The raspberry filling adds a vibrant pop of flavor that balances the richness of the chocolate cake and frosting.

Light whipped ganache frosting
Whipped ganache creates a smooth frosting that’s less sweet than buttercream but just as decadent.

Elegant chocolate drip
A glossy chocolate drip gives the cake a polished, bakery-style finish.

Perfect for celebrations
With four layers of cake and beautiful decoration, this cake always makes a stunning centerpiece.

Close up of slice of Chocolate Raspberry Cake with Whipped Cream Ganache Frosting on white plate.

The Four Components of This Cake

Chocolate Cake Layers

The chocolate cake layers are soft, moist, and full of chocolate flavor. The batter combines cocoa powder with both butter and oil, giving the cake the best of both worlds, rich flavor from the butter and lasting moisture from the oil.

Sour cream adds tenderness while ice-cold water helps create a smooth batter and enhances the chocolate flavor.

Overhead shot of ingredients for chocolate cake.
Overhead shot of Chocolate Raspberry Cake with Whipped Ganache Frosting.

Raspberry Filling

The raspberry filling adds brightness and contrast to the cake. Frozen raspberries are pureed and strained to remove the seeds, creating a smooth base for the filling.

The puree is cooked with sugar and thickened with a cornstarch slurry until it becomes thick and spreadable. A squeeze of fresh lemon juice enhances the natural raspberry flavor, while a splash of Chambord adds a subtle raspberry liqueur note.

Whipped Chocolate Ganache Frosting

This frosting is what makes the cake truly special.

Bittersweet chocolate is combined with hot heavy cream to create a smooth ganache. After chilling, the ganache is whipped until it becomes light, fluffy, and spreadable. The result is a silky frosting that tastes rich but feels surprisingly light.

A touch of Chambord ties the frosting into the raspberry filling and adds an extra layer of flavor.

Overhead shot of whipped ganache ingredients for Chocolate Raspberry Cake with Whipped Ganache Frosting.
Overhead shot of combined ingredients for whipped ganache for Chocolate Raspberry Cake.
Chilled ganache for Chocolate Raspberry Cake with Whipped Ganache Frosting.
Overhead shot of whipped ganache for Chocolate Raspberry Cake with Whipped Ganache Frosting.

Chocolate Drip

The finishing touch is a rich chocolate drip made from semi-sweet chocolate, heavy cream, butter, and Chambord.

Once slightly cooled, the ganache is carefully spooned along the edges of the cake to create beautiful drips. The remaining chocolate is spread over the top for a smooth, glossy finish.

Whole Chocolate Raspberry Cake with Whipped Ganache Frosting on marble cake stand.

Cake Assembly Tips

Slice the cake layers evenly
Cutting each cake horizontally creates four thin layers that allow the raspberry filling to shine.

Angled shot of Chocolate Raspberry Cake with Whipped Ganache Frosting filling process.

Pipe a frosting dam
A ring of whipped ganache around the edge of each layer keeps the raspberry filling from spilling out.

Filled and stacked Chocolate Raspberry Cake with Whipped Ganache Frosting process.

Use a crumb coat
Applying a thin layer of frosting before the final coat helps trap crumbs and creates a smoother finish.

Chill between steps
Refrigerating the cake during assembly helps stabilize the layers and makes frosting easier.

Frosted Chocolate Raspberry Cake with Whipped Ganache Frosting.

Tips for the Perfect Chocolate Drip

The key to a beautiful chocolate drip is temperature and consistency.

  • Let the chocolate drip cool for about 5 minutes before using. The chocolate drip should be fluid enough to drip, but cool enough to not melt the frosting.
  • Test a drip on the side of a bowl before applying to the cake.
  • Use a spoon or squeeze bottle for better control.
Overhead shot of Chocolate Raspberry Cake with Whipped Ganache Frosting with a slice cut with cake server.

Storage Tips

Because the frosting is made from whipped ganache, the cake should be stored in the refrigerator.

Allow the cake to sit at room temperature for 20–30 minutes before serving so the ganache softens slightly and the flavors shine.

The cake will keep well in the refrigerator for 3–4 days when stored in an airtight container.

Close up shot of Chocolate Raspberry Cake with Whipped Ganache Frosting with slices removed.

Baking and Cake Decorating Tools

  • Nonstick baking spray
  • 2 8-inch round cake pans
  • Food processor or blender
  • Stand mixer
  • Sieve
  • 8-inch round cake board
  • Offset cake sptaula
  • Cake turntable
  • 8-inch acrylic disc
  • Piping bags
  • Ateco piping tip #827
Close up shot of a slice of Chocolate Raspberry Cake with Whipped Ganache with chocolate drip being drizzled on top.

Plan It Out

  • Day 1: Prepare the filling.
  • Day 2: Bake the cake layers and prepare the ganache. (Ganache must chill at least 6 hours before whipping.)
  • Day 3: Whip the ganache. Assemble the cake and serve.
Chocolate Raspberry Cake with Whipped Ganache Frosting slice with chocolate sauce.

FAQ's

Can I use fresh raspberries instead of frozen?

I developed this recipe using frozen raspberries and have not tested it with fresh raspberries. Frozen berries work well because they release plenty of juice as they thaw. If you try fresh raspberries, you may need to cook the filling a little longer so the berries break down and release their juices.

Can I omit the Chambord?

Yes. The Chambord can be left out if you prefer not to use alcohol. The cake will still have plenty of raspberry flavor.

Can this cake be made ahead of time?

Absolutely. The cake layers can be baked up to two days in advance and stored tightly wrapped. The fully assembled cake can also be refrigerated overnight.

Why does the ganache need to chill before whipping?

Chilling allows the ganache to firm up so it can trap air when whipped. This creates the light, fluffy texture that makes whipped ganache perfect for frosting.

Can I freeze the cake layers?

Yes. Wrap the cooled cake layers tightly in plastic wrap and foil and freeze for up to two months. Thaw in the refrigerator before assembling the cake.

Sliced Chocolate Raspberry Cake with Whipped Ganache Frosting lying on its side.

Final Thoughts

This Chocolate Raspberry Cake with Whipped Ganache Frosting is a beautiful combination of rich chocolate flavor and bright raspberry filling. With its soft cake layers, light whipped ganache frosting, and glossy chocolate drip, it’s a dessert that feels both elegant and indulgent.

Let's Connect

Want more behind-the-scenes peeks, recipe drops, and food photography inspo? Come hang out with me on Instagram, Pinterest, Facebook and more. I’d love to connect with you there!

Suggested Recipes

  • Chocolate-Raspberry Layer Cake
  • White Chocolate Raspberry Drip Cake
    White Chocolate Raspberry Drip Cake
  • White Chocolate Raspberry Cake on pink cake pedestal.
    White Chocolate Raspberry Cake
  • Raspberry Wine Cake
    Raspberry Wine Cake
Chocolate raspberry cake with whipped ganache frosting and chocolate drip

Chocolate Raspberry Cake with Whipped Ganache Frosting

Yield: 12
Prep Time: 1 hour 45 minutes
Cook Time: 35 minutes
Additional Time: 1 hour
Total Time: 3 hours 20 minutes

Four layers of sour cream chocolate cake, filled with fresh raspberry filling, frosted with a whipped chocolate ganache, then topped with a dark chocolate glaze.

Ingredients

SPECIAL TOOLS

  • Nonstick baking spray
  • 2 8-inch round cake pans
  • Food processor or blender
  • Stand mixer
  • Sieve
  • 8-inch round cake board
  • Offset cake sptaula
  • Cake turntable
  • 8-inch acrylic disc
  • icing scraper
  • Piping bags
  • Ateco piping tip #827

CAKE

  • 2 2/3 cups (13 ounces) all-purpose flour
  • 2 ½ cups (17.5 ounces) granulated sugar
  • ½ cup (1.5 ounces) unsweetened cocoa powder
  • 1 ½ teaspoons baking soda
  • ½ teaspoon table salt
  • 3 large eggs, at room temperature
  • 2/3 cup sour cream, at room temperature
  • 1 tablespoon vanilla extract
  • 10 tablespoons (1 ¼ sticks) unsalted butter, melted and cooled
  • 2/3 cup safflower, corn, canola or grapeseed oil
  • 1 ¼ cups ice-cold water

FILLING

  • 1 12-ounce bag of frozen raspberries, thawed
  • ¼ cup (1.75 ounces)granulated sugar
  • 3 tablespoons cornstarch, mixed with 3 tablespoons cold water until dissolved
  • Fresh lemon juice for flavor
  • 2 tablespoons Chambord

WHIPPED GANACHE

  • 14 ounces bittersweet chocolate, finely chopped
  • 4 cups (32 ounces) heavy cream
  • 2 tablespoons raspberry Chambord

CHOCOLATE DRIP

  • 6 ounces semi sweet chocolate, chopped
  • 3/4 cup (6 ounces) heavy cream
  • 1/4 cup unsalted butter
  • 1 tablespoon Chambord

Instructions

CAKE

  1. Adjust an oven rack to the center position and preheat oven to 350 degrees. Spray 2 8-inch cake rounds with nonstick baking spray and set aside.
  2. In a large bowl, whisk together the flour, sugar, cocoa powder, baking soda, and salt. Set aside.
  3. In a medium bowl, whisk together the eggs until blended. Add sour cream and vanilla extract to the eggs and whisk together until combined and set aside.
  4. In the bowl of a stand mixer, with the paddle attachment attached, mix the melted butter, and oil together on low speed. Add the cold water and continue to mix on low speed. Add all of the flour mixture and continue to mix on medium-low speed for 1 minute. Add the egg mixture and mix for another minute until blended. Scrape down the sides of the bowl as necessary. Divide batter into the prepared cake pans evenly.
  5. Bake cakes for 35 to 40 minutes or until a toothpick inserted into the center comes out with a few moist crumbs attached. Cool the cakes in their pans on wire racks for about 15 minutes.
  6. Invert cakes onto wire racks and let cool completely.

FILLING

  1. Puree thawed berries in a blender or food processor until smooth. Over a bowl, pour raspberry puree over a sieve to remove the seeds. The puree will be thick. Use a spoon to stir and press the puree through the sieve. Place raspberry puree in a saucepan over medium-low heat. Add sugar and cornstarch mixture and bring to a simmer stirring constantly to keep lumps from forming. Once the puree thickens, remove from the heat. Cool for 5 minutes and then add fresh lemon juice and Chambord. Chill for a 2-3 hours in the refrigerator until ready to use.

WHIPPED GANACHE

  1. Place chocolate in the bowl of a stand mixer.
  2. In a medium saucepan, bring the heavy cream to a gentle boil over medium-high heat. Pour hot cream over the chocolate and let sit for 1 minute, then whisk until the chocolate is melted and smooth. Whisk in the Chambord. Cover the surface of the ganache with plastic wrap and refrigerate until firm enough to whip, at least 6 hours
  3. With the whisk attachment attached to a stand mixer, beat the ganache on medium-high speed, until medium peaks form and is firm enough to spread, about 1 minute.


ASSEMBLE

  1. Cut each layer of cake horizontally creating 4 thin layers of cake. Place one layer on an 8-inch cake round on a cake turntable. Fit a piping bag with a plain round tip or coupler and fill with about 1 1/2 cups Whipped Ganache Frosting and pipe a frosting dam around the edge of the cake. With an offset cake spatula, spread about 1/2 cup raspberry filling on top, spreading out in an even layer until it meets the frosting dam. Place another cake layer on top and repeat with the second and third cake layers.
    Top with the last cake layer and spread light coating of Whipped Chocolate Ganache Frosting over the top and sides of the cake, creating a crumb coat. Once the crumb coat is applied, chill in the refrigerator for 30 minutes.
  2. While the cake is chilling, line an 8-inch round acrylic disc with parchment paper, attaching the paper with a bit of frosting. Apply a heaping amount of frosting on top of the chilled cake, spreading with an offset cake spatula in an even layer. You should have excess frosting hanging off the sides of the cake.
  3. Apply the lined acrylic disc, parchment side down, making sure the disc lines up with the bottom cake board. Once the disc is lined up, gently press the disc to adhere to the cake. Apply frosting to the sides of the cake making sure the entire bottom cake board is covered. Smooth with an icing scraper, rotating the turntable and filling in any gaps with more frosting as needed. Chill the cake for 15 to 20 minutes in the freezer, or 30 to 40 minutes in the refrigerator before removing the disc.
  4. Carefully remove the disc by inserting the cake spatula under the disc, and over the parchment paper. Gently rotate the turntable until the disc releases. Carefully peel off the parchment paper from the cake. Apply additional frosting to any gaps if needed and smooth out. Clean up the edges of the cake with a toothpick if needed.
  5. Place remaining frosting in a piping bag fitted with Ateco piping tip #827. Chill the cake in the refrigerator while you prepare the Chocolate Drip.

CHOCOLATE DRIP

  1. Place chocolate in a medium heat proof bowl.
  2. In a small saucepan, bring cream and butter to a simmer over medium heat. Pour hot cream mixture over the chocolate and stir until melted. Let cool for 5 minutes before using.
  3. With a spoon or squeeze bottle, strategically place the first layer of Chocolate Drips on the side of the cake. Pour some of the Chocolate Drip in the center of the cake and spread out until it meets the chocolate drips. Chill the cake for 30 minutes. You can add a second layer of drip, but this is optional.
  4. Before piping swirls on top of the cake make sure the chocolate drip has set. Once the drip has set, pipe 8 large frosting swirls on top of the cake. Top each swirl with a fresh raspberry and serve.

Notes

Cake layers can be made up to 3 days in advance wrapped in plastic wrap and stored in an airtight container in the refrigerator.

Filling can be made up to 5 days in advance, stored in an airtight container in the refrigerator.

Assembled cake can be stored at room temperature up to 1 day in an airtight container or stored in the refrigerator up to 3 days. Bring to room temperature before serving.

Nutrition Information:
Yield: 12 Serving Size: 1 slice
Amount Per Serving: Calories: 768Total Fat: 50gSaturated Fat: 27gTrans Fat: 0gUnsaturated Fat: 20gCholesterol: 125mgSodium: 360mgCarbohydrates: 69gFiber: 10gSugar: 27gProtein: 12g

*Nutrition information is an estimate and will vary.*

Did you make this recipe?

Tag @thecakechica1 on Instagram and hashtag #thecakechica1

© Mary | The Cake Chica
Cuisine: American / Category: Dessert

Valentine Confetti Cookie Cake

February 13, 2026

Cover image for Valentine Confetti Cookie Cake.

If you love the nostalgia of a classic mall-style cookie cake but want something homemade, festive, and extra special for Valentine’s Day, this Valentine Confetti Cookie Cake is it. 💕

It has crisp golden edges, a soft and chewy center, melty white chocolate chips, and pops of festive sprinkles baked right into the dough. The finishing touch? A dreamy swirl of electric pink buttercream piped around the edges for that signature cookie cake look.

AS AN AMAZON ASSOCIATE I EARN FROM QUALIFYING PURCHASES.

Overhead shot of Valentine Confetti Cookie Cake on pink pedestal.
[feast_advanced_jump_to]

Why You'll Love This Recipe

  • No chilling required
  • Bakes in just one 9-inch pan
  • Soft and chewy texture
  • Perfect balance of sweetness
  • Customizable for any holiday
  • Bakery-style look without the bakery price

This is one of those recipes that feels impressive but is incredibly approachable.

Overhead shot of Valentine Confetti Cookie Cake with slice missing.

Ingredient Highlights

Cornstarch
A small amount of cornstarch keeps the cookie cake soft and tender in the center.

White Chocolate Chips
White chocolate pairs beautifully with Valentine sprinkles and keeps the flavor light and sweet.

Room Temperature Butter & Egg
This ensures proper creaming and helps create that soft, bakery-style texture.

Electric Pink Gel Food Color
I used Electric Pink gel food color to achieve that bold, vibrant Valentine border. Gel color gives you strong color without thinning the frosting.

Overhead shot of ingredients for Valentine Confetti Cookie Cake.

Special Tools

  • 9-inch round cake pan
  • Parchment paper
  • Piping bags
  • Piping tips (Wilton 1M, 2D or Ateco 844)

You can use any decorating tip you love, but large star tips give that classic cookie cake border.

How To Make Valentine Confetti Cookie Cake

  • Preheat oven to 350°F and prepare a 9-inch round cake pan.
  • Whisk together the dry ingredients.
  • Cream butter and sugar until light and fluffy.
  • Mix in egg and vanilla.
  • Add dry ingredients, then fold in white chocolate chips and sprinkles.
  • Press dough into pan and bake for 20–25 minutes until edges are lightly golden.
  • Cool completely before removing from the pan.
  • Make the buttercream, tint pink, and pipe a decorative border.

That’s it! A soft, chewy cookie cake with festive flair and bakery-style presentation.

Overhead shot of dry ingredients for Valentine Confetti Cookie Cake.
Overhead shot of creamed butter and sugar for Valentine Confetti Cookie Cake.
Overhead shot of cookie dough for Valentine Confetti Cookie Cake.
Overhead shot of cookie dough with white chocolate chips and sprinkles for Valentine Confetti Cookie Cake.
Overhead shot of cookie dough in cake pan for Valentine Confetti Cookie Cake.
Overhead shot of baked Valentine Confetti Cookie Cake on pan.

Buttercream Instructions

Beat butter and shortening until smooth.
Add 1 cup powdered sugar and mix until smooth.
Add vanilla and 1 to 2 tablespoons water. Mix.
Add remaining powdered sugar and beat until combined.

Color with electric pink gel food coloring.
Fit a piping bag with your favorite star tip and pipe a decorative border around the edge.

Finish with extra sprinkles.

Buttercream being piped onto Valentine Confetti Cookie Cake.

Decorating Ideas

  • Pipe rosettes using a 1M tip
  • Add Valentine candy in the center
  • Write “Be Mine” or a personalized message
  • Add heart sprinkles or edible glitter
Close up shot of sliced Valentine Confetti Cookie Cake on pink pedestal.

Storage Tips

Store covered at room temperature for up to 3 days.
Refrigerate up to 5 days (bring to room temperature before serving).

Shot of sliced Valentine Confetti Cookie Cake on pink plate with strawberry milk in the background.

FAQ's

Why is my cookie cake underdone in the center?

The center may look slightly soft when you remove it from the oven. That’s normal. It continues to firm up as it cools. Overbaking will make it dry.

Can I use milk chocolate or semi-sweet chips instead?

Absolutely. You can substitute your favorite chocolate chips, but white chocolate keeps the look lighter and more festive for Valentine’s Day.

Can I make this ahead of time?

Yes. You can bake the cookie cake one day ahead and decorate the next day.

Do I have to use shortening in the buttercream?

Shortening helps stabilize the buttercream and gives it that classic cookie cake texture. You can use all butter, but the border may be softer.

Why did my cookie cake crack when removing from the pan?

It likely wasn’t cooled long enough. Make sure it cools at least 2 to 3 hours before flipping.

Can I freeze this cookie cake?

Yes. Wrap the undecorated cookie cake tightly in plastic wrap. And next, wrap in a layer of foil and freeze for up to 2 months. Thaw at room temperature before decorating.

Can I use a different size pan?

If using an 8-inch pan, the cookie will be thicker and need a few extra minutes to bake. A 10-inch pan will produce a thinner cookie and require less baking time.

Close up shot of bite removed from slice of Valentine Confetti Cookie Cake.

Let's Connect

Want more behind-the-scenes peeks, recipe drops, and food photography inspo? Come hang out with me on Instagram, Pinterest, Facebook and more. I’d love to connect with you there!

Overhead shot of several slices of Valentine Confetti Cookie Cake on pink plates.

Suggested Recipes

  • Close up of Valentine's Day Red Velvet Cake on cake pedestal.
    Valentine's Day Red Velvet Cake
  • Chocolate Covered Strawberries Cake on marble cake pedestal.
    Chocolate Covered Strawberries Cake
  • Pink Champagne Layer Cake on pink cake pedestal.
    Pink Champagne Layer Cake
  • Strawberry Rose Cake
    Strawberry Rose Cake

Adapted from Simply Beautiful Homemade Cakes by Lindsay Conchar

Overhead shot of Valentine Confetti Cookie Cake with slice missing.

Valentine Confetti Cookie Cake

Yield: 12
Prep Time: 15 minutes
Cook Time: 25 minutes
Additional Time: 2 hours
Total Time: 2 hours 40 minutes

Festive sugar cookie baked with white chocolate chips and sprinkles, topped with buttercream and more sprinkles!

Ingredients

SPECIAL TOOLS

  • 9-inch round cake pan
  • Stand mixer
  • Piping bag
  • Wilton piping tip #1M
  • Americolor Electric Pink gel food color
  • Valentine sprinkles

COOKIE CAKE

  • 1 ¾ cups (8.75 ounces) all-purpose flour
  • ½ teaspoon baking soda
  • ½ teaspoon cornstarch
  • ¼ teaspoon salt
  • ½ cup (8 tablespoons) unsalted butter, at room temperature
  • 1 cup (7 ounces) granulated sugar
  • 1 large egg
  • 1 teaspoon vanilla extract
  • 1 cup white chocolate chips
  • ¼ cup Valentine sprinkles

BUTTERCREAM

  • ¼ cup (4 tablespoons) unsalted butter, at room temperature
  • ¼ cup (4 tablespoons) vegetable shortening
  • 2 cups (8 ounces) powdered sugar, divided
  • ½ teaspoon vanilla extract
  • 1 ½ tablespoons water
  • Americolor Electric Purple gel food color
  • Valentine sprinkles, for garnish

Instructions

COOKIE CAKE

  1. Adjust an oven rack to the middle position and heat your oven to 350 degrees. Prepare a 9-inch round cake pan with parchment paper on the bottom and spray the sides of the cake pan with baking spray. Set aside.
  2. In a medium-sized bowl, combine the flour, baking soda, cornstarch and salt. Set aside.
  3. In the bowl of an electric stand mixer, cream the butter and sugar together until light and fluffy, about 3 to 4 minutes. Scrape down the sides of the bowl. Add the egg and vanilla extract and mix until well combined. Add the flour mixture to the butter mixture and beat until well combined. The dough will be crumbly at first. Use a silicone spatula to bring it together. Stir in the white chocolate chips and sprinkles. The dough will be thick.
  4. Press and spread the cookie dough evenly into the cake pan, and add a few more white chocolate chips into the top of the cookie and gently press them into the dough. Bake for 20 to 25 minutes until the edges turn light gold. The center may not be set but will firm up as it cools.
  5. Remove the cookie cake from the oven and allow to cool in the pan for 2 to 3 hours. Loosen the cookie cake from the sides of the pan with a small cake spatula or knife. Remove the cookie cake from the pan by placing a plate or cake circle over the top of the cake pan and flip over. Next, choose the serving platter you wish to serve on and place that on top of the cookie cake and carefully flip over.

BUTTERCREAM

  1. In a large bowl beat together the butter and shortening until smooth. Add half of the powdered sugar and beat until smooth. Add the vanilla extract and 1 to 2 tablespoons water and mix until smooth. Add the remaining powdered sugar and mix until combined.
  2. Color the frosting with gel food coloring. I used Americolor Electric Pink gel food color. Fit a piping bag with Wilton piping tip #1M and fill bag with buttercream. Pipe buttercream in small swirls. Sprinkle Valentine sprinkles on top of the frosting and serve.
Nutrition Information:
Yield: 8 Serving Size: 1
Amount Per Serving: Calories: 884Total Fat: 40gSaturated Fat: 21gUnsaturated Fat: 18gCholesterol: 84mgSodium: 208mgCarbohydrates: 129gFiber: 1gSugar: 114gProtein: 4g

*Nutrition information is an estimate and will vary.*

Did you make this recipe?

Tag @thecakechica1 on Instagram and hashtag #thecakechica1

© Mary | The Cake Chica
Cuisine: American / Category: Cookies and Candies

Easy Sausage and Mushroom Lasagna

February 5, 2026

Cover image for Easy Sausage and Mushroom Lasagna.


There’s just something about lasagna that feels like a warm hug. It’s cozy, comforting, and one of those dishes that instantly makes dinner feel a little more special without needing hours in the kitchen. This Easy Sausage and Mushroom Lasagna is one of those recipes

This version keeps things simple with no-cook noodles, a rich sausage and mushroom filling, and plenty of cheesy layers that bake up bubbly and golden. It’s classic, unfussy, and exactly the kind of meal that makes everyone linger at the table just a little longer.

Close up overhead shot of sliced Easy Sausage and Mushroom Lasagna on casserole dish.
[feast_advanced_jump_to]

Why You'll Love This Recipe

  • No-cook lasagna noodles make prep fast and stress-free
  • Savory Italian sausage and mushrooms add depth and heartiness
  • Uses store-bought marinara—but still tastes homemade
  • Perfect for weekends, entertaining, or make-ahead meals
  • Even better the next day (hello, leftovers)

This is the kind of recipe that feels impressive but doesn’t require perfection. If your layers aren’t flawless? Totally fine. It all bakes together beautifully.

Overhead shot of ingredients for Easy Sausage and Mushroom Lasagna.

Ingredient Notes & Easy Swaps

  • Italian Sausage: Mild Italian sausage keeps the flavors balanced, but you can absolutely use spicy if that’s your thing.
  • Mushrooms: Cremini mushrooms add an earthy depth. Baby bellas work great here, too.
  • Marinara Sauce: Use a good-quality jarred sauce you already love, this is where a lot of the flavor comes from.
  • Ricotta Cheese: Part-skim keeps things lighter without sacrificing creaminess.
  • Italian Blend Shredded Cheese: A mix of mozzarella, provolone, parmesan, or romano melts beautifully and browns well.
Overhead shot of cooked veggies for Easy Sausage and Mushroom Lasagna.
Overhead shot of cooked sausage for Easy Sausage and Mushroom Lasagna.
Overhead shot of cooked filling for Easy Sausage and Mushroom Lasagna.

How to Make Easy Sausage and Mushroom Lasagna

This lasagna starts by building flavor in one pan. Mushrooms, onion, and Italian seasoning are sautéed until softened, then set aside while the sausage browns. Garlic and red wine come next, adding richness and depth as you scrape up all those flavorful browned bits from the pan.

Once the filling is ready, it’s all about simple layering:

  • Sauce on the bottom
  • Noodles
  • Ricotta
  • More sauce
  • Shredded cheese
  • Sausage and mushroom mixture

Repeat a few times, finish with noodles, sauce, and cheese, then bake until bubbling and golden. Letting the lasagna rest before slicing is key! It helps everything set and makes for cleaner slices.

Overhead shot of lasagna layering for Easy Sausage and Mushroom Lasagna step 1.
Overhead shot of lasagna layering for Easy Sausage and Mushroom Lasagna step 2.
Overhead shot of lasagna layering for Easy Sausage and Mushroom Lasagna step 3.
Overhead shot of lasagna layering for Easy Sausage and Mushroom Lasagna step 4.
Overhead shot of lasagna layering for Easy Sausage and Mushroom Lasagna step 5.
Overhead shot of lasagna layering for Easy Sausage and Mushroom Lasagna step 6.

Make-Ahead, Storage & Freezing Tips

  • Make Ahead: Assemble the lasagna up to 24 hours in advance, cover, and refrigerate. Bake when ready.
  • Refrigerate: Store leftovers covered in the fridge for up to 4 days.
  • Freeze: Lasagna freezes beautifully. Freeze baked or unbaked, tightly wrapped, for up to 3 months.
  • Reheat: Warm slices covered in the oven at 350°F or gently in the microwave.
Close up shot of cheese pull for Easy Sausage and Mushroom Lasagna.

FAQ's

Can I use regular lasagna noodles instead of no-cook?

Yes! You’ll need to cook them according to package directions first. Drain well before layering.

Do I really need to let the lasagna rest before cutting?

Yes! And I know it’s hard to wait. Resting for about 15 minutes helps the layers hold together and prevents a soupy slice.

Can I make this vegetarian?

Absolutely. Skip the sausage and add more mushrooms, or substitute with a plant-based sausage.

What kind of red wine should I use?

Use a dry red wine like Cabernet Sauvignon, Merlot, or Chianti. If you don’t cook with wine, you can substitute broth, but the wine adds great depth.

Why is my lasagna watery?

This usually comes from excess moisture in the sauce or vegetables. Cooking off the wine and letting the lasagna rest helps a lot.

Can I use cottage cheese instead of ricotta?

Yes, just blend it briefly for a smoother texture.

How do I know when it’s done?

The edges should be bubbling, and the cheese on top should be lightly browned and melty.

Close up shot of sliced Easy Sausage and Mushroom Lasagna in casserole dish.

What to Serve With Sausage and Mushroom Lasagna

  • Simple green salad with vinaigrette
  • Garlic bread or crusty bread
  • Roasted broccoli or green beans
  • A glass of red wine or sparkling water with lemon
Close up shot of sliced Easy Sausage and Mushroom Lasagna on white serving plate.

Final Thoughts

If you make this recipe, I’d love to know how it turned out for you. Save it, share it, and don’t forget to enjoy every cheesy bite.

Let's Connect

Want more behind-the-scenes peeks, recipe drops, and food photography inspo? Come hang out with me on Instagram, Pinterest, Facebook and more. I’d love to connect with you there!

Wide open shot of served slice of Easy Sausage and Mushroom Lasagna with salad and garlic bread.

Suggested Recipes

  • Overhead shot of Zesty Shrimp Pasta Salad in bowls.
    Zesty Shrimp Pasta Salad
  • Cover image for Chicken Fideo Soup
    Chicken Fideo Soup
  • Easy Seafood Stew
    Easy Seafood Stew
  • Cover image for Slow Cooker Pulled Pork Sandwiches.
    Slow Cooker Pulled Pork Sandwiches

Adapted from Bon Appetit Magazine November 2008

Close up shot of sliced Easy Sausage and Mushroom Lasagna on white serving plate.

Easy Sausage and Mushroom Lasagna

Yield: 12
Prep Time: 25 minutes
Cook Time: 45 minutes
Additional Time: 15 minutes
Total Time: 1 hour 25 minutes

A comforting, no-fuss lasagna layered with savory Italian sausage, sautéed mushrooms, rich marinara, and plenty of melty cheese. Made easy with no-cook noodles and perfect for weeknights or entertaining.

Ingredients

  • 2 tablespoons olive oil
  • 16 ounces cremini mushrooms, sliced
  • 1 large onion, chopped
  • 2 tablespoons dried Italian seasoning
  • 1 pound hot Italian sausage, casing removed
  • 3 garlic cloves, chopped
  • 1 cup dry red wine
  • 4 2/3 cups good quality marinara sauce (from 2 26-ounce jars)
  • 9 ounce package no-cook lasagna noodles
  • 1 cup part-skim ricotta cheese, divided
  • 16 ounces Italian blend shredded cheese

Instructions

  1. Heat an oven to 400 degrees. Heat oil in a sauté pan over high heat. Add mushrooms, onion and Italian seasoning and saute until vegetables begin to soften, about 8 minutes. Remove veggies. Add sausage and saute until browned and cooked through, breaking up with a wooden spoon, about 5 minutes. Add garlic and cooked veggies back to the pan and stir for 1 minute. Add wine and cook until almost all the liquid has evaporated, scraping up any browned bits from the pan, about 8-10 minutes. Set aside.  
  2. Spread 2/3 cup marinara sauce over the bottom of a 13x9x2 inch baking dish. Place noodles (about 4) over sauce, forming 1 layer, don’t worry if noodles slightly overlap. Spread 1/3 cup ricotta cheese on top of the noodles, followed by 1 cup marinara sauce over noodles, then 1 cup shredded cheese. Spoon 1/3 of the sausage mixture over the shredded cheese.  Repeat this process 2 more times with noodles, ricotta, sauce, shredded cheese and sausage mixture. Cover with 4 more noodles and spoon remaining 1 cup sauce over top; sprinkling remaining 1 cup shredded cheese on top. Cover with foil, tenting in the center to prevent the cheese from touching the foil. Bake lasagna for 45 minutes, and then remove the foil. Bake until bubbling at the edges and cheese is browned, about 10 minutes longer. Let stand 15 minutes before serving.
Nutrition Information:
Yield: 12 Serving Size: 1
Amount Per Serving: Calories: 458Total Fat: 29gSaturated Fat: 13gUnsaturated Fat: 16gCholesterol: 68mgSodium: 982mgCarbohydrates: 22gFiber: 3gSugar: 7gProtein: 22g

*Nutrition information is an estimate and will vary.*

Did you make this recipe?

Tag @thecakechica1 on Instagram and hashtag #thecakechica1

© Mary | The Cake Chica
Cuisine: Italian / Category: Easy Weeknight Meals


Healthier Chocolate Coffee Cake

January 27, 2026

Cover image for Healthier Chocolate Coffee Cake

If you love a rich chocolate cake but want something a little more balanced for everyday baking, this Healthier Chocolate Coffee Cake might just become your new go-to. It’s deeply chocolatey, thanks to Dutch-process cocoa, boosted with coffee for extra depth, and baked into a classic Bundt so it feels special without being fussy. This is the kind of cake I love slicing into with my afternoon coffee or serving as a simple dessert when friends drop by.

This recipe leans into smarter ingredient choices and technique to create a tender crumb and bold flavor, without crossing into overly sweet or heavy territory. It’s proof that “healthier” and “indulgent” can absolutely coexist.

As an Amazon Affiliate I earn from qualifying purchases.

Healthier Chocolate Coffee Cake on golden cake stand.
[feast_advanced_jump_to]

Why You’ll Love This Chocolate Coffee Cake

  • Deep chocolate flavor without being overly sweet
  • Coffee enhances the cocoa (you won’t taste coffee!)
  • Moist, tender crumb that slices beautifully
  • Perfect for brunch, snacking, or dessert
  • Simple optional drizzle for just the right finishing touch
Close up shot of knife cutting the Healthier Chocolate Coffee Cake.

Special Tools

  • 10-inch Bundt pan – Ensures even baking and a beautiful presentation
  • Baking spray – Helps release every curve of the Bundt cleanly
  • Stand mixer – Makes creaming and mixing effortless and consistent
Overhead shot of sliced Healthier Chocolate Coffee Cake on cake stand.

Ingredient Notes

  • Dutch-process cocoa powder: Gives a smoother, darker chocolate flavor compared to natural cocoa.
  • Cold coffee: Enhances the chocolate without making the cake taste like coffee.
  • Buttermilk: Adds moisture and tenderness while balancing the sweetness.
  • Egg whites + whole eggs: Keeps the cake light while still rich.
  • Dark brown sugar: Adds depth and a subtle molasses note.
Overhead shot of ingredients for Healthier Chocolate Coffee Cake.

Healthier Baking Approach

This cake is designed to feel indulgent while still being mindful. Using a mix of egg whites and whole eggs, balancing sugars, and relying on cocoa and coffee for bold flavor means you don’t need excessive fat or sweetness to make this cake satisfying. It’s a great example of how thoughtful baking techniques can elevate a recipe without sacrificing enjoyment.

Healthier Chocolate Coffee Cake being sliced on cake stand with slice pulled out.

How to Make Healthier Chocolate Coffee Cake

This cake comes together using a classic creaming method and alternating dry and liquid ingredients for a smooth, well-structured batter.

  • Cream the butter and sugars until combined
  • Add the eggs and egg whites, mixing well
  • Alternate adding the dry ingredients with the coffee–buttermilk mixture
  • Bake until set and cool before glazing
Overhead shot of Healthier Chocolate Coffee Cake batter.
Overhead shot of Healthier Chocolate Coffee Cake batter in cake pan.
Overhead shot of baked Healthier Chocolate Coffee Cake in cake pan.

Optional Vanilla Drizzle

This simple vanilla drizzle adds just the right amount of sweetness and is meant to be lightly piped or drizzled over the cake for a clean, classic finish.

  1. In a small bowl, stir together the powdered sugar, heavy cream, and vanilla extract until smooth.
  2. Adjust the consistency with additional cream if needed—the drizzle should be thick but pipeable.
  3. Transfer to a piping bag with a small snipped tip or a measuring cup with a pour spout.
  4. Pipe or drizzle over the cooled cake and let set for about 10 minutes before serving.

Tip: Make the drizzle right before serving, as it will firm up as it sits.

One sliced Healthier Chocolate Coffee Cake on a cake plate.

Serving & Storage Tips

  • Serve slightly warm or at room temperature
  • Pairs perfectly with coffee or espresso
  • Store covered at room temperature for up to 2 days, or refrigerate for up to 5 days
  • This cake freezes well (unglazed) for up to 2 months
Overhead close up of sliced Healthier Chocolate Coffee Cake on laying down on cake plate with fork.

FAQs

Can I taste the coffee in this cake?

No, coffee simply enhances the chocolate flavor without tasting like coffee.

Can I make this without a stand mixer?

Yes, a hand mixer will work, but be sure to mix thoroughly for proper structure.

Can I skip the glaze?

Absolutely. The cake is delicious on its own and perfect for everyday snacking.

Is this cake really healthier?

It’s a more balanced take on chocolate cake, less sweet, thoughtfully structured, and made to feel good about enjoying a slice.

What if I don’t have Dutch-process cocoa?

This recipe is developed specifically for Dutch-process cocoa powder. Natural cocoa powder is more acidic and will not give the same flavor or structure. For best results, stick with Dutch-process cocoa.

Close up shot of sliced Healthier Chocolate Coffee Cake on cake stand.

Final Thoughts

This Healthier Chocolate Coffee Cake is one of those recipes that quietly becomes a staple. It’s dependable, deeply chocolatey, and versatile enough for casual afternoons or dressed-up gatherings. If you’re looking for a cake that feels both comforting and intentional, this one deserves a spot in your baking rotation.

Happy baking,

The Cake Chica

Overhead shots of Healthier Chocolate Coffee Cake slices on plates.

Let's Connect

Want more behind-the-scenes peeks, recipe drops, and food photography inspo? Come hang out with me on Instagram, Pinterest, Facebook and more. I’d love to connect with you there!

Suggested Recipes

  • Cover image for Lightened Up Brownie a la Mode.
    Lightened Up Brownie a la Mode
  • Lemon Bundt Cake
    Lemon Bundt Cake
  • Cinnamon Swirl Protein Bread
    Cinnamon Swirl Protein Bread
  • Thumbnail image for Protein Packed Chocolate Mocha Pudding.
    Protein Packed Chocolate Mocha Pudding
Healthier Chocolate Coffee Cake on golden cake stand.

Healthier Chocolate Coffee Cake

Yield: 16
Prep Time: 15 minutes
Cook Time: 50 minutes
Total Time: 1 hour 5 minutes

This Healthier Chocolate Coffee Cake is deeply chocolatey, perfectly moist, and subtly enhanced with coffee to bring out the cocoa flavor. Baked in a Bundt pan and finished with a simple vanilla drizzle, it’s a balanced, everyday cake that feels just indulgent enough.

Ingredients

SPECIAL TOOLS

  • 10-inch bundt pan
  • Baking spray
  • Stand mixer

CAKE

  • 3 cups (15 ounces/426 grams) all-purpose flour
  • ½ cup (1.5 ounces/42.5 grams) alkalized Dutch-process cocoa powder
  • 1 ½ teaspoons baking powder
  • ¼ teaspoon salt
  • 8 tablespoons unsalted butter, softened
  • 1 ½ cups (10.5 ounces/297 grams) granulated sugar
  • ¾ cup (5.25 ounces/148.5 grams) dark brown sugar
  • 3 large egg whites
  • 2 large eggs
  • 1 ½ buttermilk
  • 2/3 cup cold coffee

GLAZE (OPTIONAL)

  • 1 cup (4 ounces/113 grams) powdered sugar, sifted
  • ¼ cup heavy cream
  • ½ teaspoon vanilla extract

Instructions

CAKE

  1. Set oven rack to the lower third position in the oven and heat to 350 degrees. Coat a 10-inch tube or Bundt pan with baking spray and set aside.
  2. In a medium-sized mixing bowl, sift the flour, cocoa, baking powder, and salt. Whisk to combine.
  3. In the bowl of an electric stand mixer, fitted with the paddle attachment, beat butter, granulated sugar and brown sugar together until well combined on medium speed for about 2 minutes. Beat in the egg whites and the eggs, one at a time. Scrape down the sides of the bowl as necessary.
  4. Whisk together the buttermilk and coffee in a large measuring cup with a pour spout.
  5. Beat a third of the dry ingredients into the batter on low speed, and then beat in half the coffee-buttermilk mixture. Continue beating until the coffee-buttermilk mixture is absorbed. Then repeat with another third of the dry ingredients and the remaining coffee-buttermilk mixture. Scrape down the bowl and bowl as necessary. And finish with the remaining dry ingredients. Beat batter for about 3 minutes on medium speed.
  6. Pour the batter into the prepared pan and smooth the top with a rubber spatula.
  7. Bake for 50 to 60 minutes, or until a toothpick inserted in the middle of the cake comes out clean or with a few moist crumbs.
  8. Cool in the pan for 10chat minutes, and then invert the cake on a cooling rack to cool completely.

GLAZE

  1. In a small bowl, combine all ingredients and stir vigorously with a rubber spatula until smooth. Adding more cream if necessary.
  2. Pour the glaze into a measuring cup with a pour spout or a piping bag and snip a tiny hole on the bottom corner. Drizzle the glaze onto the cake and let sit for 10 minutes before serving. Be sure to make this glaze right before serving as the glaze will harden as it stands.

Notes

STORAGE: Store covered at room temperature for up to 2 days or refrigerate for up to 5 days. Bring to room temperature before serving. Freeze unglazed cake for up to 2 months wrapped in plastic wrap, then wrapped in foil. Thaw at room temperature overnight before serving.

Nutrition Information:
Yield: 16 Serving Size: 1
Amount Per Serving: Calories: 392Total Fat: 9gSaturated Fat: 5gUnsaturated Fat: 4gCholesterol: 44mgSodium: 119mgCarbohydrates: 68gFiber: 3gSugar: 28gProtein: 9g

*Nutrition information is an estimate and will vary.*

Did you make this recipe?

Tag @thecakechica1 on Instagram and hashtag #thecakechica1

© Mary
Cuisine: American / Category: Dessert


Adapted from Perfect Light Desserts and The Cake Cook

Lightened Up Brownie a la Mode

January 22, 2026

Cover image for Lightened Up Brownie a la Mode.

Brownies à la mode will always be one of those desserts that feels a little extra! Warm, rich chocolate brownies topped with cold, creamy ice cream. And honestly? I never think dessert needs defending. But sometimes it is nice to enjoy a classic in a way that feels just a bit more balanced.

These Lightened Up Brownies à la Mode do exactly that. They’re still chocolatey, satisfying, and indulgent, they're just made with a few thoughtful swaps that lighten things up without sacrificing texture or flavor. Finished with a scoop of Halo Top ice cream and optional fun toppings, this dessert proves you really can have the best of both worlds.

Wide open shot of Lightened Up Brownie a la Mode stacked 3 brownies high with chocolate sauce, sprinkles and maraschino cherry.
[feast_advanced_jump_to]

What Makes These Brownies “Lightened Up”?

Let’s be clear: lightened up does not mean dry, boring, or “diet dessert.” These brownies are rich, fudgy, and deeply chocolate-forward, just built smarter.

Here’s how:

  • Cocoa powder instead of melted chocolate
    Dutch-processed cocoa powder delivers intense chocolate flavor without the added fat of chocolate bars.
  • Egg whites instead of whole eggs
    Egg whites provide structure and lift while keeping the brownies lighter in texture.
  • Unsweetened applesauce
    Applesauce replaces a portion of the fat, adding moisture and tenderness without heaviness.
  • Less butter, used intentionally
    Just enough melted butter to carry flavor without weighing the brownies down.
  • Coconut sugar + dark brown sugar
    This combination adds warmth, depth, and richness without excessive sweetness.

The result is a brownie that feels indulgent but not overwhelming. The perfect base for a classic à la mode dessert.

Close up shot of one brownie with one scoop of ice cream for Lightened Up Brownie a la Mode.

Ingredients You’ll Need

Dry Ingredients

  • ½ cup Dutch-processed cocoa powder
  • 1 cup all-purpose flour
  • 1 teaspoon baking powder
  • ½ teaspoon salt

Wet Ingredients

  • 3 tablespoons unsalted butter, melted
  • 1 cup coconut sugar
  • ½ cup dark brown sugar, firmly packed
  • 2 large egg whites
  • ½ cup unsweetened applesauce
  • 2 teaspoons vanilla extract

For Serving

  • Halo Top ice cream, any flavor you love

Optional Toppings

  • Rainbow sprinkles
  • Chocolate sauce
  • Maraschino cherries
Overhead shot of ingredients for Lightened Up Brownie a la Mode.

How to Make Lightened Up Brownies

  • Preheat the oven
    • Adjust a rack to the middle position and preheat to 350°F. Prepare your baking dish.
  • Mix the dry ingredients
    • Whisk together the cocoa powder, flour, baking powder, and salt in a medium bowl.
  • Combine the wet ingredients
    • Mix the butter and coconut sugar, then beat in the brown sugar, egg whites, applesauce, and vanilla until smooth.
  • Add the dry ingredients
    • Gently stir the dry ingredients into the wet ingredients just until combined.
  • Bake and cool
    • Spread the batter into the prepared pan and bake until a toothpick comes out with moist crumbs. Cool before slicing, or warm slightly before serving with ice cream.
Overhead shot of dry ingredients for Lighted Up Brownie a la Mode.
Overhead shot of wet ingredients for Lightened Up Brownie a la Mode.
Overhead shot of completed batter for Lightened Up Brownie a la Mode.
Overhead shot of brownie batter in the baking pan for Lightened Up Brownie a la Mode.

Building the Perfect Lightened Up Brownie à la Mode

This is where the fun really starts.

Top a warm brownie with a scoop of Halo Top ice cream, it’s creamy, flavorful, and lighter than traditional ice cream, making it a great match for these brownies without feeling overly heavy.

From there, you can keep it simple or lean into full sundae mode with optional toppings:

  • A drizzle of chocolate sauce for extra richness
  • Rainbow sprinkles for a playful, nostalgic touch
  • A classic maraschino cherry on top, because some things never go out of style

Lightened up doesn’t have to mean boring, and these toppings prove it.

Close up shot of chocolate sauce being poured over Lightened Up Brownie a la Mode.
Close up shot of sprinkles being poured on top of Lightened Up Brownie a la Mode.
Close up shot of maraschino cherry being placed on top of Lightened Up Brownie a la Mode.

Texture & Flavor Notes

  • Fudgy but not dense
  • Deep chocolate flavor from cocoa powder
  • Moist crumb thanks to applesauce
  • Balanced sweetness with subtle caramel notes from coconut and brown sugar
Close up shot of spoon digging into Lightened Up Brownie a la Mode.

Storage & Make-Ahead Tips

  • Store brownies in an airtight container at room temperature for up to 3 days
  • Refrigerate for up to 5 days for a firmer texture
  • Reheat individual brownies for 10–15 seconds before serving
  • Freeze brownies (without ice cream or toppings) for up to 2 months
Close up shot of a piece of Lightened Up Brownie a la Mode on a spoon.

FAQ's

Do these brownies taste “healthy”?

Not at all. They taste like real brownies, rich, chocolatey, and satisfying. The swaps simply make them feel lighter.

Can I use whole eggs instead of egg whites?

Yes. Whole eggs will make the brownies richer and slightly denser.

Can I substitute the applesauce?

You can use mashed banana or Greek yogurt, but applesauce provides the most neutral flavor and best texture.

Are these brownies fudgy or cakey?

They land in the middle, soft, fudgy, and structured. Slightly underbake for extra fudginess.

Can I use a different flour?

All-purpose flour works best. Whole wheat pastry flour can be used, but expect a heartier crumb.

Why Halo Top ice cream?

Halo Top is lighter than traditional ice cream but still creamy and flavorful, making it ideal for brownie à la mode.

Can I make these dairy-free?

Yes, use a plant-based butter and choose a dairy-free ice cream option.

Are the toppings necessary?

Not at all. They’re completely optional, but they add a fun, classic sundae feel that makes this dessert extra special.

Two stacked brownies with ice cream on a plate for Lightened Up Brownie a la Mode.

Final Thoughts

These Lightened Up Brownies à la Mode strike the perfect balance between indulgent and mindful, classic and fun. Warm brownie. Cold ice cream. Sprinkles if you want them.

Let's Connect

Want more behind-the-scenes peeks, recipe drops, and food photography inspo? Come hang out with me on Instagram, Pinterest, Facebook and more. I’d love to connect with you there!

Suggested Recipes

  • Thumbnail image for Protein Packed Chocolate Mocha Pudding.
    Protein Packed Chocolate Mocha Pudding
  • Three quarter angle of Protein Coconut Cupcakes with a bite.
    Protein Coconut Cupcakes
  • Cinnamon Swirl Protein Bread
    Cinnamon Swirl Protein Bread
  • Best Ever Blueberry Muffins
    Best Ever Blueberry Muffins

Adapted by Mary Hatton from Perfect Light Desserts by Nick Malgieri

Cover image for Lightened Up Brownie a la Mode.

Lightened Up Brownie a la Mode

Yield: 9 servings
Prep Time: 15 minutes
Cook Time: 20 minutes
Additional Time: 15 minutes
Total Time: 50 minutes

These Lightened Up Brownies à la Mode are rich, chocolatey, and perfectly balanced. Made with cocoa powder, egg whites, and unsweetened applesauce, they’re moist and fudgy without feeling heavy. Serve warm with a scoop of Halo Top ice cream and optional classic sundae toppings for a lighter take on a timeless dessert.

Ingredients

SPECIAL TOOLS

  • 1 8-inch square baking pan
  • Rubber spatula
  • Hand mixer

BROWNIES

  • ½ cup (1.5 ounces/42.5 grams) Dutch processed cocoa powder
  • 1 cup (5 ounces/142 grams) all-purpose flour
  • 1 teaspoon baking powder
  • ½ teaspoon salt
  • 3 tablespoons unsalted butter, melted
  • 1 cup (7 ounces/200 grams) coconut sugar
  • ½ cup (3.5 ounces/ 99 grams) dark brown sugar, firmly packed
  • 2 large egg whites
  • ½ cup unsweetened applesauce
  • 2 teaspoons vanilla extract

ICE CREAM

  • 2 1/4 cups Halo Top Vanilla Bean Ice Cream

TOPPINGS

  • Chocolate sauce (optional)
  • Sprinkles (optional)
  • Maraschino cherries (optional)

Instructions

BROWNIES

  1. Adjust an oven rack to the middle position and heat oven to 350 degrees.
  2. In a medium bowl, whisk together the cocoa, flour, baking powder and salt.
  3. In a large bowl, mix together the butter and coconut sugar with a rubber spatula. With a hand mixer, beat in the brown sugar, egg whites, applesauce and vanilla one at a time, beating until smooth after each addition.
  4. Stir in the dry ingredients with a rubber spatula.
  5. Scrape the batter into the prepared baking dish and bake for about 25 to 30 minutes or until a toothpick inserted in the center comes out with moist crumbs attached. Cool in the pan on a rack for about 10 to 15 minutes before removing the brownies from the pan. Let cool completely before slicing. (If you prefer your brownies warm, heat them up in the microwave for a few seconds before serving with ice cream.)

ASSEMBLE

  1. Cut cooled brownies into 2-inch squares and serve with about 1/4 cup of your choice of lightened up ice cream. Top with chocolate sauce, sprinkles and a cherry if desired.

Notes

Storage: Wrap brownies in plastic wrap and store at room temperature for up to 3 days. Or freeze, wrapped with plastic wrap twice. Bring to room temperature before serving.

Nutrition Information:
Yield: 9 Serving Size: 1
Amount Per Serving: Calories: 264Total Fat: 7gSaturated Fat: 4gCholesterol: 50mgSodium: 317mgCarbohydrates: 53gFiber: 6gSugar: 31gProtein: 8g

Did you make this recipe?

Tag @thecakechica1 on Instagram and hashtag #thecakechica1

© Mary
Cuisine: American / Category: Brownies and Bars


Slow Cooker Pulled Pork Sandwiches

January 13, 2026

Cover image for Slow Cooker Pulled Pork Sandwiches.

If there’s one recipe I always come back to when I need something comforting, reliable, and downright delicious, it’s these Slow Cooker Pulled Pork Sandwiches. This is the kind of meal that feels like you spent all day in the kitchen, even though your slow cooker did all the heavy lifting.

This pulled pork checks all the boxes. It’s tender, juicy, flavorful, and incredibly versatile. Plus, your house will smell amazing while it cooks, which is always a bonus in my book.

Close up shot of Slow Cooker Pulled Pork Sandwich with chips and second sandwich in the background.
[feast_advanced_jump_to]

Why You'll Love This Recipe

  • Easy prep with simple pantry ingredients
  • Hands‑off cooking thanks to the slow cooker
  • Perfect for crowds or meal prep
  • So many serving options, not just sandwiches
Overhead shot of pulled pork in slow cooker for Slow Cooker Pulled Pork Sandwiches.

Ingredients You'll Need

  • Brown sugar
  • Paprika
  • Garlic powder
  • Onion powder
  • Ground cumin
  • Cayenne pepper
  • Salt
  • 5 pound boneless pork shoulder
Close up shot of pulled pork in tongs with pulled pork in slow cooker behind it.

Best Cut of Pork for Pulled Pork

The best cut of pork for pulled pork is pork shoulder, also known as pork butt or Boston butt. Despite the confusing name, it comes from the shoulder and has the perfect amount of fat and connective tissue. That fat slowly melts as it cooks, giving you tender, juicy meat that shreds effortlessly.

Lean cuts like pork loin may seem tempting, but they tend to dry out and don’t shred as well. For the best flavor and texture, stick with pork shoulder.

Macro shot of just pork in the slow cooker for Slow Cooker Pulled Pork Sandwiches.

How to Make Slow Cooker Pulled Pork

  • Trim pork of excess fat and seasonings.
  • Let pork sit overnight wrapped tightly in plastic wrap in the refrigerator.
  • Place pork in slow cooker and add barbecue sauce.
  • Cover and cook until pork is tender, about 9 to 11 hours on low, or 5 to 7 hours on high.
  • Remove pork, shred pork, and mix about 1 cup braising liquid into the pork.
Overhead shot of pulled pork on open faced bun with slow cooker in the corner.

How to Shred Pulled Pork

Shredding pulled pork is easy once it’s properly cooked.

  • Use two forks to pull the meat apart
  • A hand mixer on low speed works great for large batches
  • Remove any large chunks of fat as you go

If the pork doesn’t shred easily, it needs more time in the slow cooker.

Angled shot of Slow Cooker Pulled Pork Sandwiches on wood serving board.

Serving Suggestions

Pulled pork sandwiches are a classic for a reason, but don’t stop there.

  • Pile onto toasted buns with coleslaw
  • Serve over baked potatoes
  • Use in tacos or quesadillas
  • Add to nachos or flatbreads
  • Pair with mac and cheese or baked beans

This recipe is incredibly flexible and works with just about any side dish.

Close up shot of Pulled Pork Sandwich with chips and slow cooker in the background.

Make-Ahead and Storage Tips

  • Make‑ahead: Pulled pork tastes even better the next day.
  • Refrigerate: Store in an airtight container for up to 4 days.
  • Freeze: Freeze in portions with sauce for up to 3 months.
  • Reheat: Warm gently on the stove or in the slow cooker with a splash of liquid.
Angled shot of Slow Cooker Pulled Pork Sandwiches with bottle of beer.

Recipe Tips for Success

  • Don’t skip the seasoning, this is where the flavor starts
  • Cook low and slow whenever possible
  • Taste and adjust seasoning before serving
Wide open shot of Slow Cooker Pulled Pork Sandwiches with beer and slow cooker in the background.

FAQs

Can I use a different cut of pork?

Pork shoulder or pork butt is best. Pork loin is too lean and won’t shred properly.

Do I need to sear the pork first?

No, but you can if you want extra depth of flavor. This recipe works perfectly without searing.

How do I keep pulled pork from drying out?

Always store and reheat it with some of the cooking liquid or sauce.

Can I cook this overnight?

Yes, cooking on LOW overnight is perfect, as long as your slow cooker is in good working condition.

What buns work best?

Brioche buns are my favorite, but any sturdy sandwich roll will work.

Man hands holding Slow Cooker Pulled Pork Sandwich.

Final Thoughts

These Slow Cooker Pulled Pork Sandwiches are one of those recipes you’ll keep in your back pocket for busy days, casual entertaining, and everything in between. Simple ingredients, big flavor, and minimal effort, what’s not to love?

If you make this recipe, be sure to leave a comment and let me know how you served it. I always love hearing how you make these recipes your own!

Let's Connect

Want more behind-the-scenes peeks, recipe drops, and food photography inspo? Come hang out with me on Instagram, Pinterest, Facebook and more. I’d love to connect with you there!

Adapted by Mary Hatton from Slow Cooker Revolution by America's Test Kitchen

...

Read More

The Cake Chica's Top 10 Recipes of 2025

January 1, 2026

Cover image for The Cake Chica's Top 10 Recipes of 2025

As 2025 comes to a close, I couldn’t help but look back at the recipes you loved most this year. From cozy soups to celebratory cakes and a few savory surprises, these are the dishes that stood out, recipes that were baked, cooked, shared, and saved again and again.

So let’s count them down, starting at number 10.

10. Peaches & Cream Cake

This cake feels like pure comfort. Soft, tender peach cake layers paired with a sweet peach filling made it a go-to for spring and summer celebrations. It’s nostalgic, simple, and just the right balance of fruity and indulgent.

Peaches and Cream Layer Cake on marble cake pedestal.

9. Orange Cranberry Cake

Bright citrus meets tart cranberry in this crowd-pleasing cake. Perfect for the holiday season, this one quickly became a reader favorite thanks to its fresh flavor and festive feel.

Three quarter angle of top cake decoration for Orange Cranberry Cake.

8. Key Lime Pie Layer Cake

All the flavors of classic key lime pie, but stacked into a cake. This recipe quickly earned its spot thanks to its tangy filling, fluffy layers, and just-the-right-amount-of-sweet frosting.

Key Lime Pie Layer Cake

7. Zesty Shrimp Pasta

Yes, a savory recipe made the list, and for good reason. This zesty shrimp pasta is fast, flavorful, easy and perfect for pot lucks, as it's best made ahead of time. It’s proof that The Cake Chica kitchen isn’t just about desserts.

Overhead shot of Zesty Shrimp Pasta Salad in bowls.

6. White Cake with Strawberry Filling

Classic, clean, and timeless. This white cake with strawberry filling became a favorite for birthdays, showers, and special occasions. It’s light, elegant, and a recipe you can truly make your own.

White Cake with Strawberry Filling

5. Mexican Sprinkle Cookies

These cheerful cookies brought color and joy to kitchens everywhere. Crisp edges, soft centers, and plenty of sprinkles made them a hit, especially around holidays and family gatherings.

Head-on shot of 3 stacked Mexican Sprinkle Cookies with plate of cookies in the background with coffee and jar of sprinkles.

4. Easy Seafood Stew

Warm, cozy, and surprisingly simple, this seafood stew quickly became a reader favorite during cooler months. It’s hearty without being heavy and perfect for nights when comfort food is calling.

Easy Seafood Stew

3. Cinnamon Swirl Protein Bread

A recipe that proves protein baking doesn’t have to be boring. This cinnamon swirl bread is flavorful, satisfying, and perfect for breakfast or a mid-day snack. No chalky taste here.

Cinnamon Swirl Protein Bread on gray serving plate.

2. Chicken Fideo Soup

This comforting, flavorful soup resonated deeply with readers. It’s simple, nourishing, and filled with familiar flavors that feel like home. Exactly the kind of recipe people come back to again and again.

Overhead shot of Chicken Fideo Soup on baking sheet with serving pot and garnishes.

1. Mexican Alphabet Soup

Taking the top spot for 2025 is Mexican Alphabet Soup. Cozy, nostalgic, and full of heart, this recipe clearly struck a chord. Whether it was the comforting flavors or the memories tied to it, this soup became the most-loved recipe on The Cake Chica this year.

Mexican Alphabet Soup

Thank You for an Incredible Year 

Thank you for baking, cooking, and sharing these recipes with me throughout 2025. Whether you’ve been here for years or just joined along the way, I’m so grateful for this community.

Here’s to more cozy bakes, meaningful meals, and beautiful recipes in 2026.

Happy baking, 

Mary

Which recipe was your favorite this year?

Suggested Posts

  • The Cake Chica's Top 10 Cake Recipes of 2024
  • The Cake Chica's Top 10 Cake Recipes of 2023
  • The Cake Chica's Top 10 Cake Recipes of 2022
  • The Cake Chica's Top 10 Recipes of 2021
    The Cake Chica's Top 10 Recipes for 2021

Hangover Cure

December 30, 2025

Hangover Cure cover image.

If you’ve ever woken up after a night out feeling dehydrated, headachy, and generally blah, this drink is for you.

This Hangover Cure Drink has been one of those quiet fan favorites. Simple ingredients, quick to make, and surprisingly effective. It’s refreshing, fizzy, salty, and citrusy in the best way, and it’s easy to see why so many people swear by it.

No fancy ingredients. No blender. Just a glass, a lime, and a few pantry staples.

[feast_advanced_jump_to]
Angled close up shot of one Hangover Cure with one in the background with a couple of Topo Chico bottles around.

Why This Hangover Cure Works

This drink isn’t magic, it works because it targets the most common hangover issues:

  • Dehydration
  • Electrolyte imbalance
  • Headaches
  • Upset stomach

Instead of masking symptoms with something overly sweet or heavy, this drink focuses on rehydration, balance, and relief.

One glass of Hangover Cure with a bottle of Topo Chico head on shot.

Ingredients Breakdown: What Each One Does

Topo Chico (Sparkling Mineral Water)

Topo Chico is more than just bubbles.

  • Helps rehydrate after alcohol-related dehydration
  • Contains natural minerals that plain water doesn’t
  • Carbonation can help calm an unsettled stomach

The crisp fizz also makes this drink easier (and more enjoyable) to sip when you’re not feeling your best.

Fresh Lime Juice

Fresh lime juice is key here.

  • Adds vitamin C and antioxidants
  • Helps stimulate digestion
  • Brightens the drink so it doesn’t taste flat

Fresh-squeezed lime makes a noticeable difference. Bottled juice just doesn’t hit the same.

BC Powder

BC Powder is fast-acting and commonly used for headaches.

  • Contains aspirin for pain relief
  • Contains caffeine, which may help with fatigue
  • Powdered form works quickly for many people

This is especially helpful if headache pressure is your main hangover symptom.

Dash of Salt

Just a pinch! This drink shouldn't be salty.

  • Helps replenish sodium lost through dehydration
  • Aids fluid absorption
  • Balances the acidity of the lime juice

This tiny addition makes a big difference.

Action shot of Topo Chico being poured into a glass for Hangover Cure recipe.

How To Make the Hangover Cure Drink

  • Fill a glass with ice
  • Pour chilled Topo Chico in a glass
  • Add fresh lime juice
  • Add in BC Powder until dissolved
  • Add a small pinch of salt
  • Stir gently and sip

That's it.

Head on shot of one glass of Hangover Cure, with 2 more glasses in the background.

Tips for Best Results

  • Drink it slowly. Chugging isn’t necessary
  • Fresh lime juice matters for both flavor and effectiveness
  • Go easy on the salt. A pinch is plenty
  • Best enjoyed the morning after, but it can also be helpful later in the day
Macro shot of one glass of Hangover Cure.

FAQ's

Can I make this without BC Powder?

Yes. You can skip it entirely or substitute with a pain reliever you personally tolerate well. The drink will still help with hydration and electrolytes.

Can I drink this before bed instead of the morning after?

You can, especially if dehydration tends to hit you hard. Many people still prefer it the next morning when symptoms are more noticeable.

Is this safe to drink on an empty stomach?

Some people tolerate it just fine, while others may prefer having a small snack first, especially when using BC Powder. Listen to your body.

Can I use another sparkling water instead of Topo Chico?

Yes, but mineral water works best. If you substitute, choose something crisp and not overly flavored.

Why Topo Chico specifically?

Topo Chico has a strong carbonation and mineral content that holds up well against citrus and salt, making the drink more refreshing and balanced.

How salty should this taste?

It shouldn’t taste salty at all. If it does, you’ve added too much.

Does this actually cure a hangover?

It won’t undo last night, but it can significantly help with hydration, headaches, and overall recovery.

Angled shot of 3 glasses of Hangover Cure on white tray.

Important Disclaimer

This drink is not medical advice. BC Powder contains aspirin and caffeine and may not be suitable for everyone. Avoid use if you are sensitive to aspirin, have certain medical conditions, are pregnant, or have been advised otherwise by a healthcare professional. Always listen to your body and use discretion.

Close up of lime garnish on a glass of Hangover Cure.

Final Thoughts

This Hangover Cure Drink is popular for a reason, it’s simple, refreshing, and made with ingredients that actually do something.

If you try it, leave a comment or rating and let me know how it worked for you. And if nothing else, it’s a really good excuse to keep Topo Chico stocked in your fridge 😉

Refreshing Hangover Cure garnished with lime and mint leaves.

Let's Connect

Want more behind-the-scenes peeks, recipe drops, and food photography inspo? Come hang out with me on Instagram, Pinterest, Facebook and more. I’d love to connect with you there!

Angled shot of refreshing Hangover Cures with ice and mint on work surface.

Suggested Recipes

  • Featured image for Simple Sangria recipe.
    Simple Sangria
  • Blue Lagoon Cocktail cover image.
    Blue Lagoon Cocktail
  • Topo Chico Cucumber Cocktails
    Topo Chico Cucumber Cocktails
  • Jalapeno Margaritas cover image.
    Jalapeno Margaritas
Angled shot of 3 glasses of Hangover Cure on white tray.

Hangover Cure

Yield: 1
Prep Time: 10 minutes
Total Time: 10 minutes

This quick and refreshing Hangover Cure drink is made with fizzy Topo Chico, fresh lime juice, a pinch of salt, and BC Powder. Light, citrusy, and easy to sip, it helps rehydrate and ease headache discomfort when you need a simple morning-after fix.

Ingredients

  • Ice
  • 8 ounces Topo Chico mineral water
  • 1 whole lime, juiced
  • Pinch of salt
  • 1 packet BC Powder
  • Fresh mint for garnish, optional

Instructions

  1. Fill a glass with ice and pour in mineral water, lime juice, pinch of salt, BC powder and stir.

Notes

This drink is not medical advice. BC Powder contains aspirin and caffeine and may not be suitable for everyone. Avoid use if you are sensitive to aspirin, have certain medical conditions, are pregnant, or have been advised otherwise by a healthcare professional. Always listen to your body and use discretion.

Nutrition Information:
Yield: 1 Serving Size: 1
Amount Per Serving: Calories: 127Sodium: 153mgCarbohydrates: 32gFiber: 0gSugar: 29gProtein: 0g

*Nutrition information is an estimate and will vary.*

Did you make this recipe?

Tag @thecakechica1 on Instagram and hashtag #thecakechica1

© Mary
Cuisine: American / Category: Beverage
  • Page 1
  • Page 2
  • Page 3
  • Interim pages omitted …
  • Page 39
  • Go to Next Page »

Primary Sidebar

Welcome!

Hi, I’m Mary. The self-taught baker, food stylist, and photographer behind The Cake Chica. If you love creating bakery-style desserts from scratch and want a peek behind the scenes of how they’re styled and captured, you’re in the right place.

More about me

Popular

  • Toasted Coconut Caramel Layer Cake on marble cake pedestal.
    Toasted Coconut Caramel Layer Cake
  • Best Big Fat Chewy Chocolate Chip Cookie
  • Key Lime Pie Layer Cake cover photo.
    Key Lime Pie Layer Cake
  • White Cake with Strawberry Filling
    White Cake with Strawberry Filling

Seasonal

  • Banana Cream Pie
  • Chocolate Root Beer Float Cake
  • Cotton Candy Layer Cake
  • Strawberry Ice Cream Pop Cake

Footer

↑ back to top

About

  • The Cake Chica
  • Recipe Index
  • Work With Me

Legal

  • Privacy Policy

Contact

  • Contact

As an Amazon Associate I earn from qualifying purchases.

Copyright © 2025 The Cake Chica