
I created this recipe to celebrate the upcoming Valentine's Day holiday, however; this Chocolate Covered Strawberries Cake is great to make and eat any time of the year!
As an Amazon Associate, I earn from qualifying purchases.
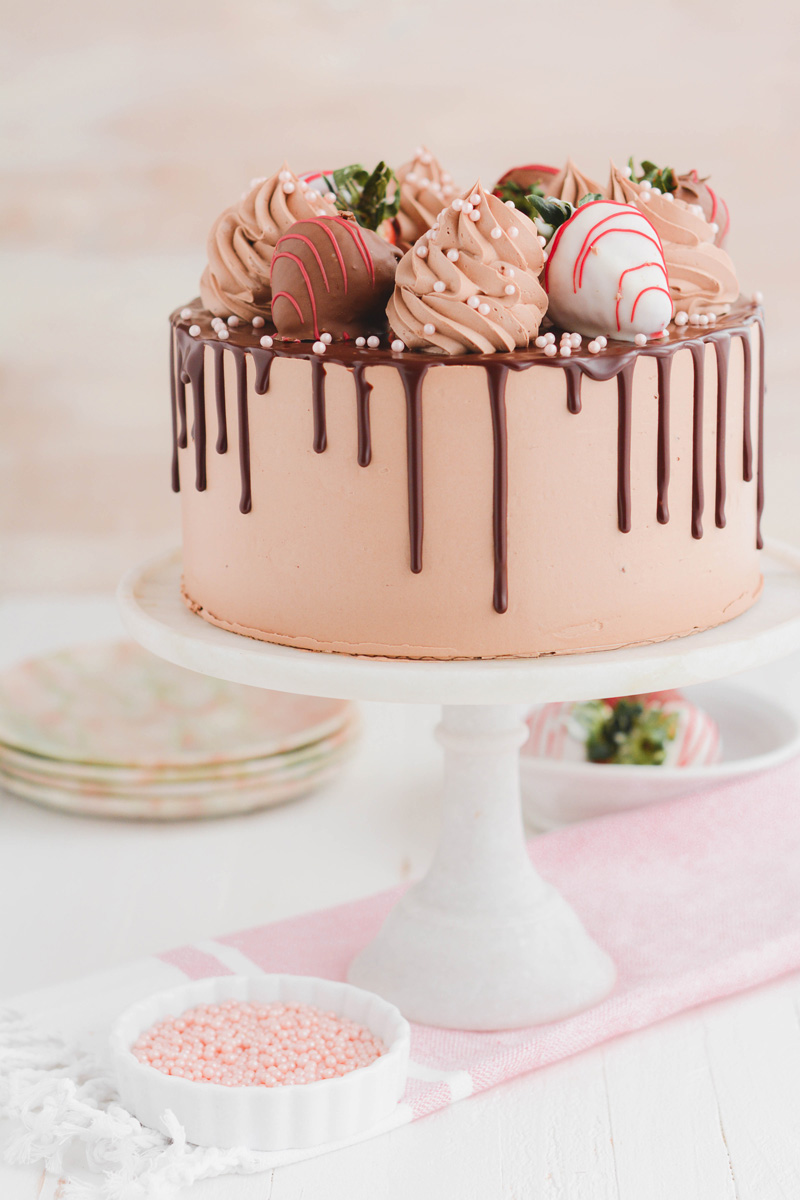
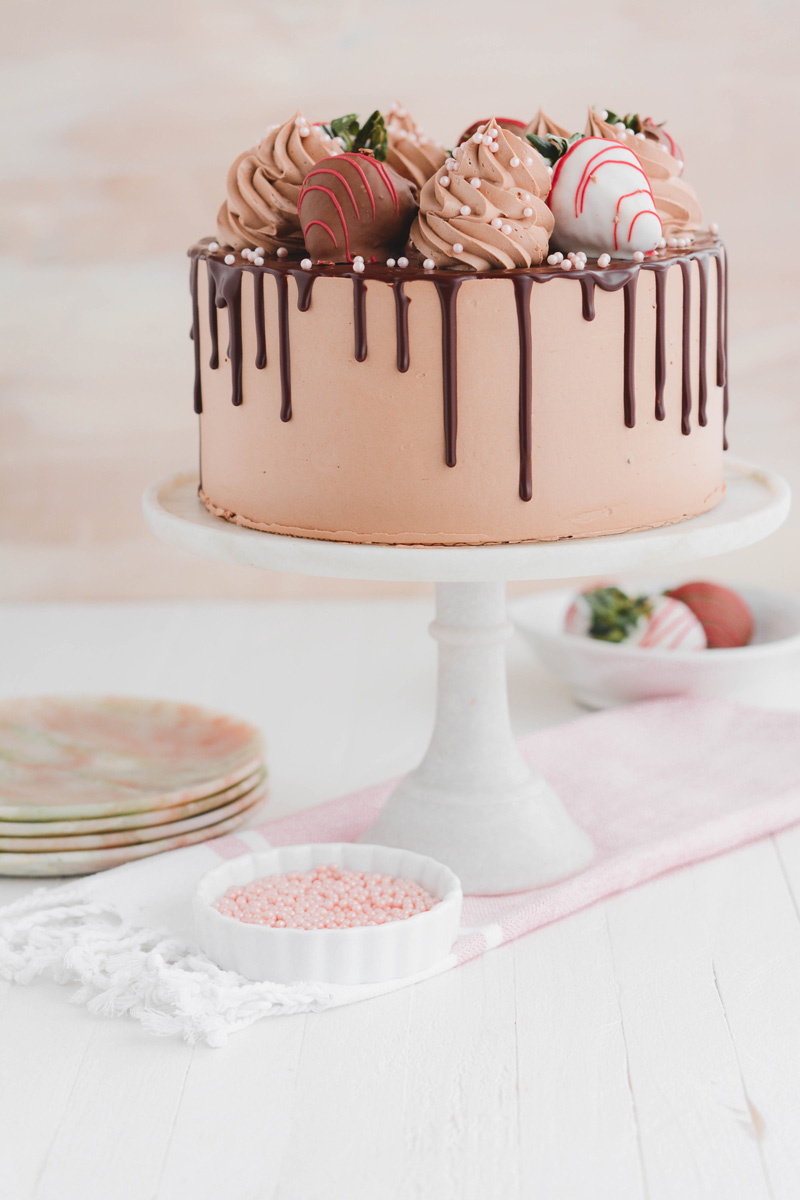
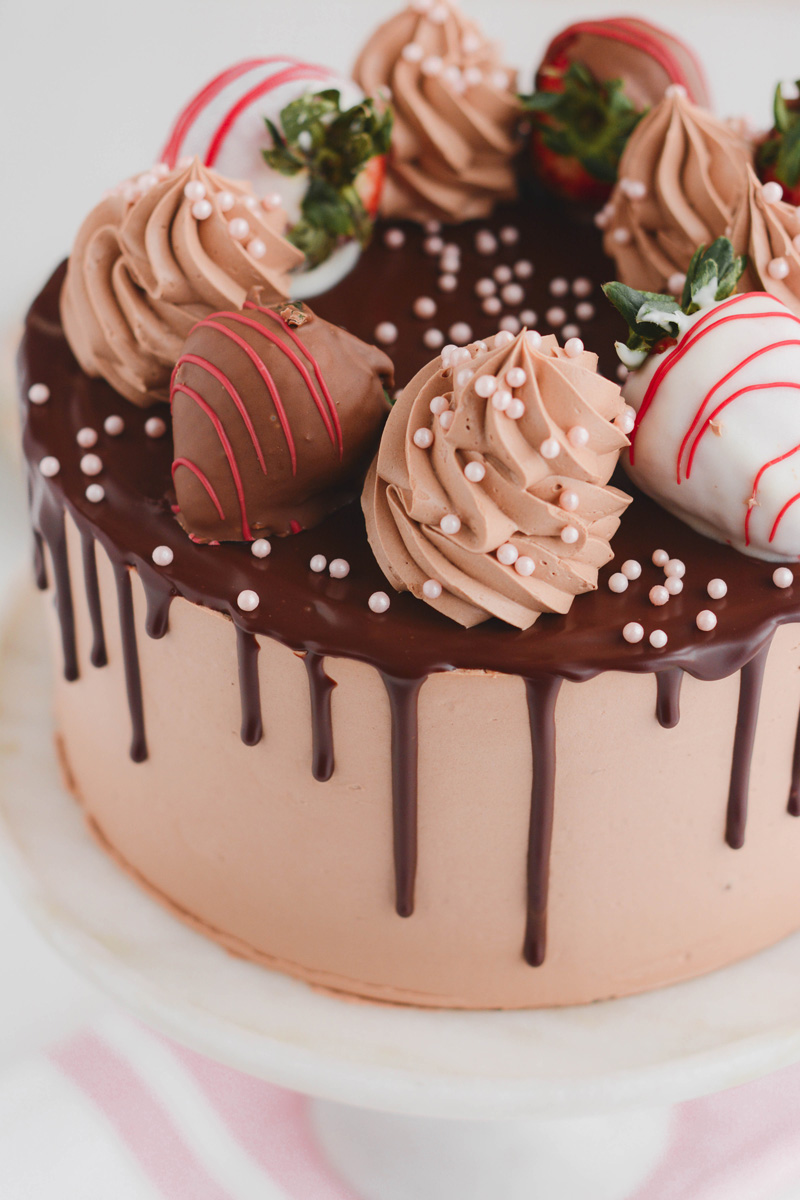
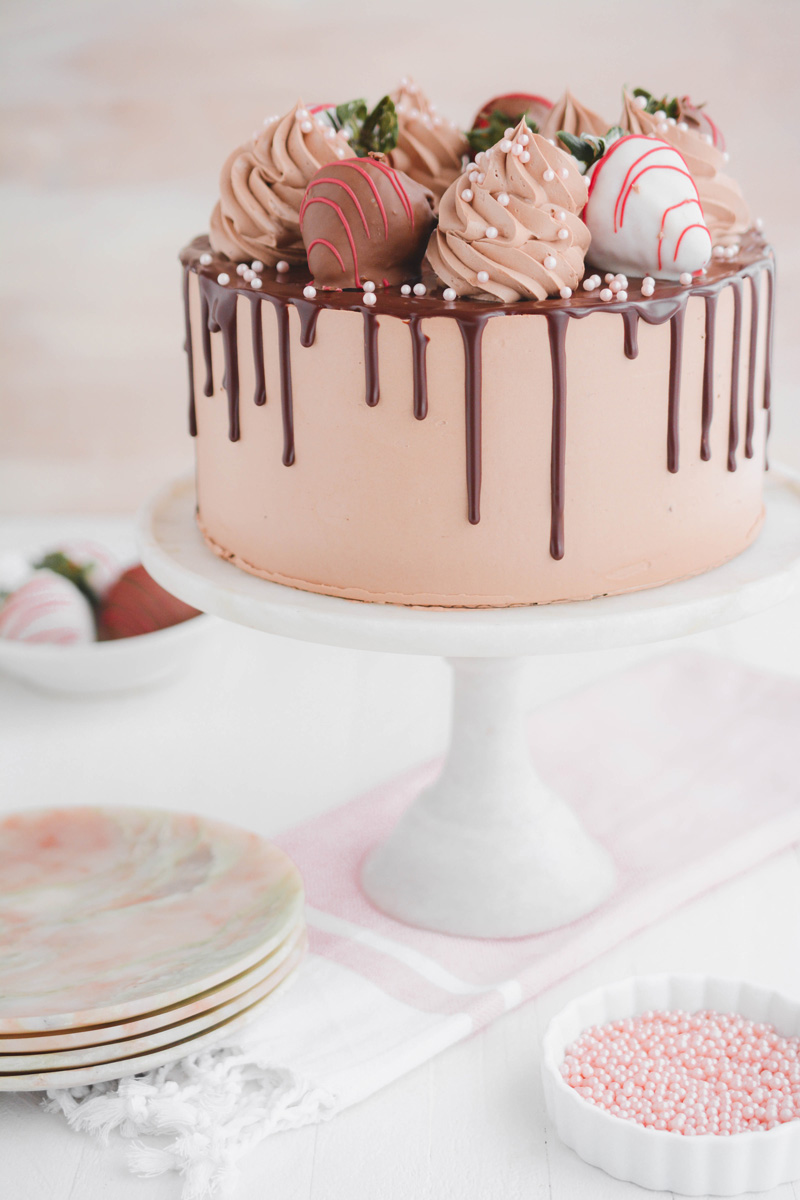
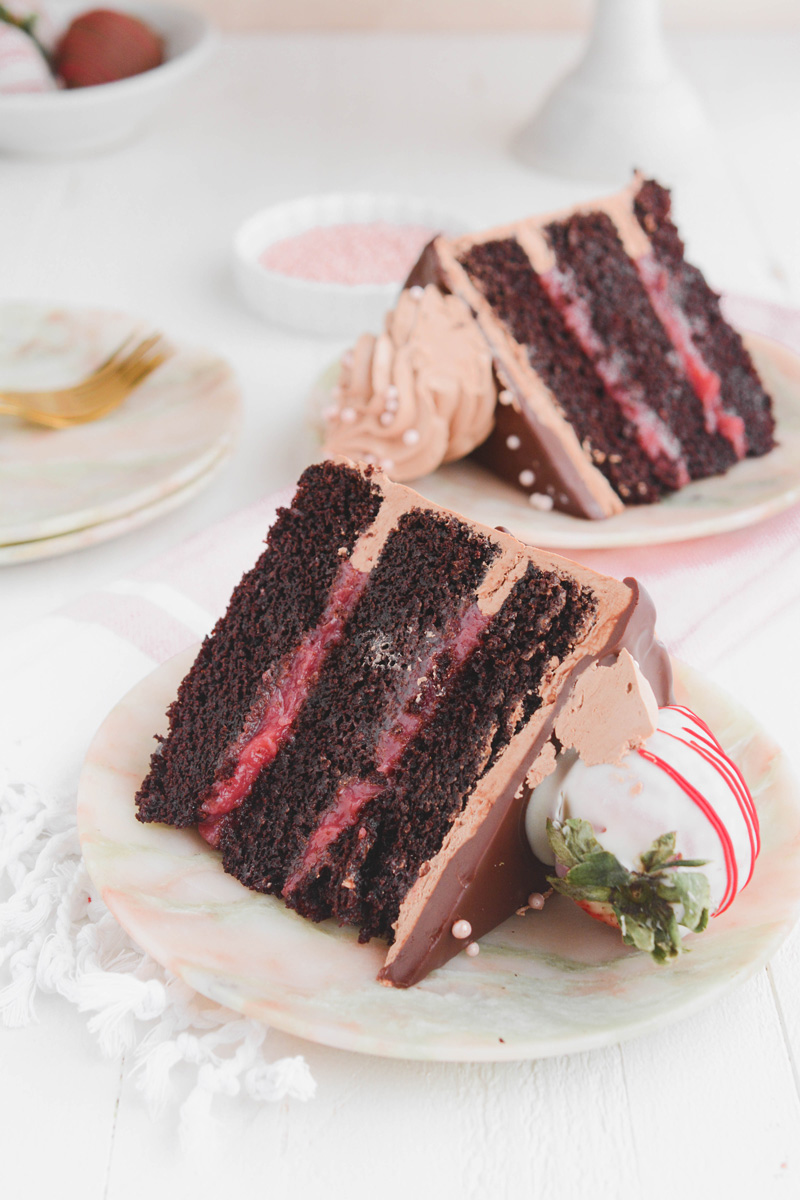
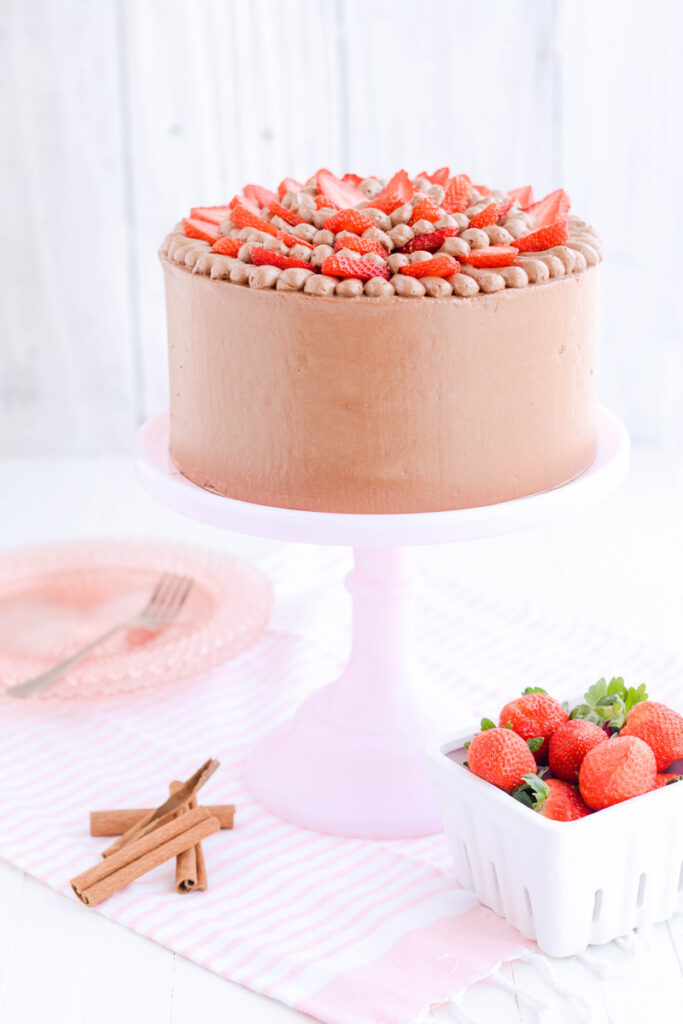
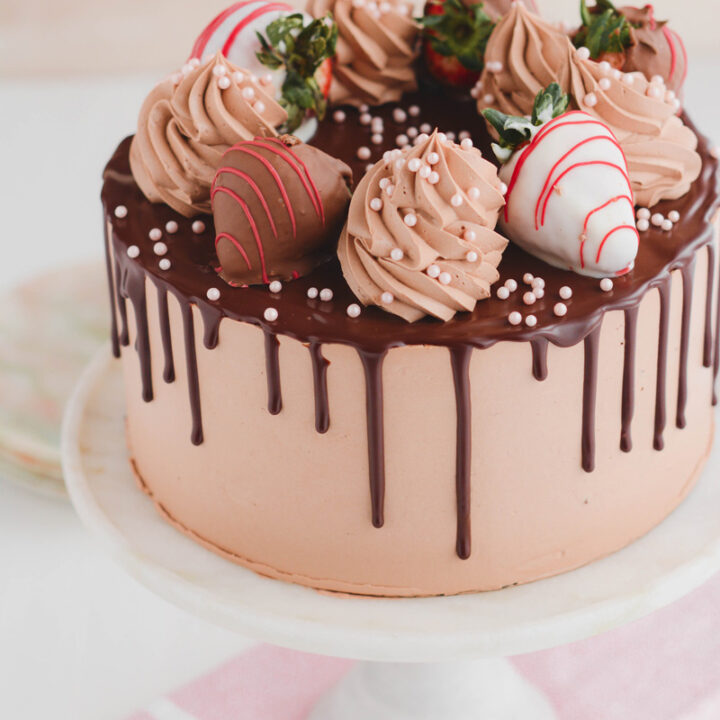
Enjoy sinking your teeth into three layers of moist dark chocolate cake, filled with strawberry filling and frosted with chocolate Swiss meringue buttercream. But that's not all, lastly I topped the cake with chocolate drip and chocolate covered strawberries!

Super Moist Chocolate Cake
Super Moist Chocolate Cake gets its rich flavor from the use of espresso powder. Boiling water is used to melt the instant espresso powder so that it easily incorporates into the cake batter. TIP: To accurately measure boiling water, bring a saucepan of water to a boil. Make sure you boil more than you need. Pour boiling water into a heatproof liquid measuring cup with the espresso powder and whisk to melt and combine. Cool the mixture about 10 minutes before using.


Strawberry Filling
If you’re looking for a homemade fruit filling that is sweet, firm and holds its shape when sliced, then look no further, this is it! And the flavor can easily be changed by changing up the frozen fruit.
Chocolate Swiss Meringue Buttercream Tips
- Your mixer bowl should be completely dry and clean before use.
- There should be no grease residue on the bowl and your egg whites should be free of egg yolks.
- Whisk together the sugar and egg whites well or the eggs may start to cook on their own.
- Make sure the double boiler stays at a simmer.
- Your butter should be room temperature before using.
- Add your butter by tablespoon to the meringue.
- The buttercream should be as smooth as possible.
- To help remove air bubbles, run the mixer on low speed for one minute.
- Make sure your chocolate is completely melted and cooled about 10 minutes before adding it to your buttercream.
Chocolate Drip Tips
- Make sure your cake is chilled before adding chocolate drips. The cold cake will help control the chocolate drips when they’re applied.
- Be sure your chocolate drip is at the correct temperature before using. It should be fluid but not hot or warm. Let your melted chocolate sit for about 20 minutes before using.
- If your chocolate drip slides off the cake it’s too warm, if it clumps it’s too cold.
- For a more controlled drip, use a spoon or a squeeze bottle to strategically apply the drips.
- Chocolate Raspberry Cake with Whipped Ganache Frosting has two layers of chocolate drip applied. You’ll probably need to reheat your chocolate before applying the second layer. As soon as I chill the first layer of chocolate drip, I microwave the remaining chocolate drip for 30 seconds and let sit until the first layer of chocolate has set on the cake. At that point the remaining chocolate drip is the perfect dripping consistency.

Cake Decorating Tips
- Use a crumb coat.
- Be sure your cake is well chilled before applying the final layer of buttercream. A chilled cake makes the frosting process much easier.
- Before applying the chocolate drip, the chocolate should be liquid but not hot. If your chocolate is too hot it will melt the buttercream.
- If your chocolate is too cold it won't drip. Check your chocolate around the 10 to 15 minute mark for the proper consistency.
- Apply a test drip to the back of the cake before applying all the drips. If it slides down to quickly, wait until the chocolate has firmed up a bit. If it doesn't drip at all the chocolate is too cool and you'll need to reheat it.
- After you've applied the chocolate drip be sure to chill the cake until the chocolate has set before piping on buttercream swirls and chocolate covered strawberries.
- I took a cheat here and purchased chocolate covered strawberries to speed up the prep process.
Chocolate Covered Strawberries Cake Decorating Tools
- 8-inch round cake board
- Cake turntable
- Nonslip mat for cake turntable
- Piping bags
- Coupler or round piping tip
- Offset cake spatula
- 8-inch round acrylic disc
- Parchment paper
- Cake scraper
- Ateco piping tip #828
Baking Schedule
- Day 1: Bake chocolate cake layers and prepare the strawberry filling.
- Day 2: Prepare chocolate buttercream, assemble cake and serve.
Let's Connect
The Cake Chica is on the following social media platforms below. Click subscribe, like and follow! We would love to have you over!

Suggested Recipes

Chocolate Covered Strawberries Cake
Three layers of moist chocolate cake filled with strawberry filling, covered in chocolate Swiss meringue buttercream and chocolate drip, topped with chocolate covered strawberries.
Ingredients
SPECIAL TOOLS
- 3 8-inch round cake pans
- Nonstick baking spray
- 4 cup liquid measuring cup
- 2 cup liquid measuring cup
- Food processor or blender
- Sieve
- Stand mixer
- Candy thermometer
- 8-inch round cake board
- Cake turntable
- Nonslip mat for cake turntable
- Piping bags
- Coupler or round piping tip
- Offset cake spatula
- 8-inch round acrylic disc
- Parchment paper
- Cake scraper
- Ateco piping tip #828
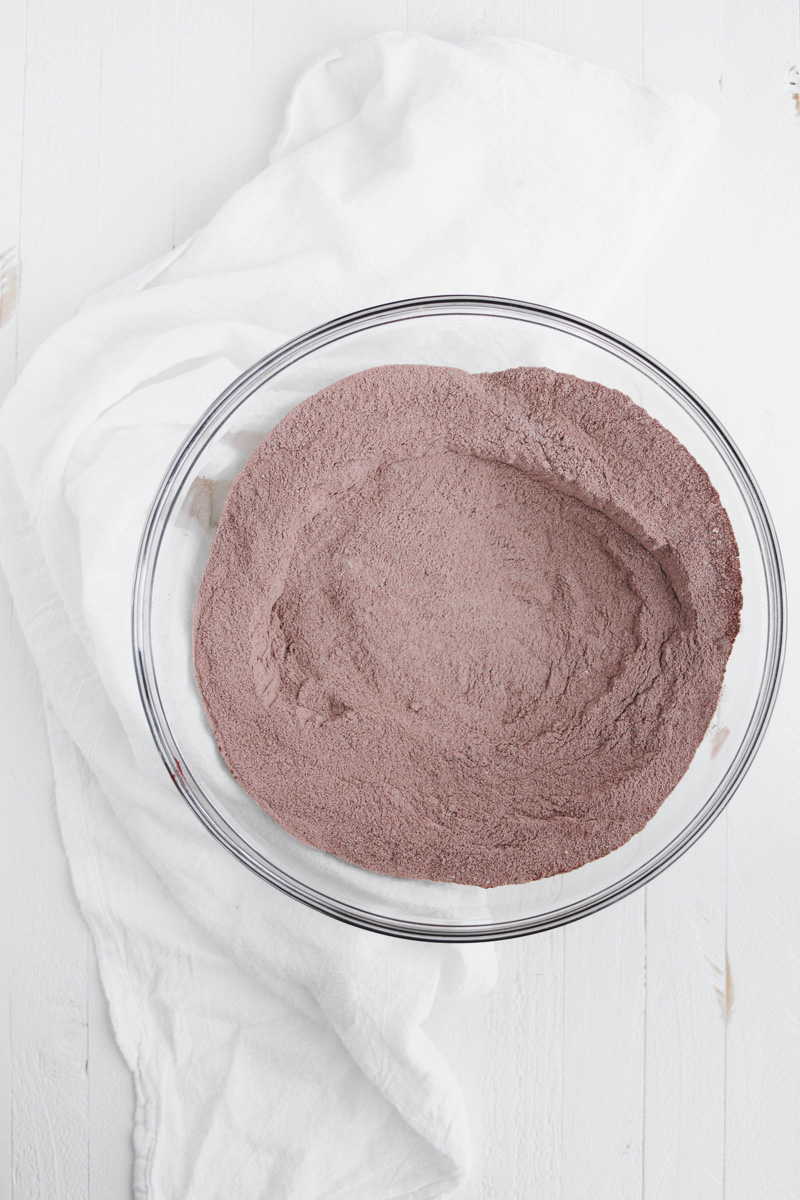
CHOCOLATE CAKE
- 2 cups plus 2 tablespoons (15 ounces/428 grams) granulated sugar
- 1 3/4 cups (8.3 ounces/237 grams) all-purpose flour
- 3/4 cup plus 2 tablespoons (3 ounces/87 grams) unsweetened Dutch-processed cocoa powder, sifted
- 1 1/2 teaspoons baking powder
- 1 1/2 teaspoons baking soda
- 1 1/2 teaspoons salt
- 2 eggs
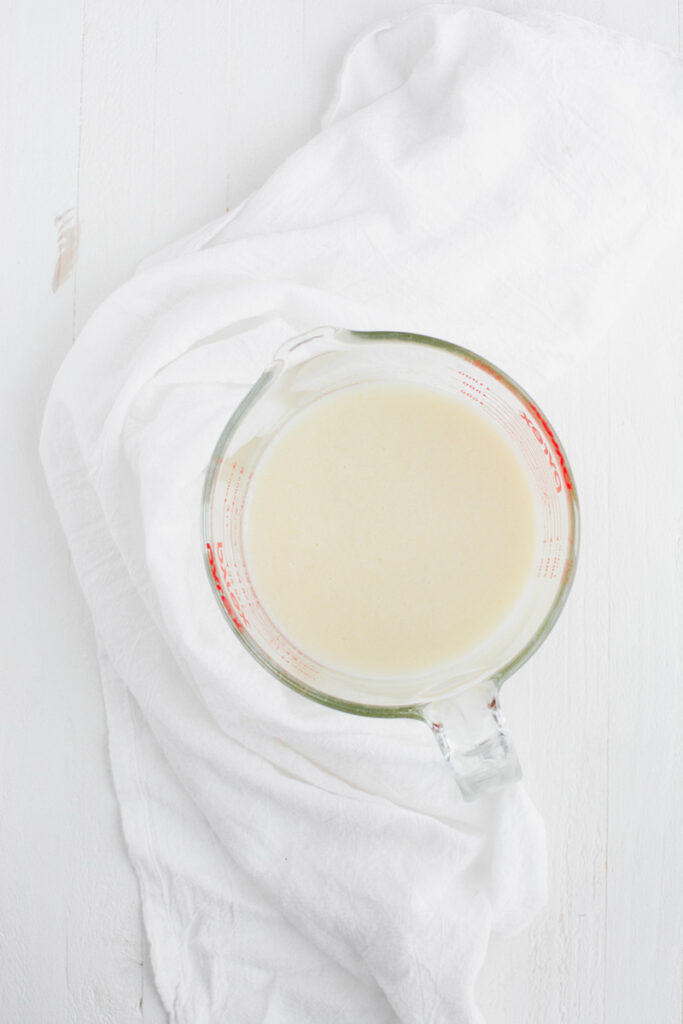
- 1 cup (8 ounces/240 grams) whole milk
- 1/2 cup (3.6 ounces/104 grams) vegetable oil
- 1 tablespoon vanilla extract
- 2 tablespoons instant espresso powder
- 3/4 cup (6.3 ounces/180 grams) boiling water
STRAWBERRY FILLING
- 12 ounces frozen strawberries, thawed
- ¼ granulated sugar
- 3 tablespoons cornstarch, mixed with 3 tablespoons cold water
- Fresh lemon juice, to taste
CHOCOLATE SWISS MERINGUE BUTTERCREAM
- 1/2 cup plus 2 tablespoons egg whites
- 1 1/4 cups (8.75 ounces/250 grams) granulated sugar
- 2 cups (4 sticks) unsalted butter, cut into tablespoon sized pieces and softened
- 2 teaspoons vanilla extract
- 6 ounces bittersweet chocolate, melted and cooled
CHOCOLATE DRIP
- 6 ounces semi sweet chocolate, chopped
- 3/4 cup (6 ounces) heavy cream
Instructions
CHOCOLATE CAKE
- Adjust an oven rack to the middle position and heat oven to 325 degrees. Spray 3 8-inch round cake pans with nonstick baking spray.
- In a large bowl whisk together the sugar, flour, cocoa, baking powder, baking soda, and salt.
- In a 4 cup liquid measuring cup or bowl, whisk together the eggs, milk, oil and vanilla extract.
- In a 2 cup liquid measuring cup or bowl whisk together the espresso powder and boiling water.
- Add the egg-milk mixture to the dry ingredients and whisk together to combine. Use a rubber spatula to scrape down the sides of the bowl.
- Pour the espresso mixture into the batter and whisk to combine. The batter will be thin.
- Divide the cake batter between the prepared cake pans and bake for 25 to 30 minutes, or until a wooden skewer inserted in the center comes out with a few moist crumbs attached.
- Let cakes cool in their pans for 30 minutes on wire racks. Invert cakes on to wire racks to cool completely.
STRAWBERRY FILLING
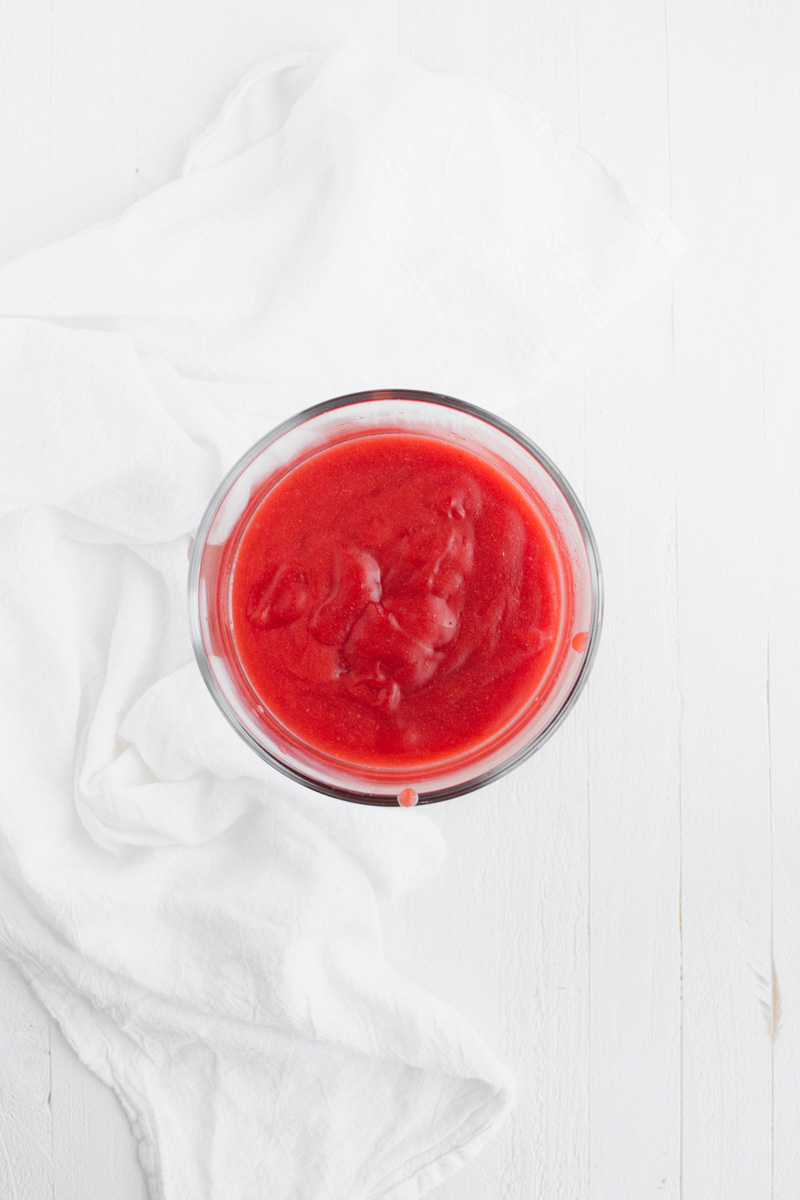
- Place thawed strawberries in a blender or food processor and puree until smooth. Over a bowl pour strawberry puree over a sieve to remove the solids. The puree will be thick. Use a spoon to stir and press the puree through the sieve.
- Place strawberry puree in a small saucepan over medium-low heat. Add sugar and cornstarch mixture and bring to a simmer, stirring constantly to keep lumps from forming. Once the puree thickens, remove from the heat. Cool for 5 minutes and then add fresh lemon juice. Chill for about 2-3 hours in the refrigerator until ready to use.
CHOCOLATE BUTTERCREAM
- In the bowl of a stand mixer fitted with the whisk attachment, pour in the egg whites and sugar and whisk by hand until combined. Fill a medium saucepan with about 2 inches of water and bring to a simmer. Place mixer bowl on top, being sure the bottom of the bowl does not touch the water and attach a candy thermometer.
- Whisking occasionally, heat the egg mixture until the temperature reaches 160 degrees. Once the mixture reaches 160 degrees, transfer to a stand mixer and beat the mixture on high speed for 10 minutes or until medium-stiff peaks form. At this point the outside of the mixer bowl should be room temperature. Switch out the whisk attachment with the paddle attachment and with the mixer on low speed, add the butter one tablespoon at a time, and then add the vanilla extract. Once combined, turn up the mixer speed to medium-high and beat until the buttercream is smooth about 5 minutes. Add the melted chocolate and mix until combined.
ASSEMBLE
- Place one cake layer on an 8-inch cake board and place it on a cake turntable with a nonslip mat. Fit a piping bag with a coupler or round piping tip and fill with buttercream. Pipe a buttercream dam around the edge of the cake. Spread about 1/2 cup strawberry filling on top and spread in an even layer all the way to the buttercream dam using an offset cake spatula.
- Place second cake layer on top. Pipe a buttercream dam around the edge of the cake. Spread about 1/2 cup strawberry filling on top and spread in an even layer all the way to the buttercream dam. Place third cake layer on top (bottom side up) and press gently to adhere.
CRUMB COAT
- Apply a small amount of buttercream on top of the cake and spread a thin layer of buttercream over the top and sides of the cake with an offset cake spatula, creating a crumb coat. Place the cake in the freezer to chill for 15 minutes.
DECORATE
- Line an 8-inch acrylic disc with parchment paper and set aside. Apply a large dollop of buttercream to the top of the chilled cake and spread in an even layer. You should have extra buttercream hanging off the edge. Place the acrylic disc on top, parchment side down and line the disc up with the bottom cake board.
- Apply more buttercream to the sides of the cake, making sure the entire bottom cake board is covered in buttercream. Gently touch the bottom cake board and top acrylic disc with a cake scraper and rotate the turntable to even out the buttercream. Continue this process all around to smooth out the buttercream. Apply more buttercream to any gaps and repeat until completely covered and smooth. Chill the cake in the freezer for another 10 to 15 minutes before removing the acrylic disc.
- Gently place an offset cake spatula under the acrylic disc and gently rotate the turntable until the disc releases. Peel off the parchment paper and fill in any gaps with more buttercream if needed and spread evenly. Chill the cake in the freezer or refrigerator while you prepare the chocolate drip.
CHOCOLATE DRIP
- Place chocolate and heavy cream in a microwavable bowl. Microwave on 30 second intervals, stirring between intervals until the chocolate is smooth and completely melted. Cool chocolate for 15 to 20 minutes before adding drips to the sides and top of the cake.
- Using a spoon, carefully drip chocolate off the sides of the cake. Pour remaining chocolate on the center of the cake and using a small offset spatula, spread the chocolate out until it meets the chocolate drips and is smooth. Return the cake to the freezer or refrigerator for about 15 minutes so the chocolate drips can set before adding additional decoration to the cake.
- Fit a piping bag with Ateco piping tip #827 and fill with remaining buttercream. Pipe buttercream swirls on top of the cake, alternating with a chocolate covered strawberry. Apply a few pink sprinkles for added texture and color. Carefully transfer cake to a cake pedestal and serve.
Notes
Cake layers can be made up to 3 days in advance, wrapped in plastic wrap and stored in an airtight container in the refrigerator.
Strawberry filling can be made up to 5 days in advance stored in an airtight container in the refrigerator.
Chocolate buttercream is best the day of assembly.
Assembled cake can be stored in the refrigerator in an airtight container.
Nutrition Information:
Yield: 12 Serving Size: 1Amount Per Serving: Calories: 414Total Fat: 19gSaturated Fat: 8gTrans Fat: 0gUnsaturated Fat: 11gCholesterol: 72mgSodium: 650mgCarbohydrates: 52gFiber: 4gSugar: 23gProtein: 8g
*Nutrition information is an estimate and will vary.*
Leave a Reply