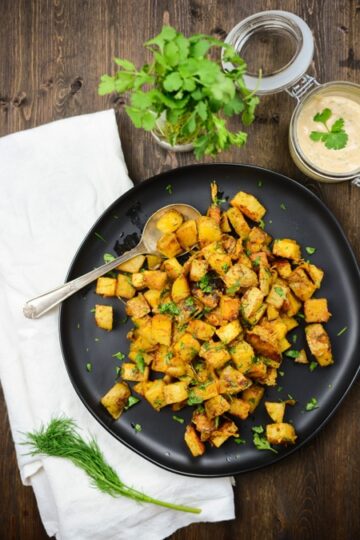

Crispy, creamy, tangy, those are just some of the words that best describe these Roasted Chipotle Ranch Potatoes.
...

Crispy, creamy, tangy, those are just some of the words that best describe these Roasted Chipotle Ranch Potatoes.
...
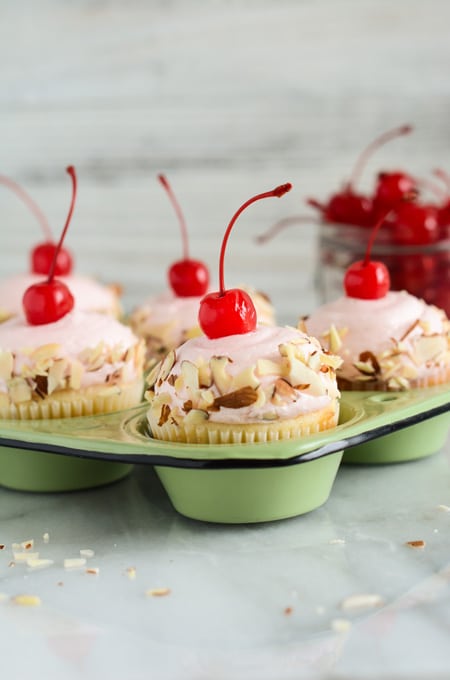
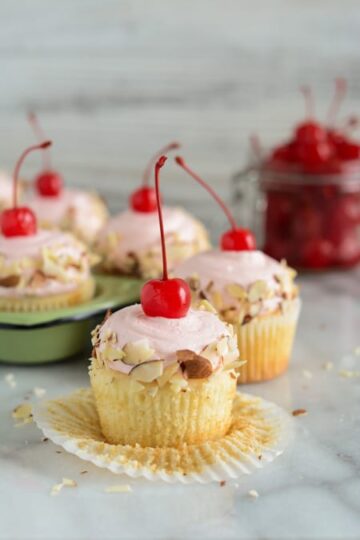
These Cherry Almond Cupcakes remind me of something from a cupcake bakery. And definitely something I would pick back when I was a kid. I absolutely loved anything cherry when I was young and still do!
...
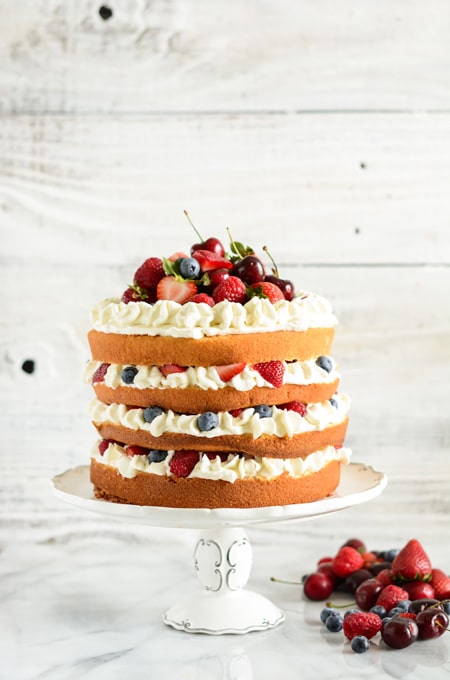
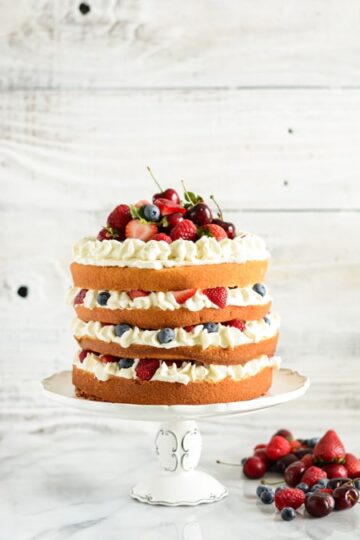
It's officially summer! And it's crazy hot and humid here in Houston, Texas. Thankfully I have a refreshing and light (well lighter) dessert for your summertime indulgence with this Mixed Berry Sponge Cake!
...
As an Amazon Associate, I earn from qualifying purchases.
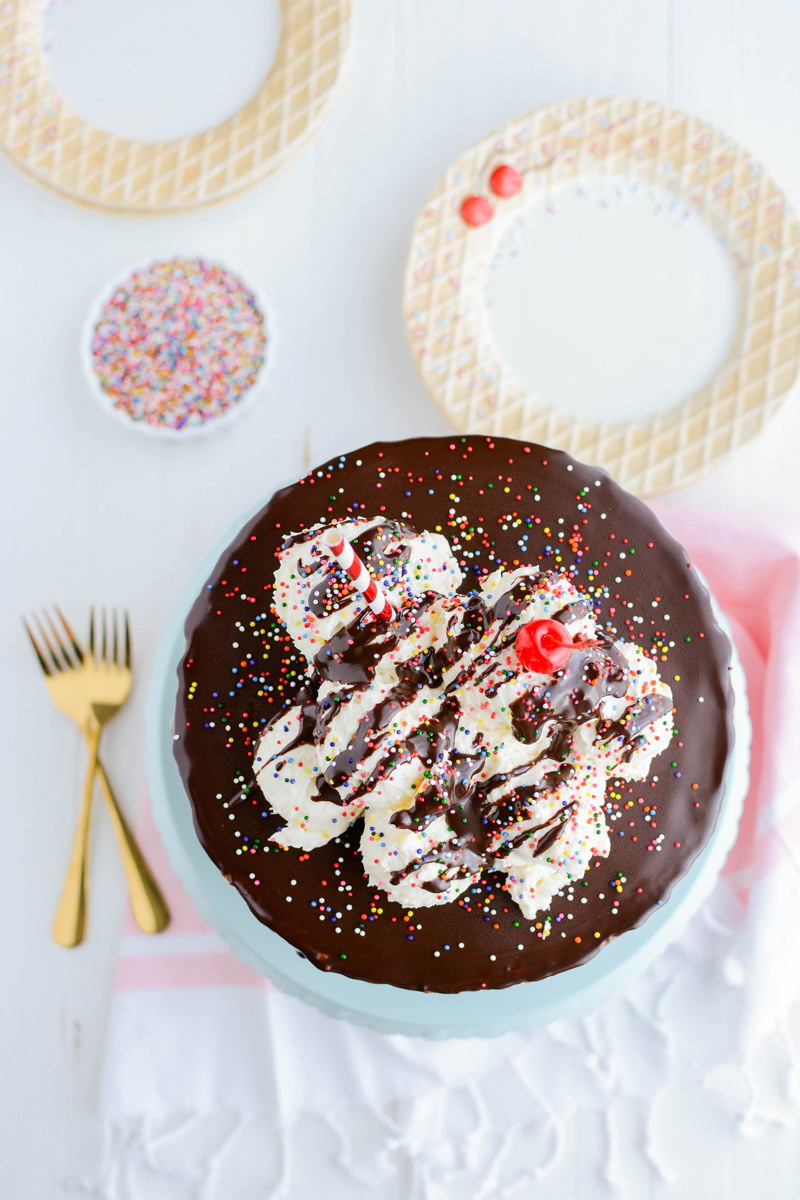
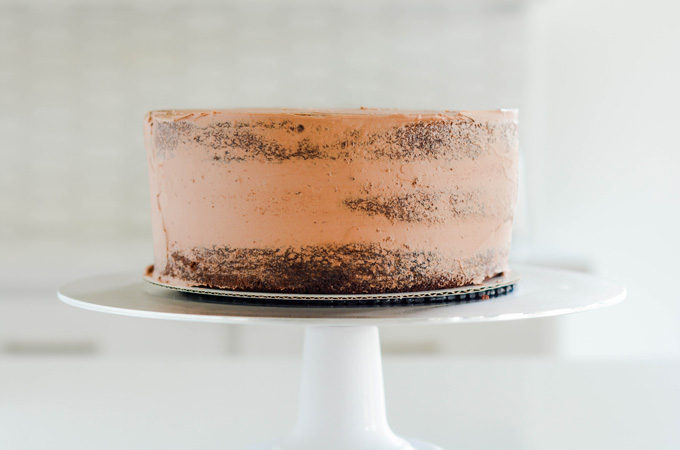
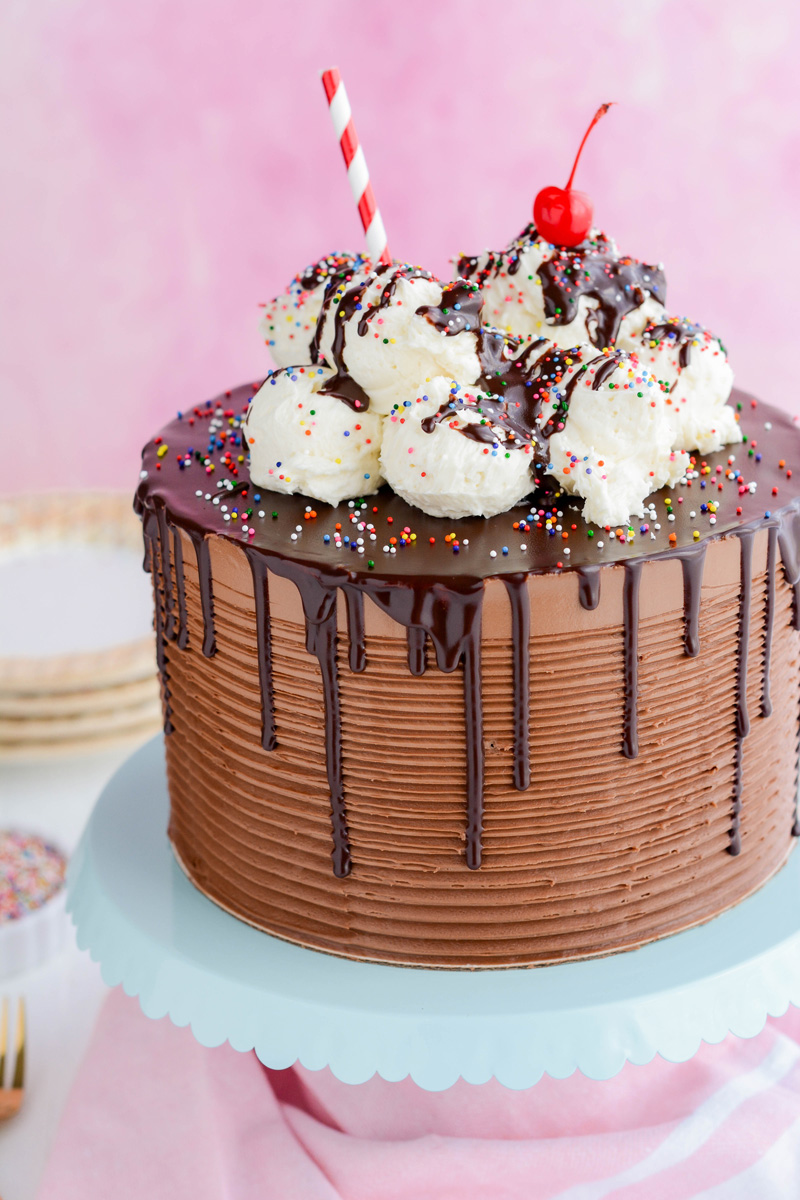
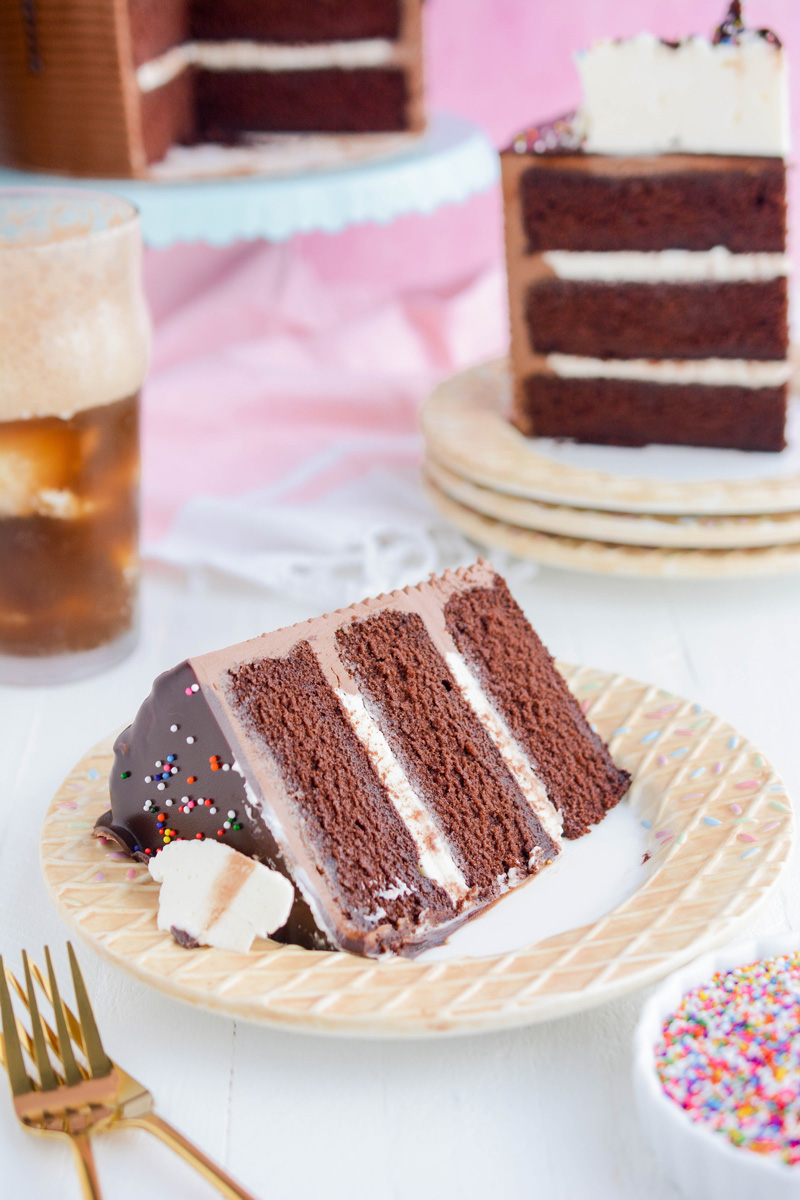
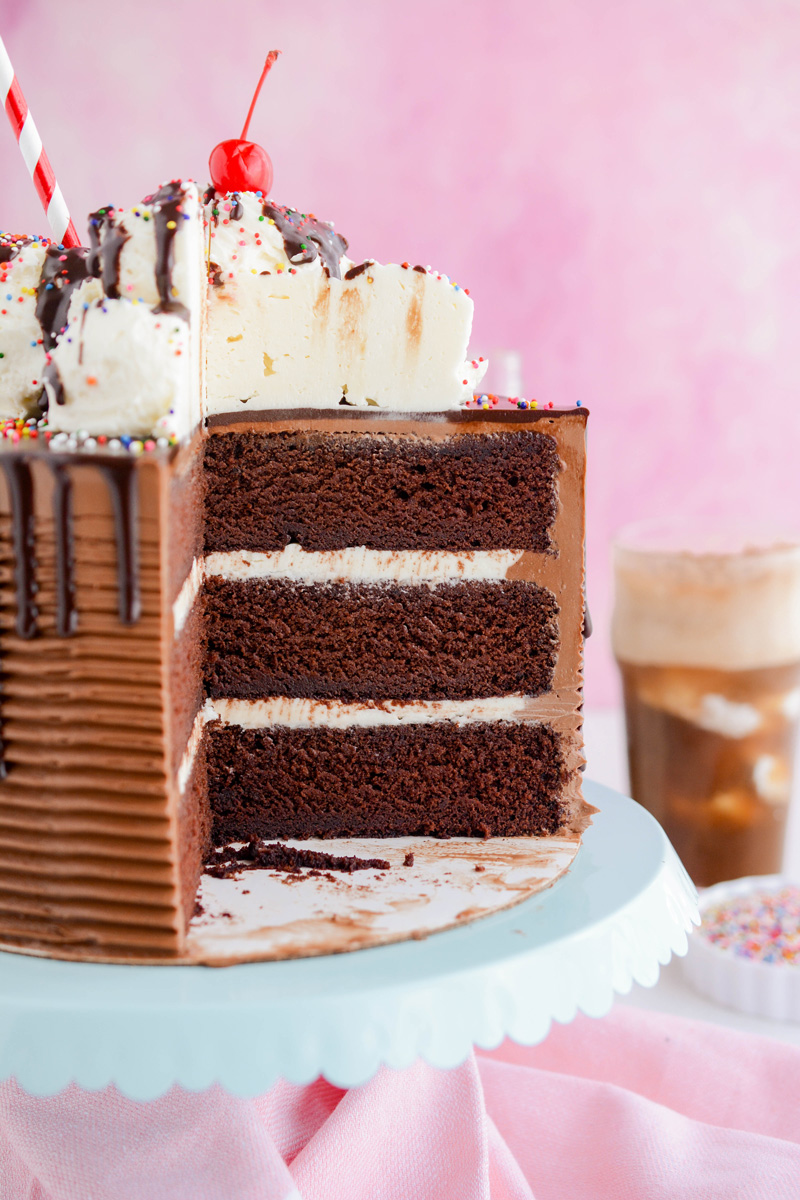
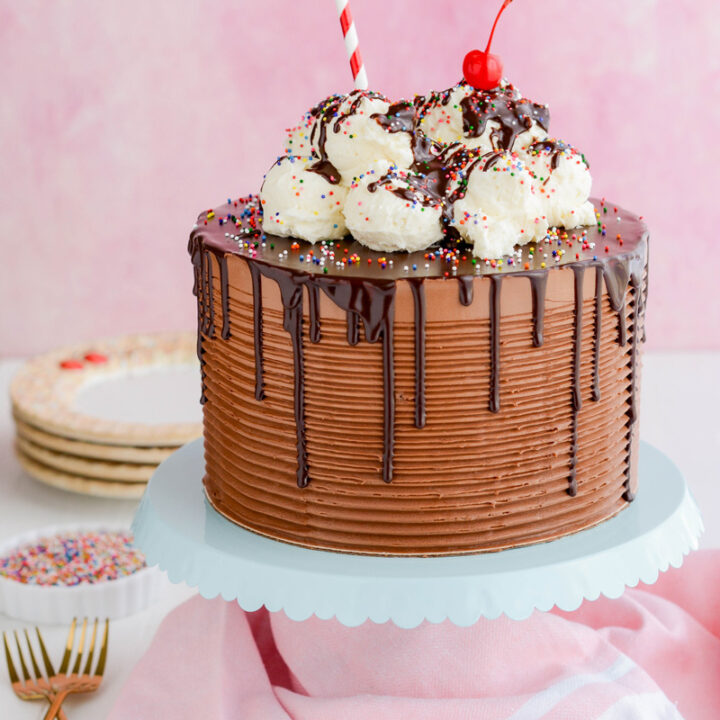
Indulgence takes on a new form with a delightful twist in our updated creation - the Chocolate Root Beer Float Cake. In this culinary adventure, we're diving into a world where rich cocoa meets the nostalgic essence of root beer, resulting in a dessert that's a symphony of flavors and textures.
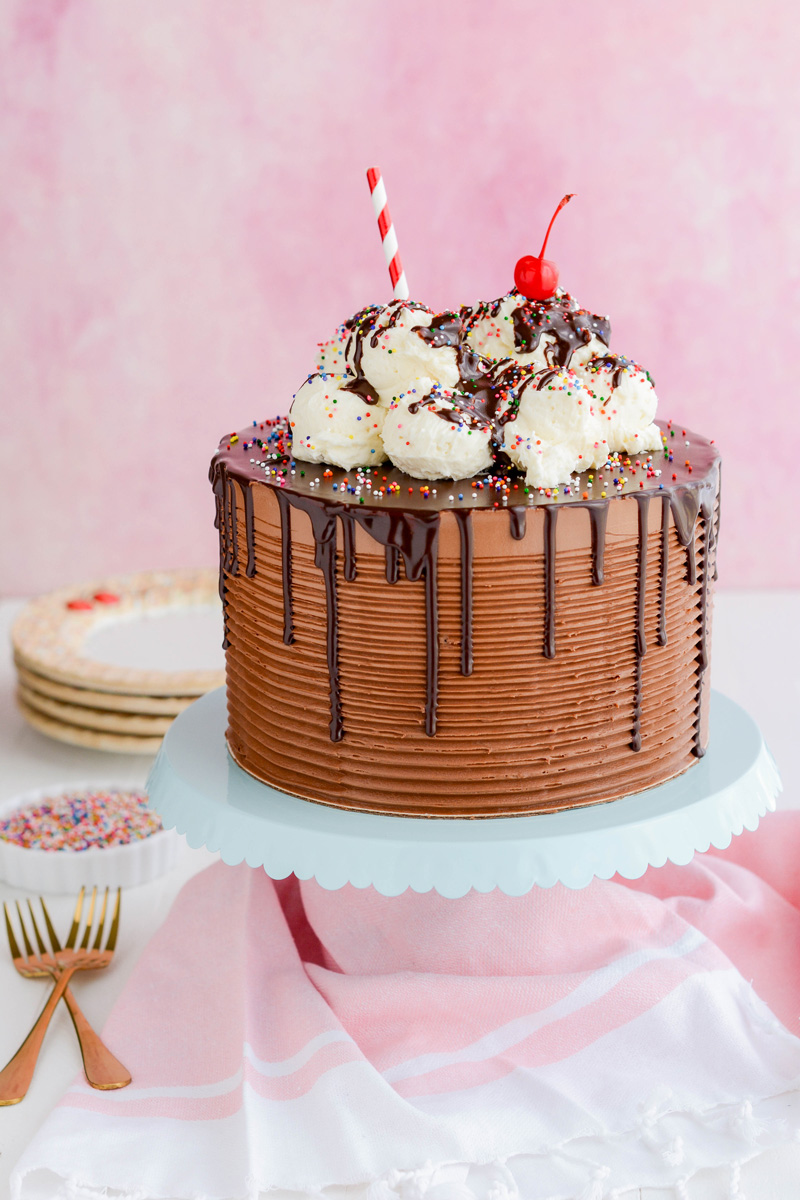
Join us as we unravel the secrets behind this extraordinary treat, perfect for satisfying your sweet tooth and bringing a touch of whimsy to your baking repertoire. Get ready to embark on a journey of taste and imagination, where chocolatey decadence and fizzy nostalgia collide in every delectable slice
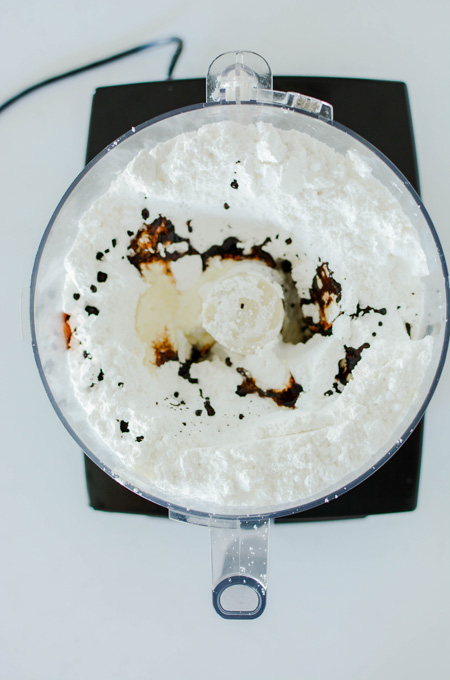
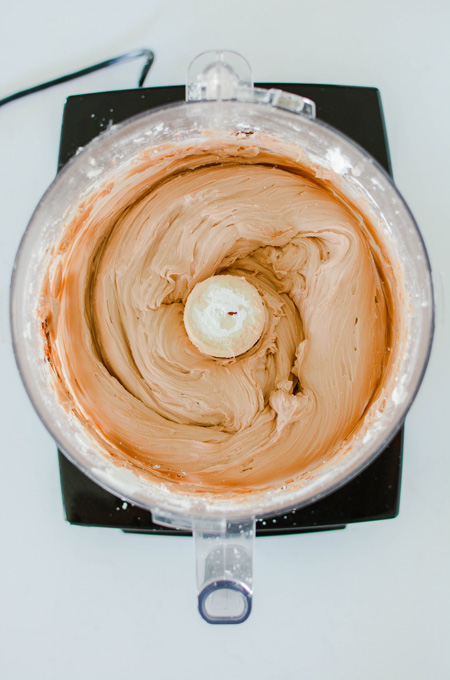
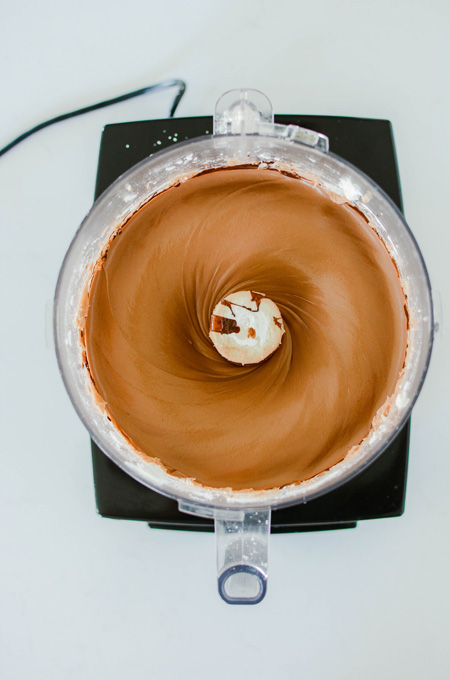
This super fun frosting looks and tasted like vanilla ice cream! And it should because it's made with, you guessed it! Vanilla ice cream!
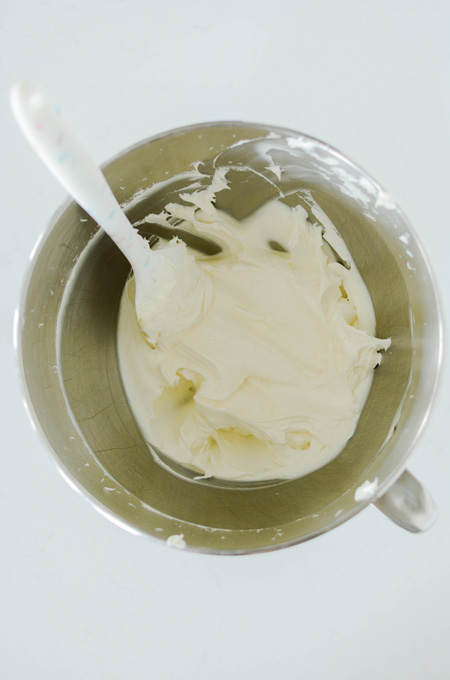
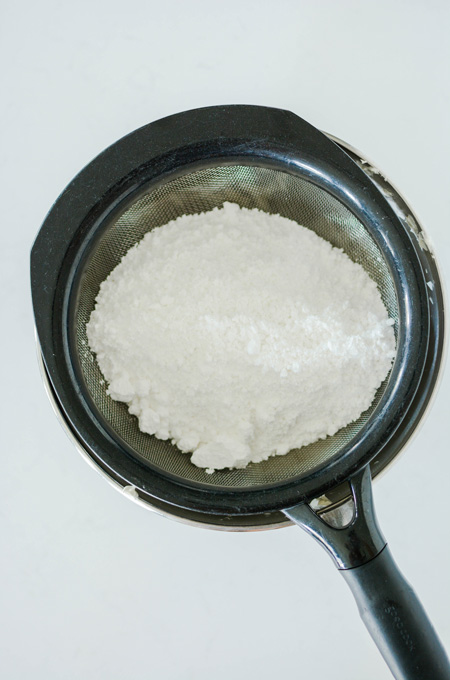
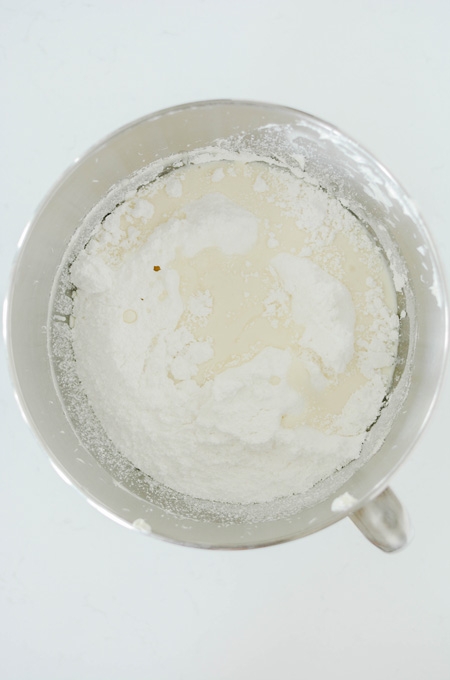
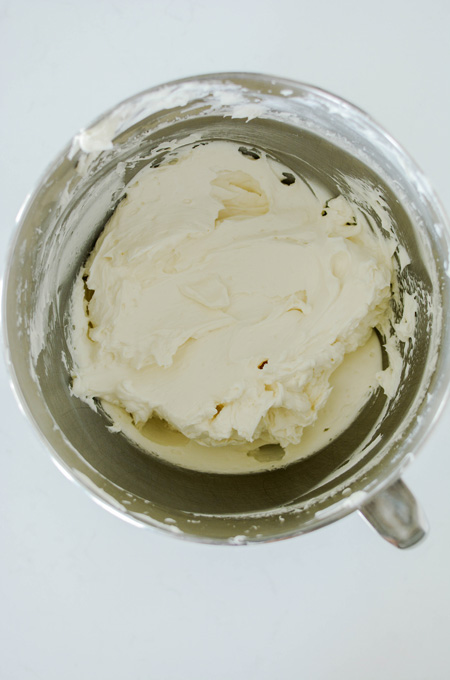
If you've never made frosting in a food processor now is your chance! And best of all it's super easy and quick.

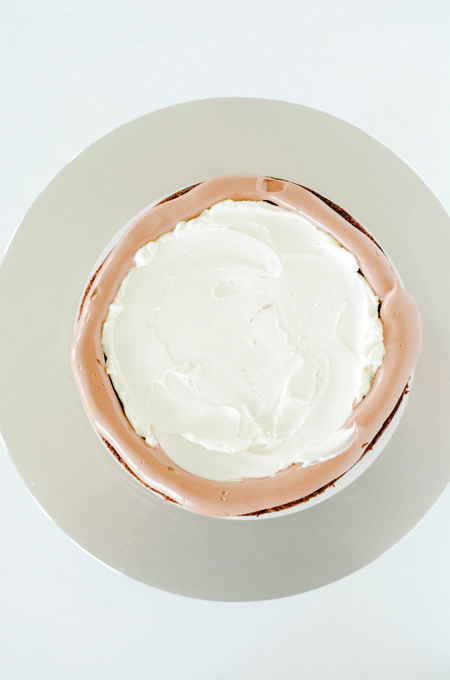
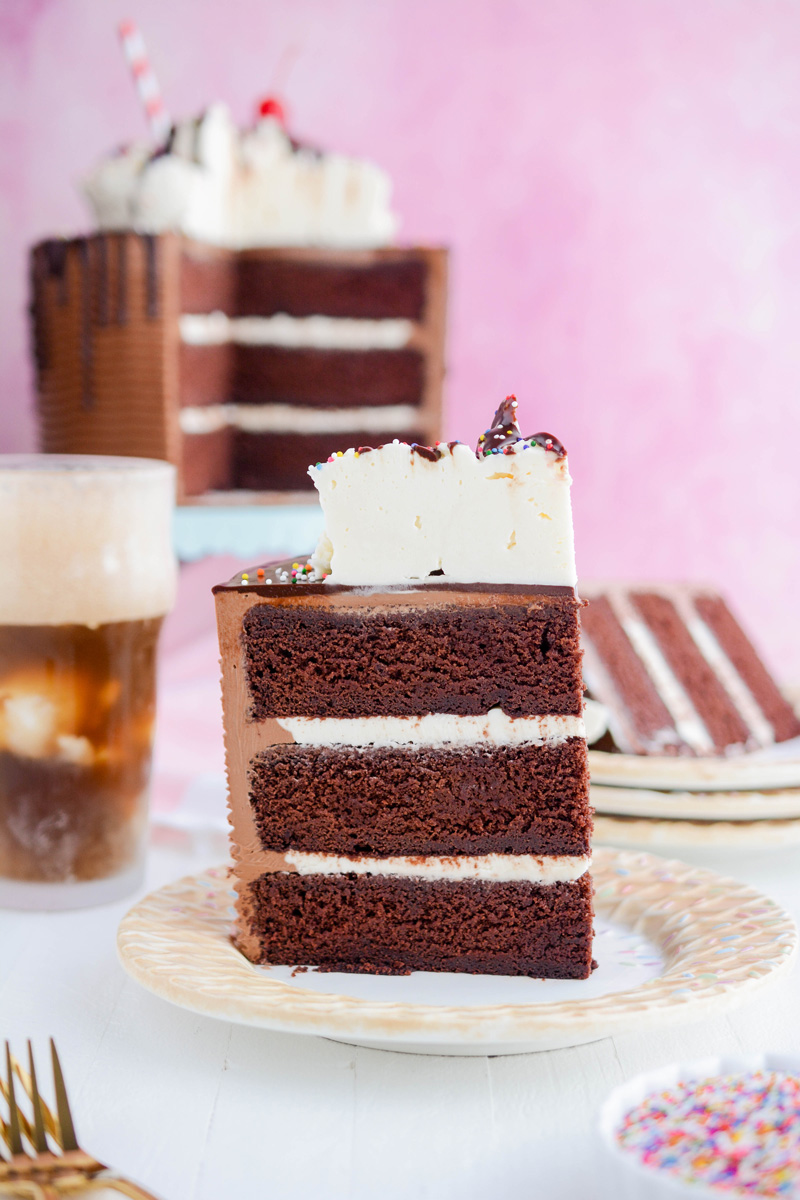
The first coat of frosting is called the crumb coat. This helps hold in the loose crumbs and prevents the crumbs from getting into the final layer of frosting.
The Cake Chica is on the following social media platforms below. Click subscribe, like and follow! We would love to have you over!
Adapted from The Sweetapolita Bakebook by Rosie Alyea
Indulgence takes on a new form with a delightful twist in our updated creation - the Chocolate Root Beer Float Cake. In this culinary adventure, we're diving into a world where rich cocoa meets the nostalgic essence of root beer, resulting in a dessert that's a symphony of flavors and textures.
Assembled cake will keep at a cool room temperature in an airtight container for up to 1 day or in the refrigerator for up to 3 days. Bring to room temperature before serving.
Cake layers can be made up to 3 days in advance, wrapped in plastic wrap, stored in an airtight container in the refrigerator.
Vanilla frosting will keep in an airtight container in the refrigerator for up to 3 days. Bring chilled frosting to room temperature and beat on low speed to soften.
Chocolate frosting will keep in an airtight container in the refrigerator for up to 3 days. When ready to use, bring to room temperature and beat on low speed to bring back to a spreadable consistency.
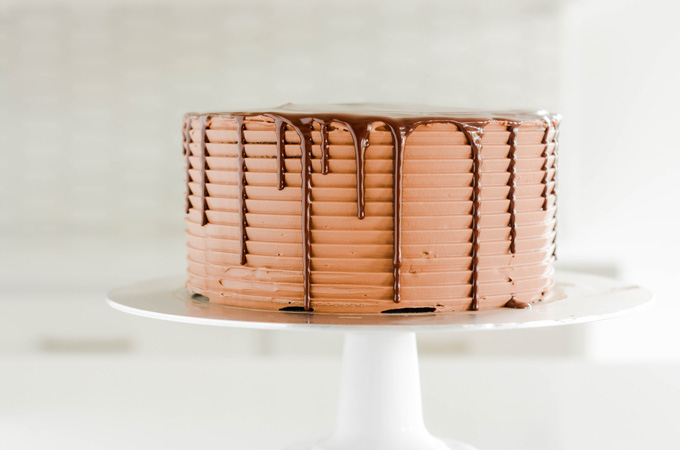
Chocolate drip will keep in an airtight container in the refrigerator for up to 1 week. When ready to use, warm glaze in the microwave or over a pan of simmering water.
*Nutrition information is an estimate and will vary.*
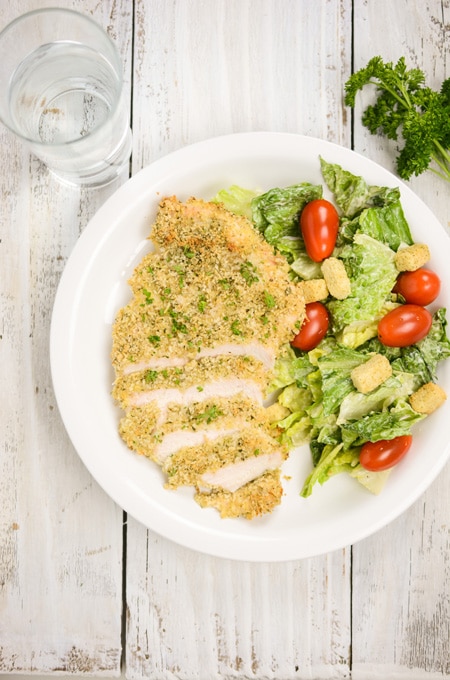
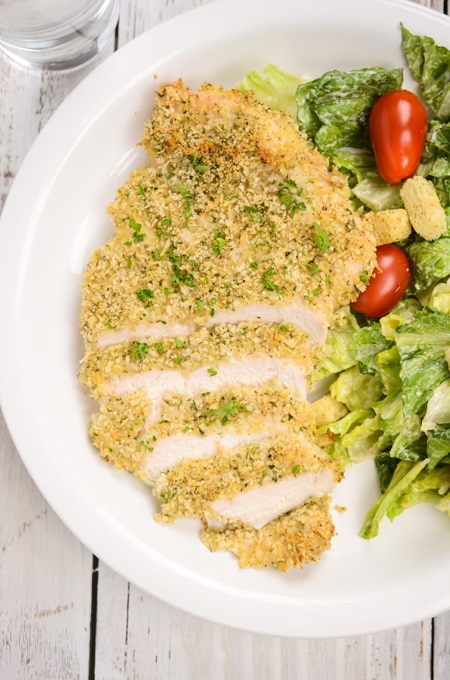
I've got something a little different this week a savory dinner recipe for Baked Ranch Chicken Breast. What I like about this recipe is that it's easy, pretty quick and extremely tasty. Paired with a salad or veggie it makes for a quick weeknight dinner!
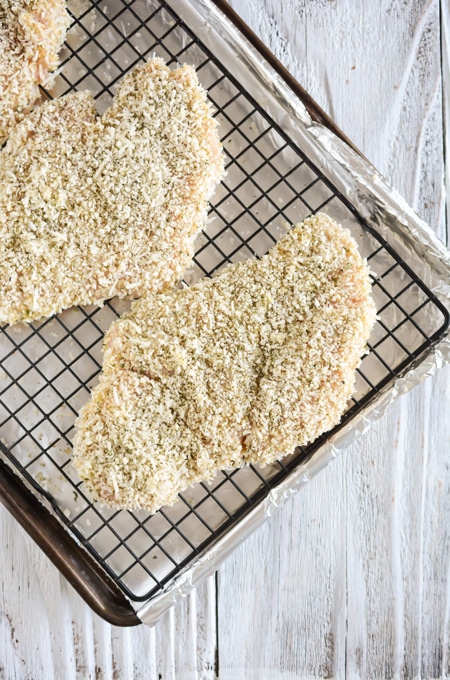
Since chicken breast have a little bit of a wet surface even if you pat them dry, if you skipped the flour dip and went straight ahead to the egg wash the egg wash would fall right off. You could use several types of flour, such as coconut flour, almond flour or even chickpea flour.
When you stick the floured chicken in the egg wash it creates a the perfect "glue" for the breadcrumbs that you'll dip the chicken breast into next. If you would like to skip the egg you can use mayo or Dijon mustard in its place. And if you have the time you can let the breaded chicken rest in the refrigerator for up to 30 minutes. This will give the coating a little extra time to adhere to the chicken and you won't have to worry about your breading falling off of your chicken while devouring it!
Follow The Cake Chica on social media: Facebook, Instagram and Pinterest.
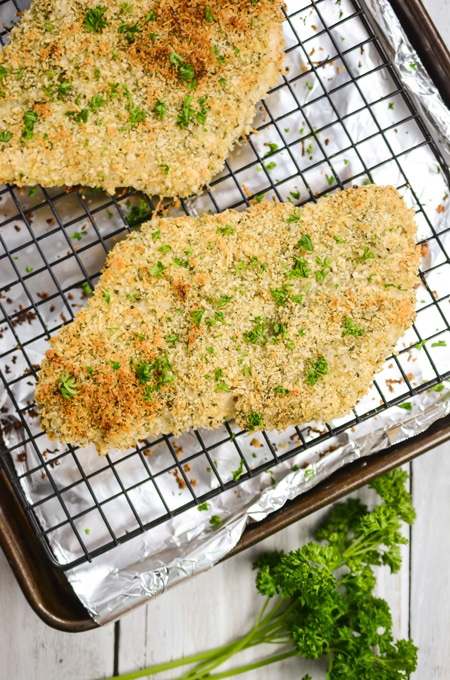
Baked Ranch Chicken Breast, coated with panko bread crumbs and Parmesan cheese, creating a crispy bread coating. *Nutrition information is an estimate and will vary.*

Baked Ranch Chicken Breast
Yield:
4 servings
Prep Time:
15 minutes
Cook Time:
35 minutes
Total Time:
50 minutes
Ingredients
SPECIAL TOOLS
RANCH CHICKEN BREAST
Instructions
Notes
Nutrition Information:
Yield: 4
Serving Size: 8
Amount Per Serving:
Calories: 398Total Fat: 14gCholesterol: 157mgSodium: 1642mgCarbohydrates: 14gFiber: 1gSugar: 1gProtein: 44g
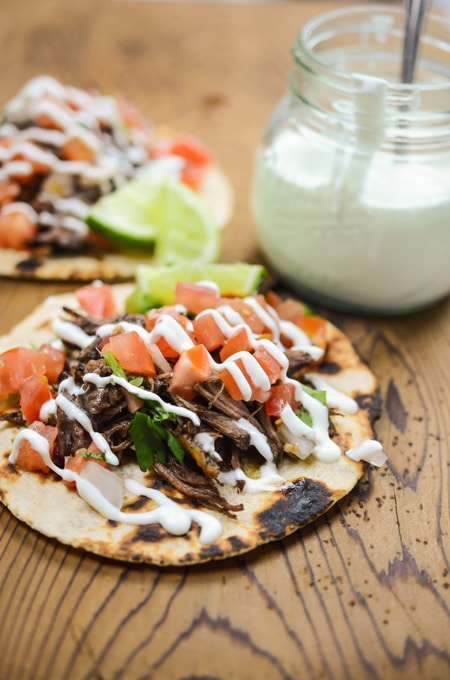
My weekends are usually crazy-busy so slow cooker meals like these Slow Cooker Barbacoa Tacos are a great option to get in a great meal while working on my weekend chores.

I recommend making this recipe on a weekend because you do have a little prep work before it goes in the slow cooker. You'll need to brown the meat before putting it in the slow cooker, but I promise it will be worth the extra step to do this. Don't skip out on getting as much flavor in as possible!
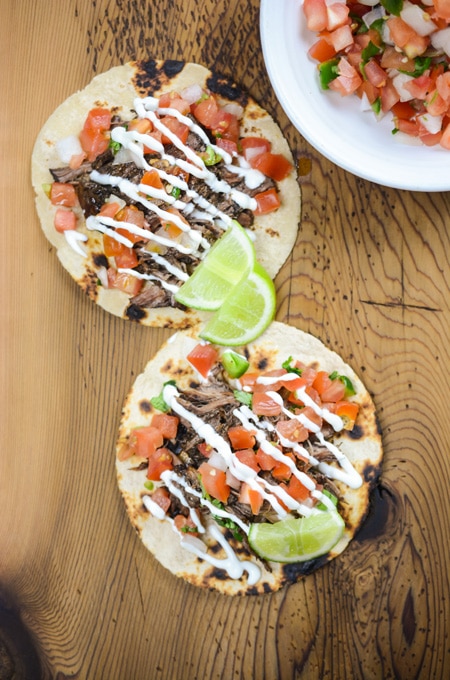
With so many great toppings to add to your Slow Cooker Barbacoa, I decided to keep it simple and added a little homemade crema, pico de gallo and lime. You have to have fresh limes on tacos over here in Texas, you just gotta!
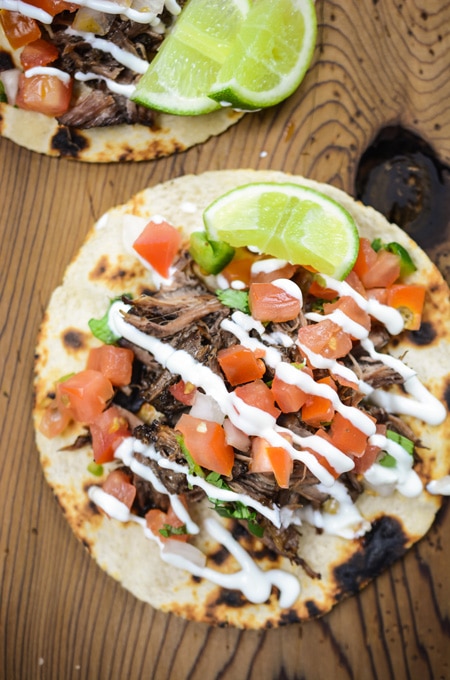
I like to use La Tortilla Factory tortillas if you can't get them homemade. Plus they have many healthy options as well.
Before you leave, be sure to go follow The Cake Chica on social media: Facebook, Instagram, and Pinterest.
Adapted from La Tortilla Factory
...
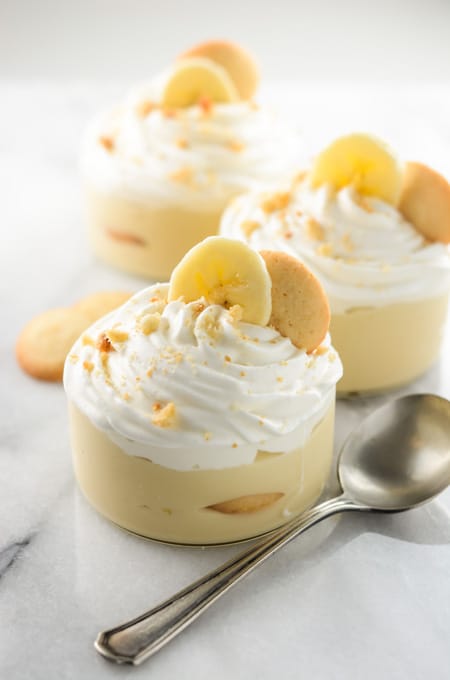
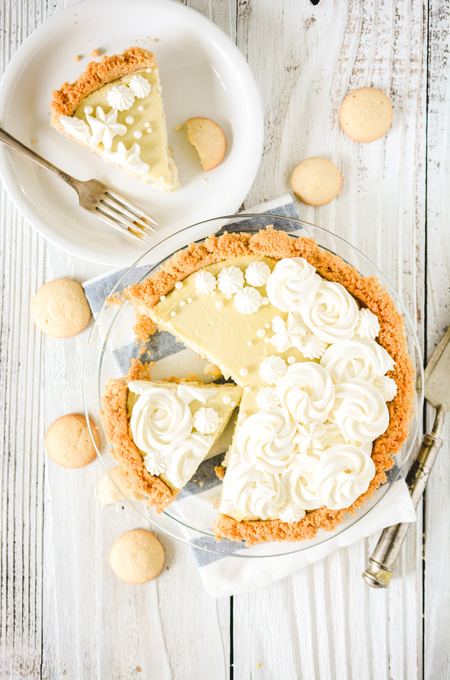
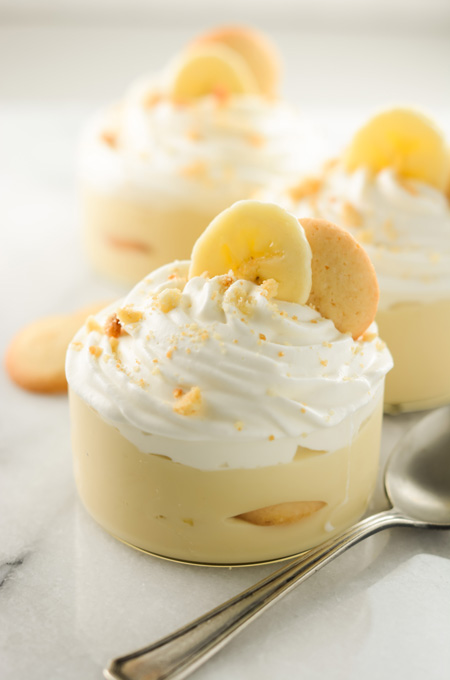
Sometimes I forget that there are other desserts to make besides cake. I made this recipe for Banana Caramel Pudding and realized I need to branch out sometimes. Plus this pudding is really easy to make and comes together in just about 3 hours total! Including chill time!
Not to mention it's incredibly rich, silky and smooth! And is the perfect "something sweet" to end your lunch or dinner with.

If you want to take this Banana Caramel Pudding up a notch, be sure to checkout this recipe for Homemade Vanilla Wafers! You're making homemade pudding you might as well make homemade cookies as well. Homemade Caramel Pudding, Homemade Vanilla Wafers and to top it all off with...you guessed it Homemade Whipped Cream. All of which are simple to make. I also crumbled a few cookies for garnish along with the banana slice and whipped cream.
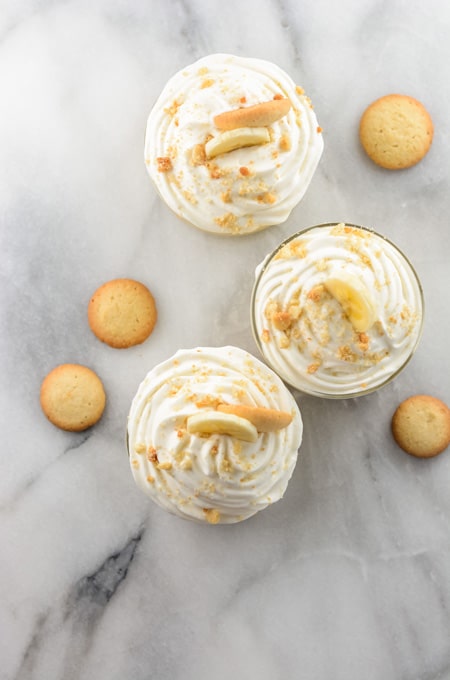
Make someone feel special by making this old diner classic Banana Caramel Pudding completely from scratch!
Check out The Cake Chica on social media: Facebook, Instagram, and Pinterest.
Adapted from Diner Desserts by Tish Boyle
...
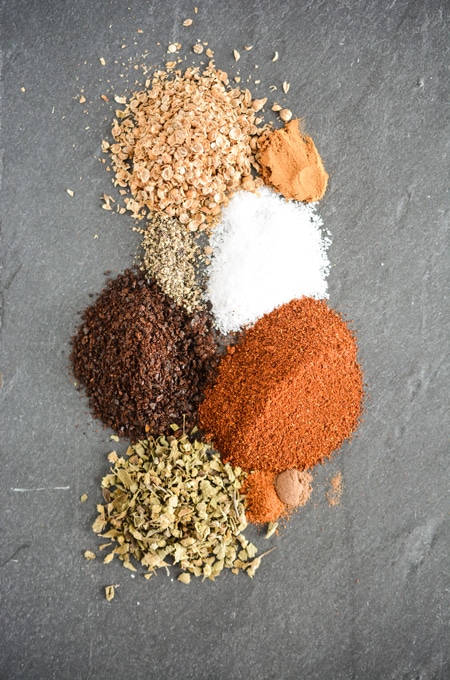
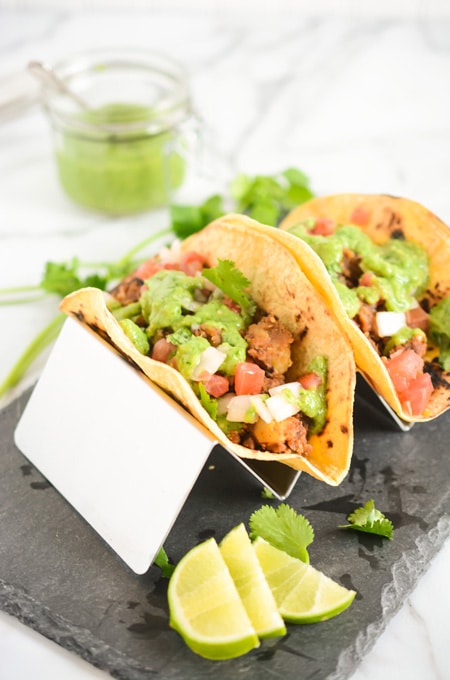
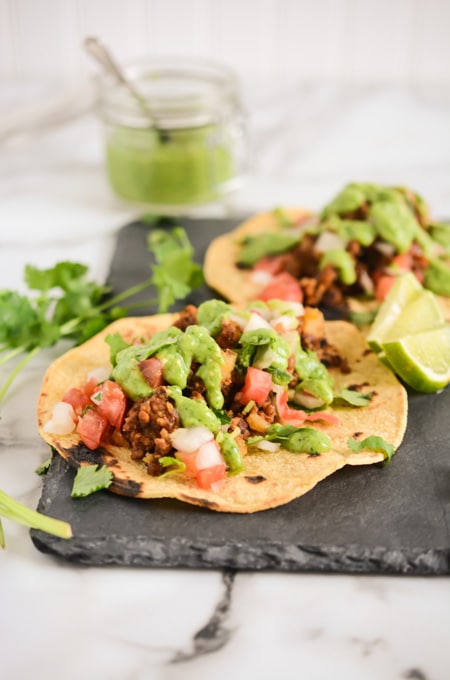
Over here in Texas we have easy access to many International foods, especially Mexican food. Chorizo is a type of sausage, usually Mexican or Spanish.
Spanish chorizo is made from coarsely chopped pork and pork fat, seasoned with smoked paprika and salt. It is generally classed as either spicy or sweet, depending upon the type of smoked paprika used. Depending on the variety, chorizo can be eaten sliced without further cooking, sometimes sliced in a sandwich, or grilled, fried, or baked alongside other foodstuffs, and is also an ingredient in several dishes where it accompanies beans, such as fabada or cocido montañés. -Wikipedia
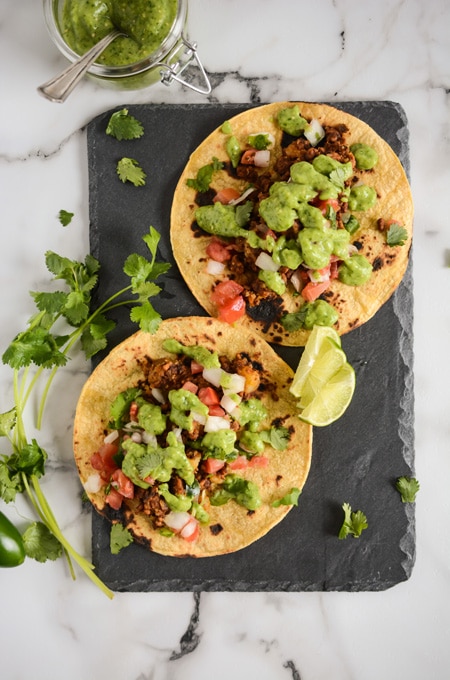
Mexican Chorizo is more widely available here in Houston, Texas and is the kind we'll be making in this recipe for Chorizo and Potato Tacos!
Mexican versions of chorizo are made from fatty pork, but beef, venison, chicken, kosher, turkey, and even tofu and vegan versions are made. The meat is usually ground (minced) rather than chopped, and different seasonings are used. This type is better known in Mexico and other parts of the Americas, including the border areas of the United States, and is not frequently found in Europe. It is equally and by far much hotter and spicier than Spanish and Portuguese varieties of the sausage, and often contains chili peppers that are much higher on the Scoville scale.-Wikipedia
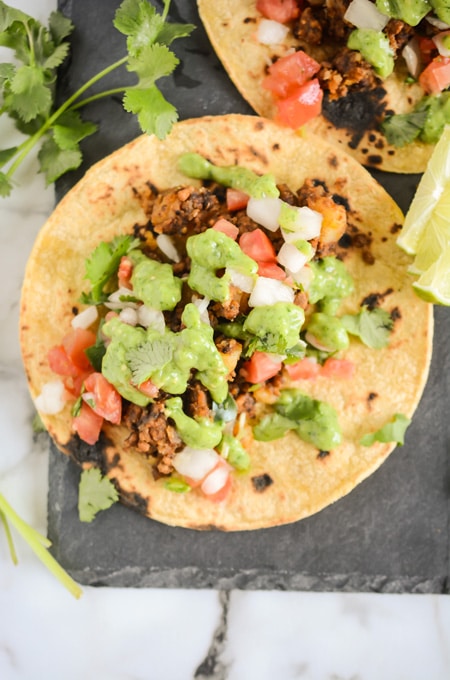
If you're from Texas you can skip the sausage making part, however I highly suggest you give it a try. I haven't found a better Mexican chorizo than this one you make right in your home. Trust me it's worth the few minutes to make it yourself. It's not hard or complicated at all.
Follow The Cake Chica on these social media platforms: Facebook, Instagram, and Pinterest.
Adapted from Cook's Illustrated
...
As an Amazon Associate, I earn from qualifying purchases.
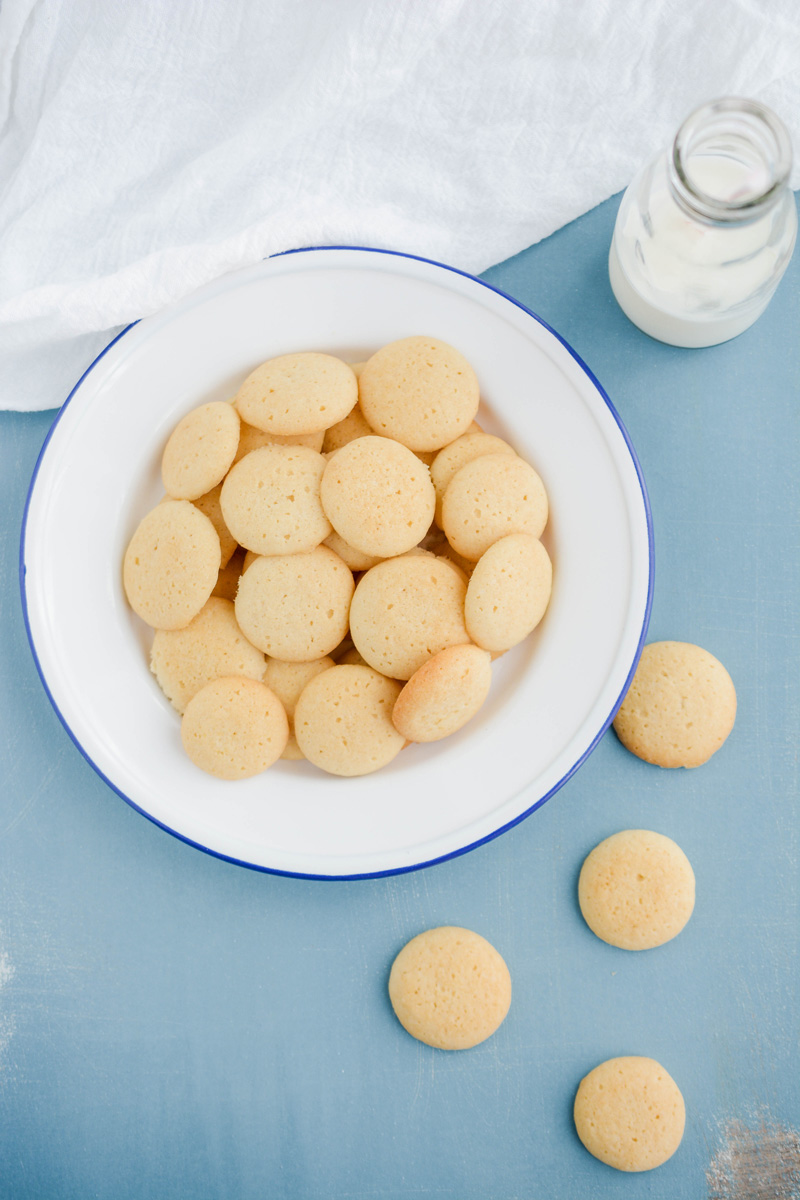
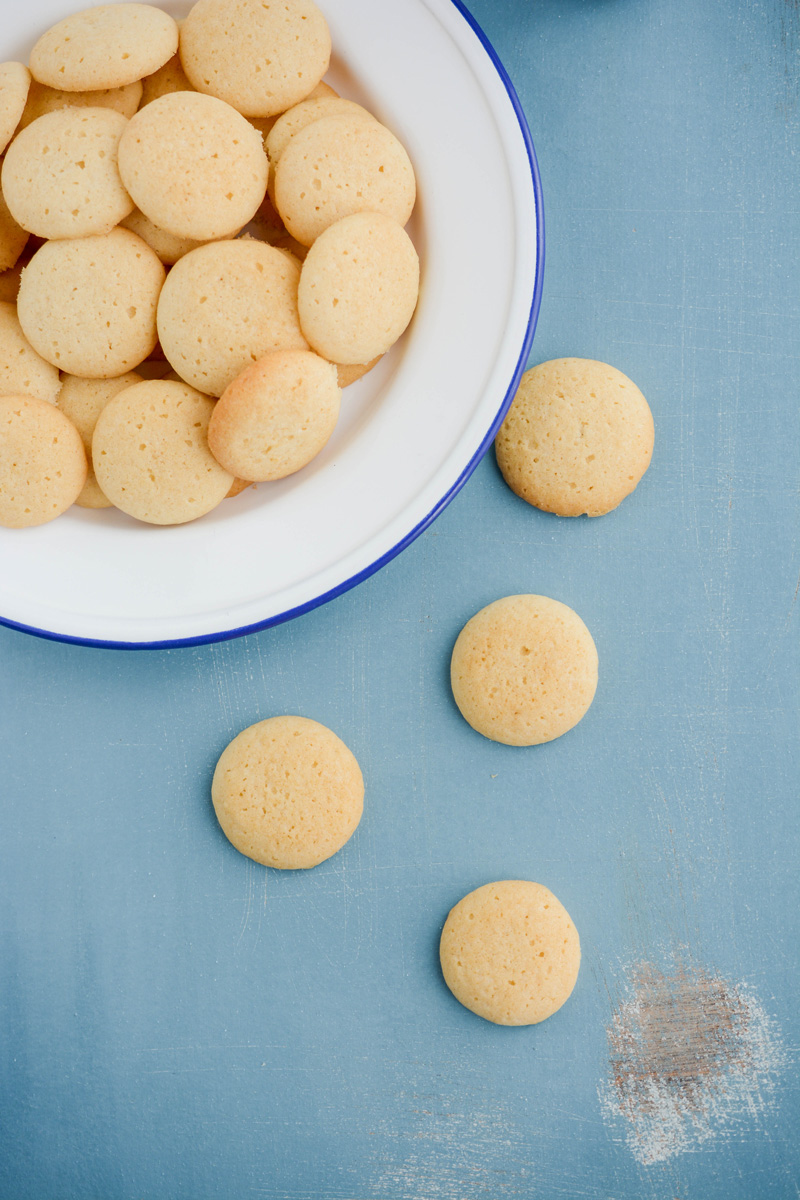
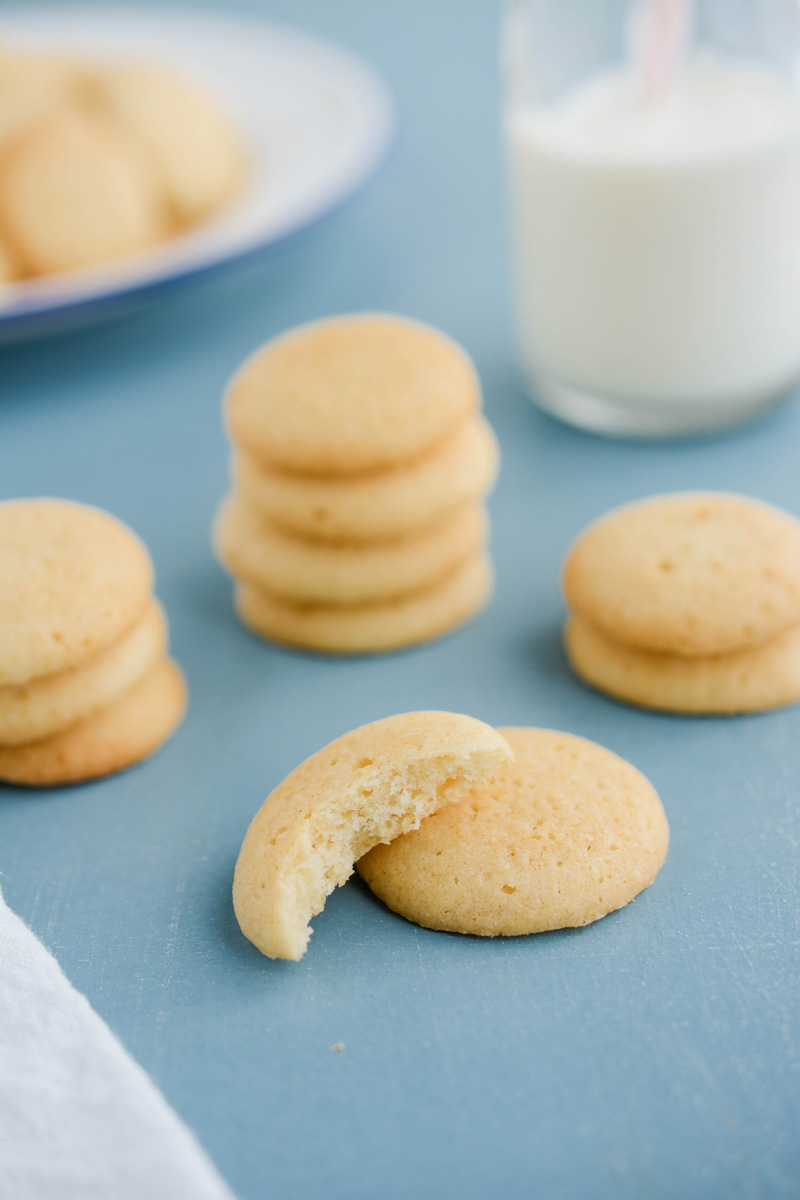
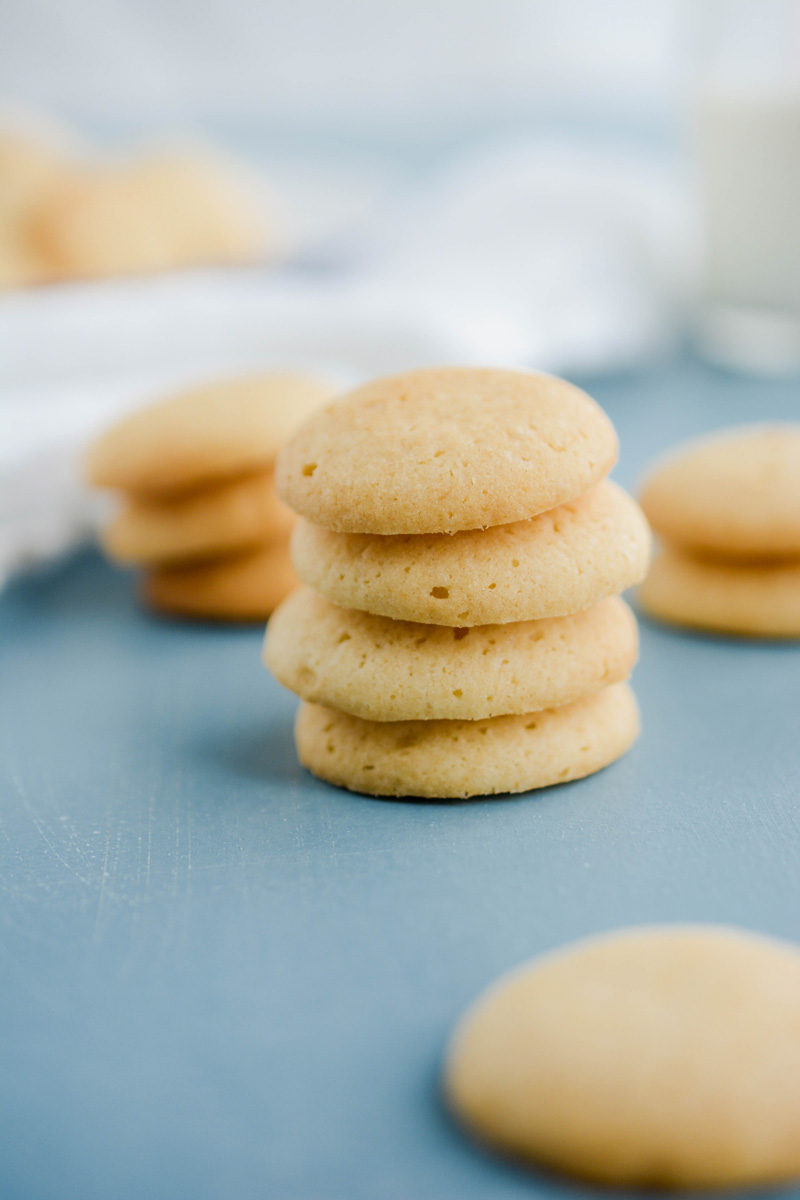
Talk about addicting! These simple and flavorful Homemade Vanilla Wafers will have you questioning why your ever bought those lack luster store bought versions. Make a double batch and have plenty on hand for adding to your next baked good or for snacking. Banana Caramel Pudding anyone!

Store Homemade Vanilla Wafers in a zip top storage bag in the pantry for up to 2 months.
The Cake Chica is on the following social media platforms below. Click subscribe, like and follow! We would love to have you over!
Adapted from BraveTart by Stella Parks
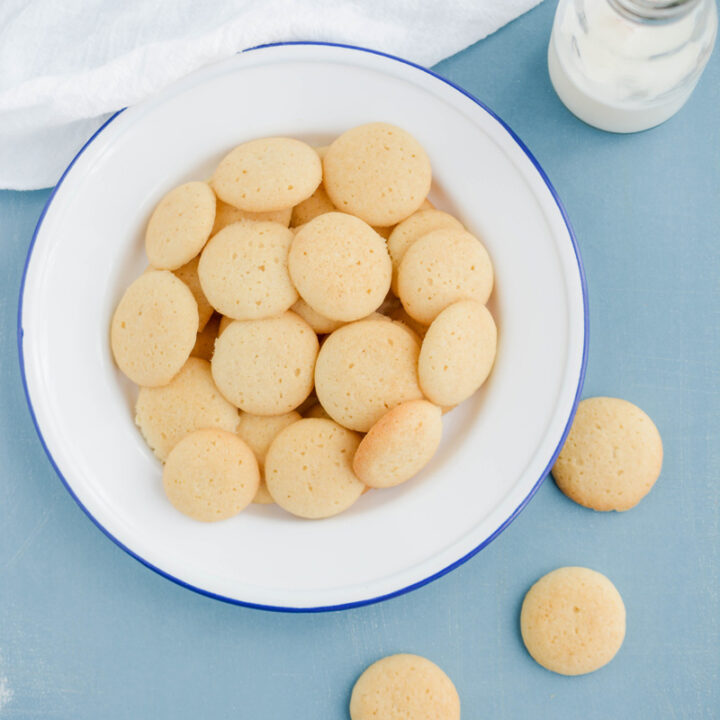
These Homemade Vanilla Wafers are full of real vanilla flavor. With crisp golden edges and fluffy centers, you'll never crave the store bought version again!
Store in a 1 gallon zip-top bag for up to 2 months at room temperature.
*Nutrition information is an estimate and will vary.*
*Nutrition information is an estimate and will vary.*
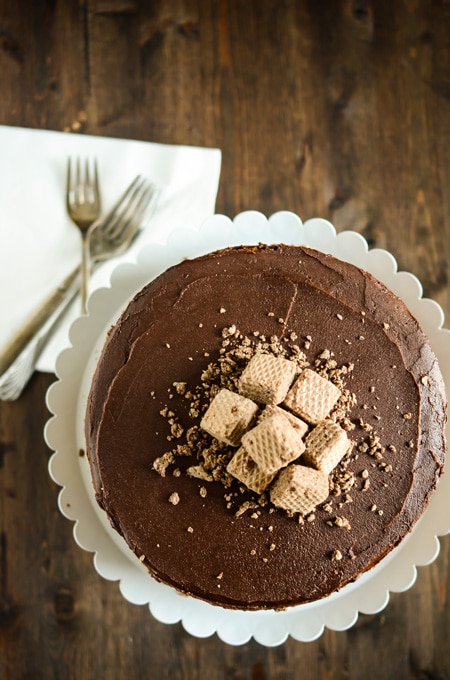
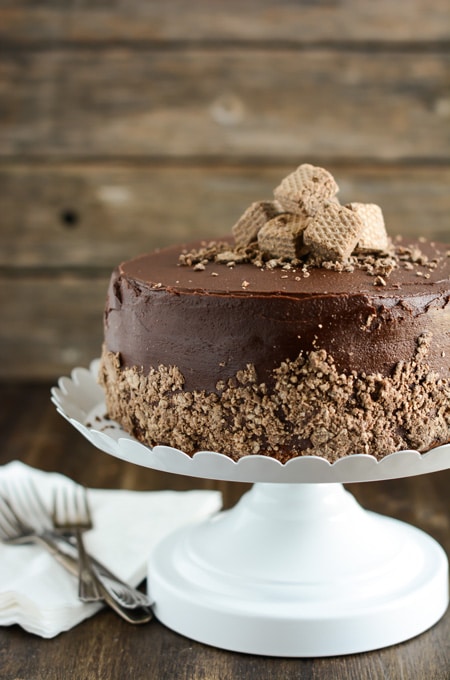
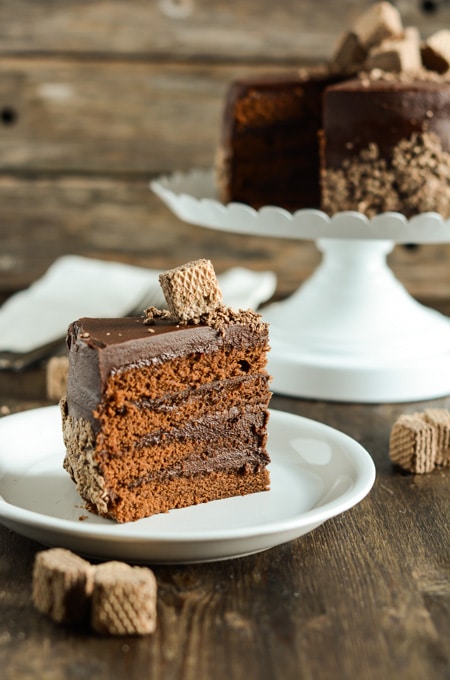
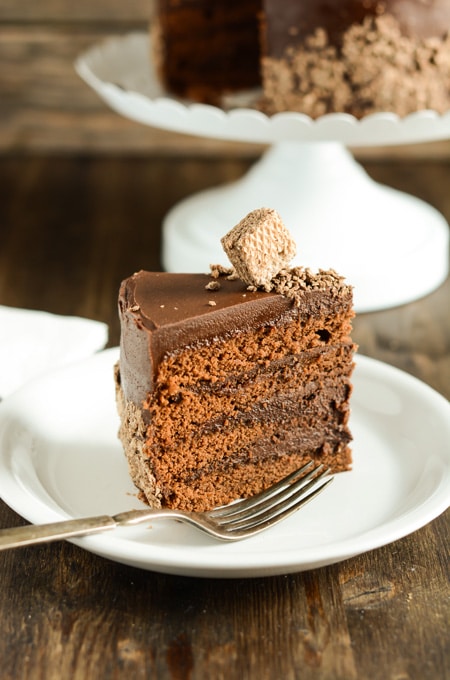
This Espresso Chocolate Cake has 4 thin layers of chocolate cake with a rich chocolate fudge frosting sandwiched in between each layer.
Check out The Cake Chica on social media: Facebook, Instagram, and Pinterest!
Adapted from Bon Appetit Desserts by Barbara Fairchild
...
As an Amazon Associate, I earn from qualifying purchases.
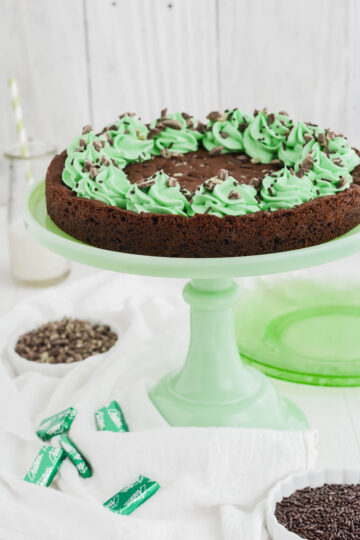
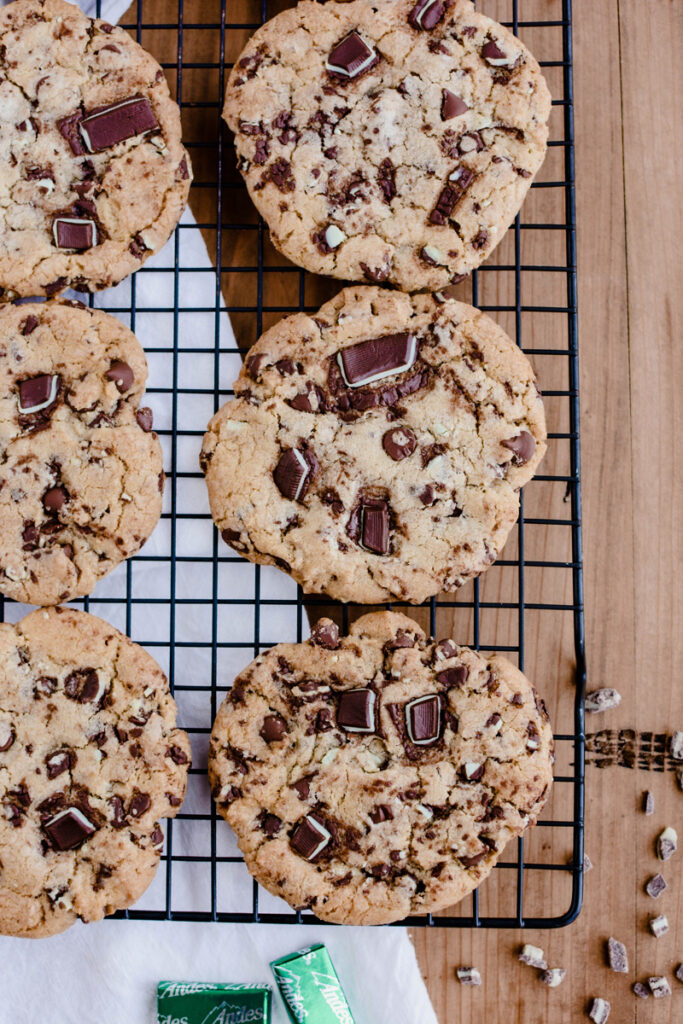
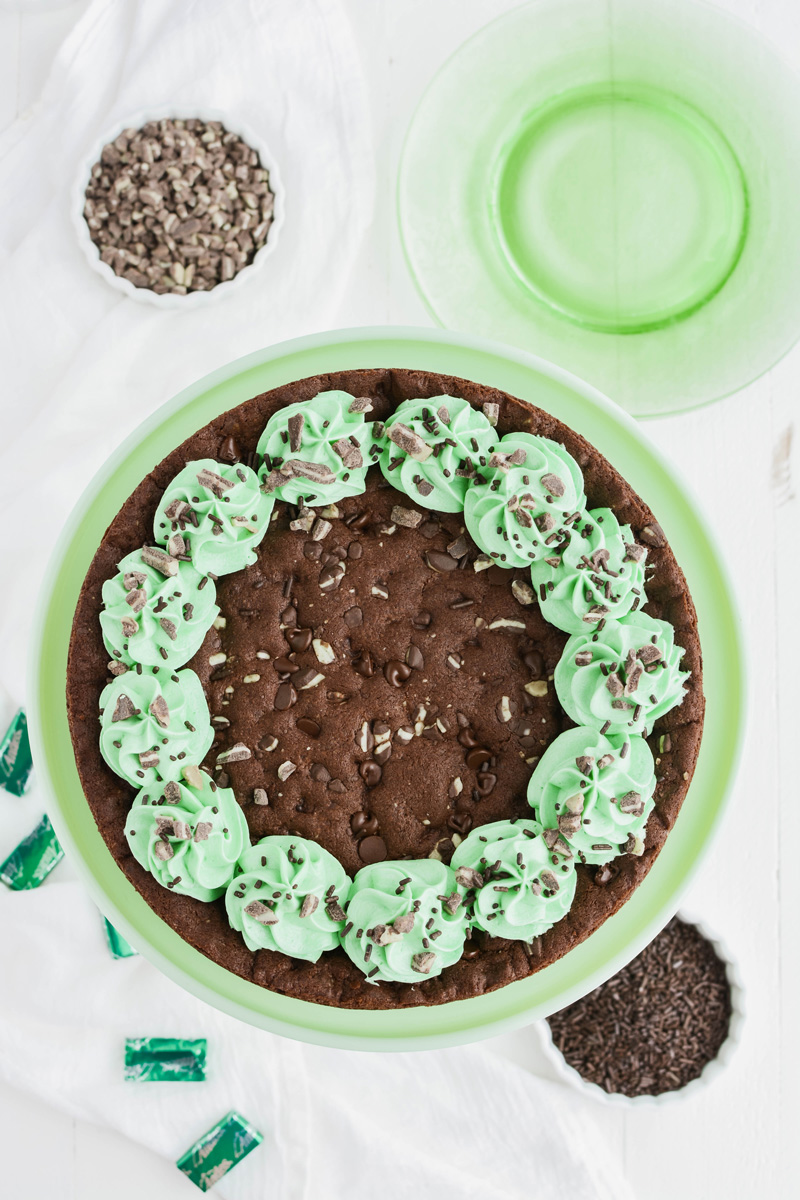
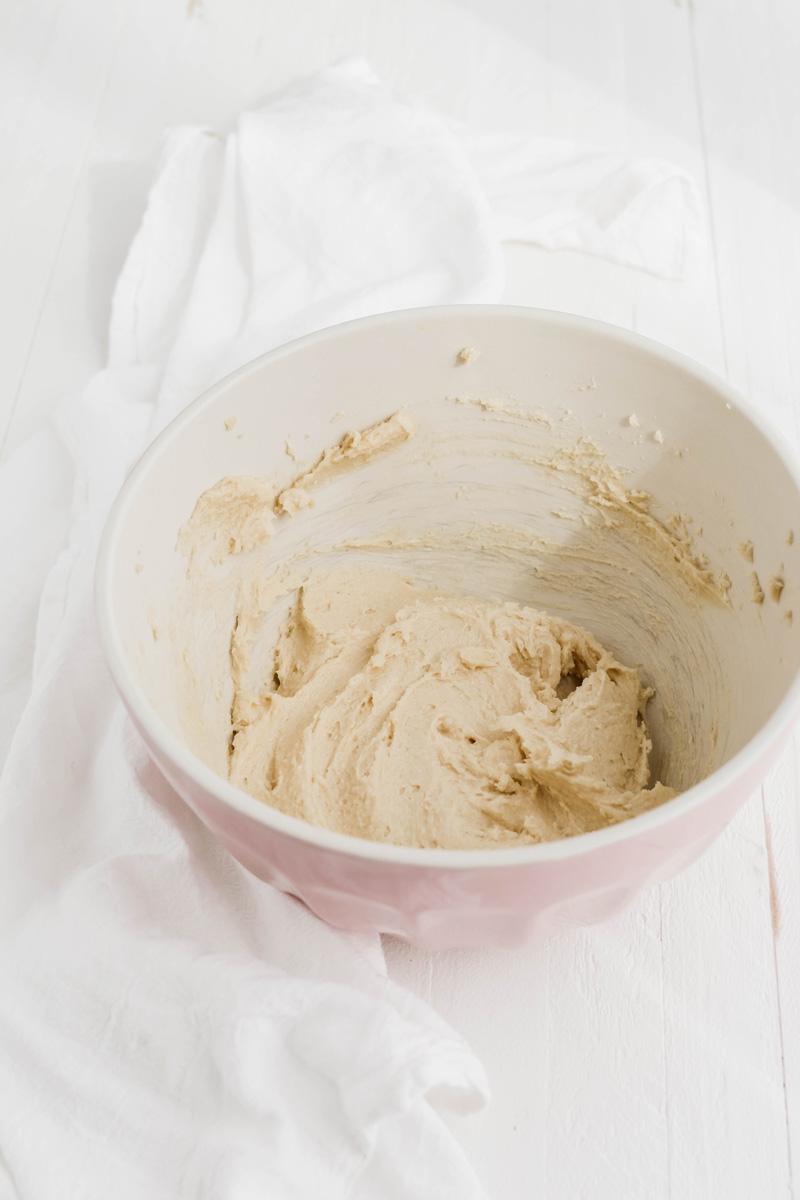
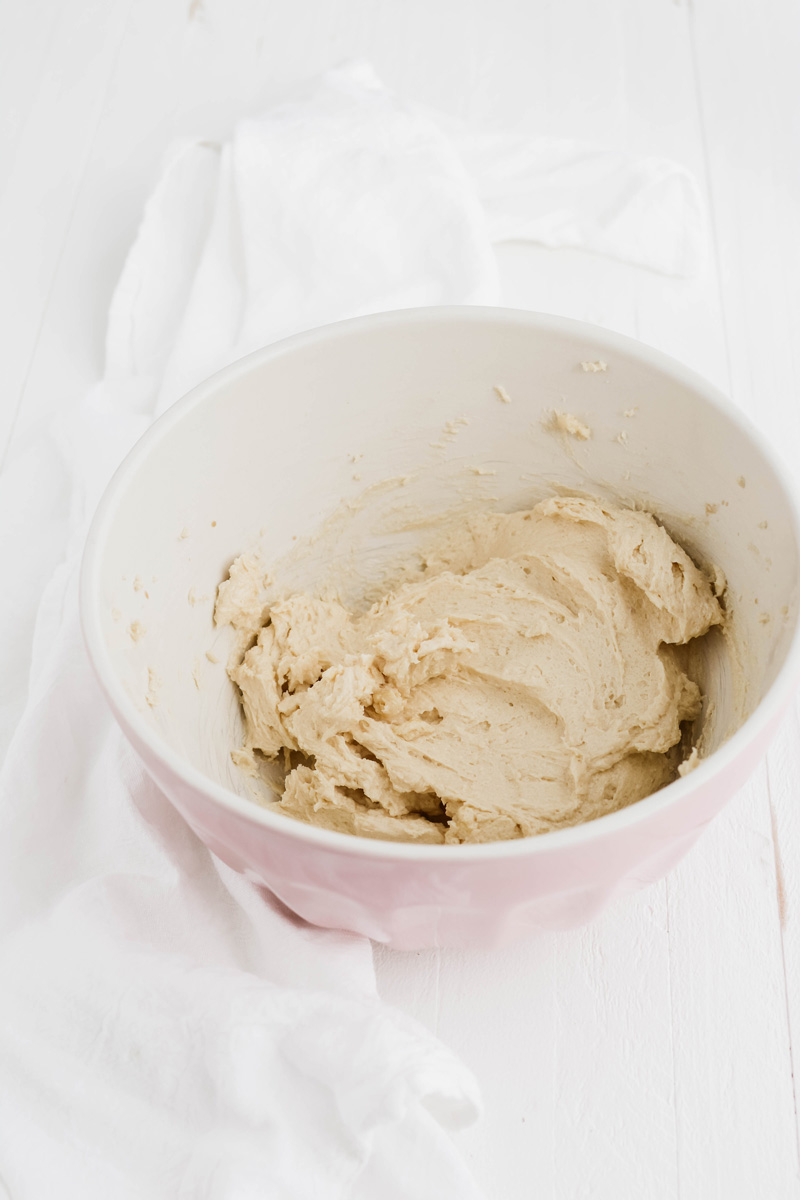
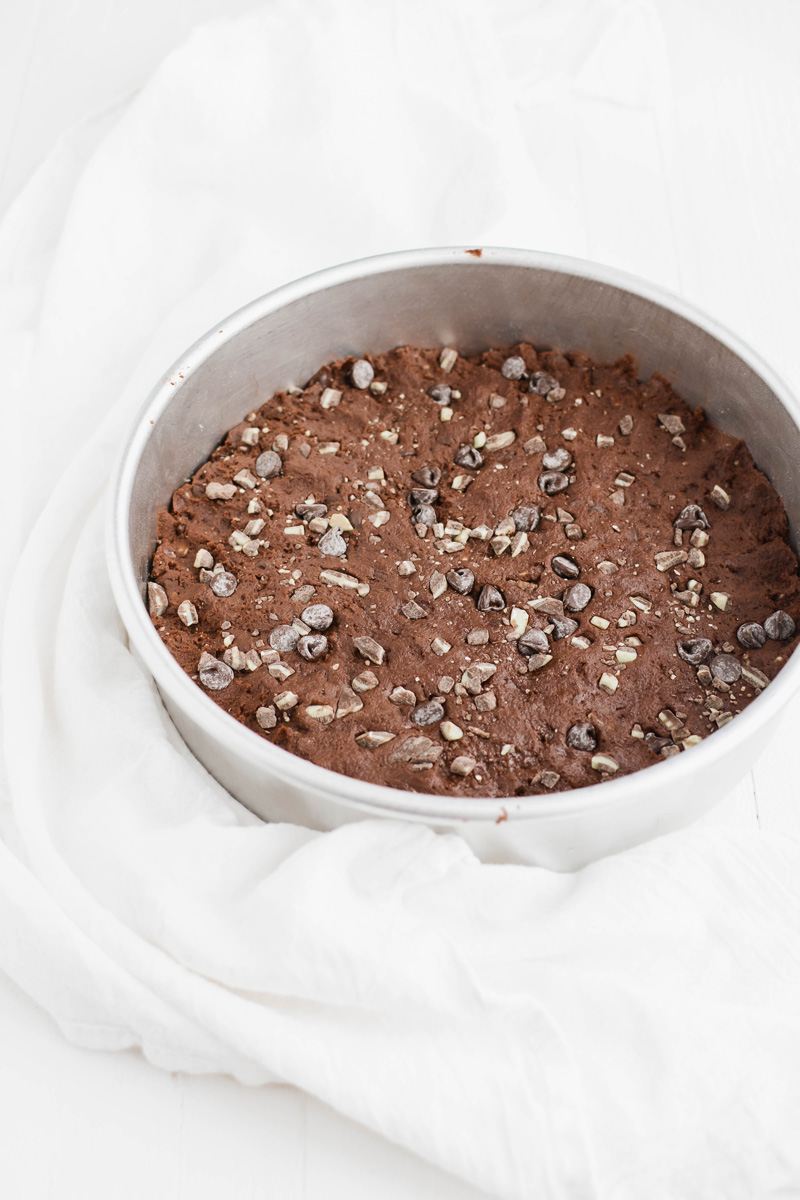
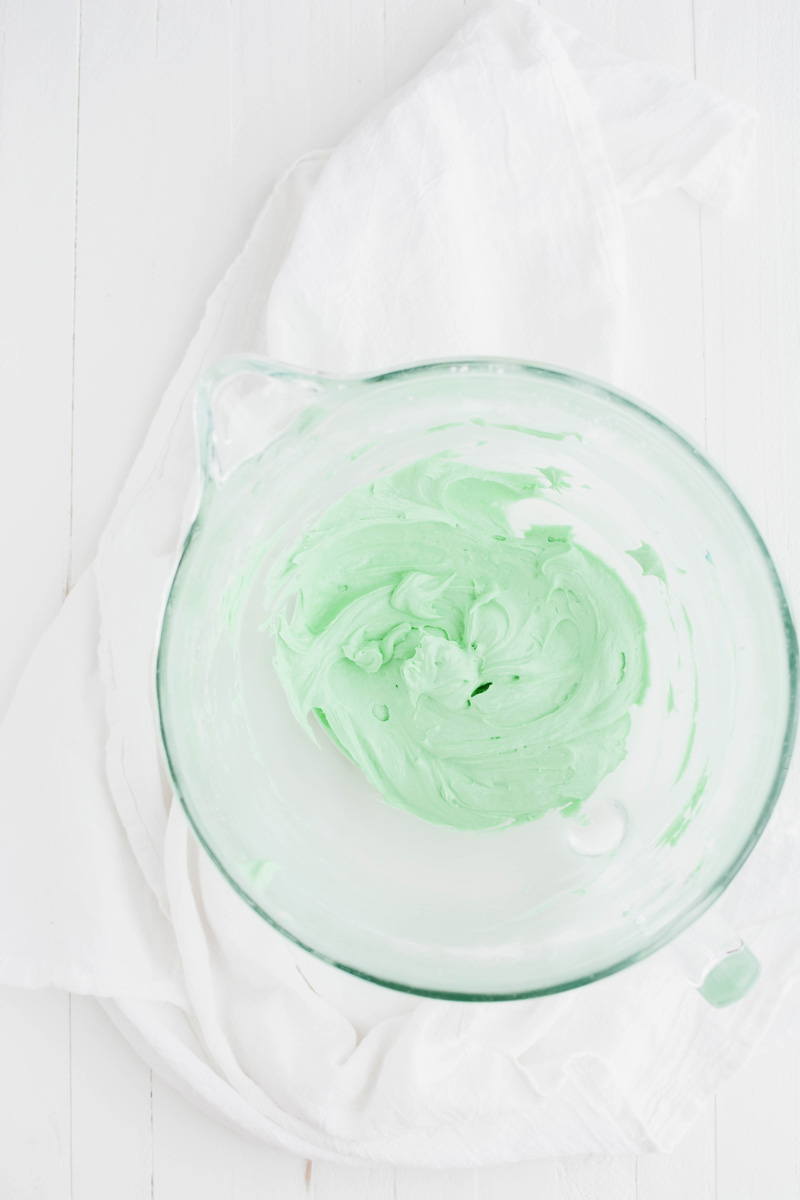
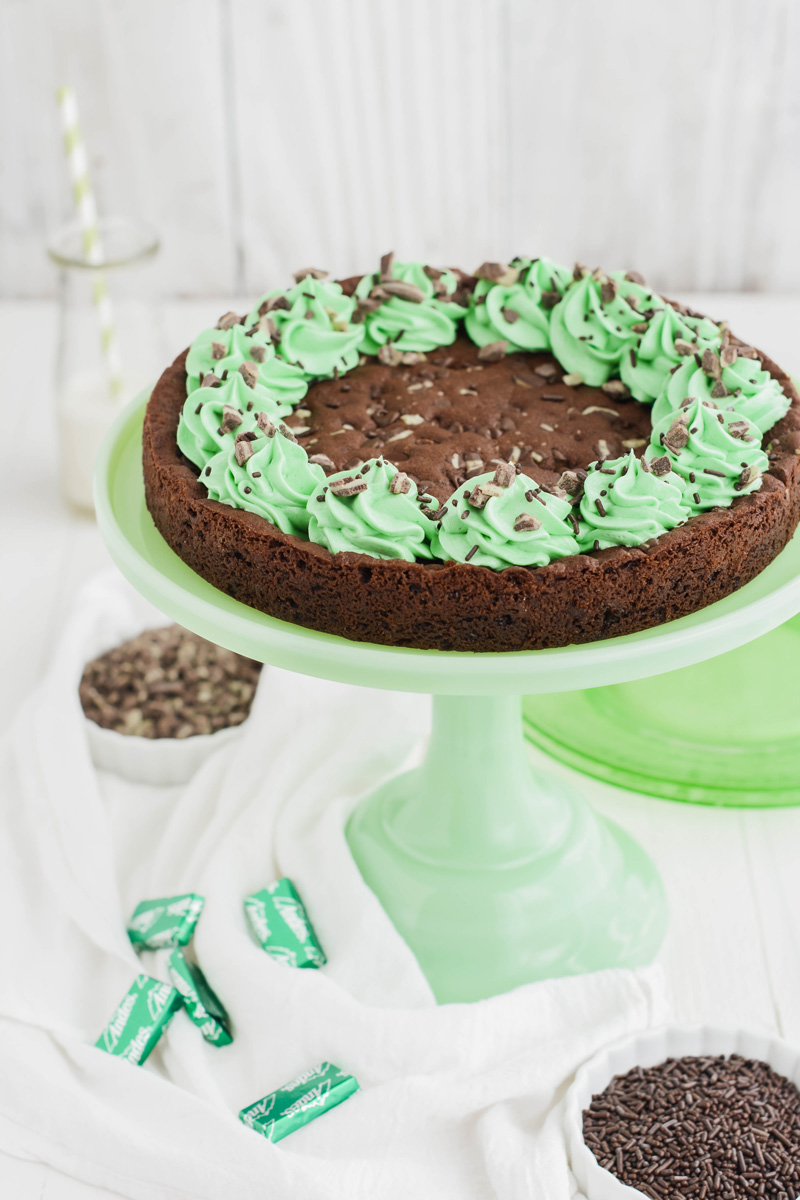
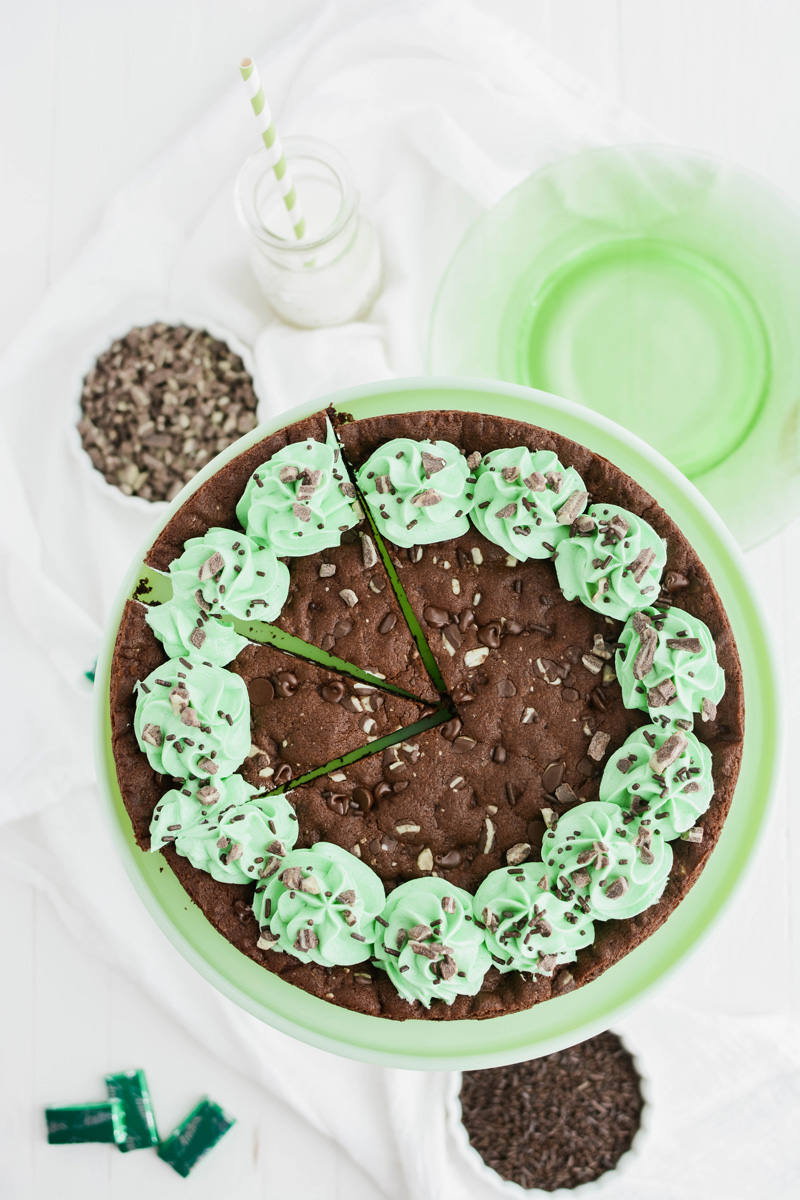
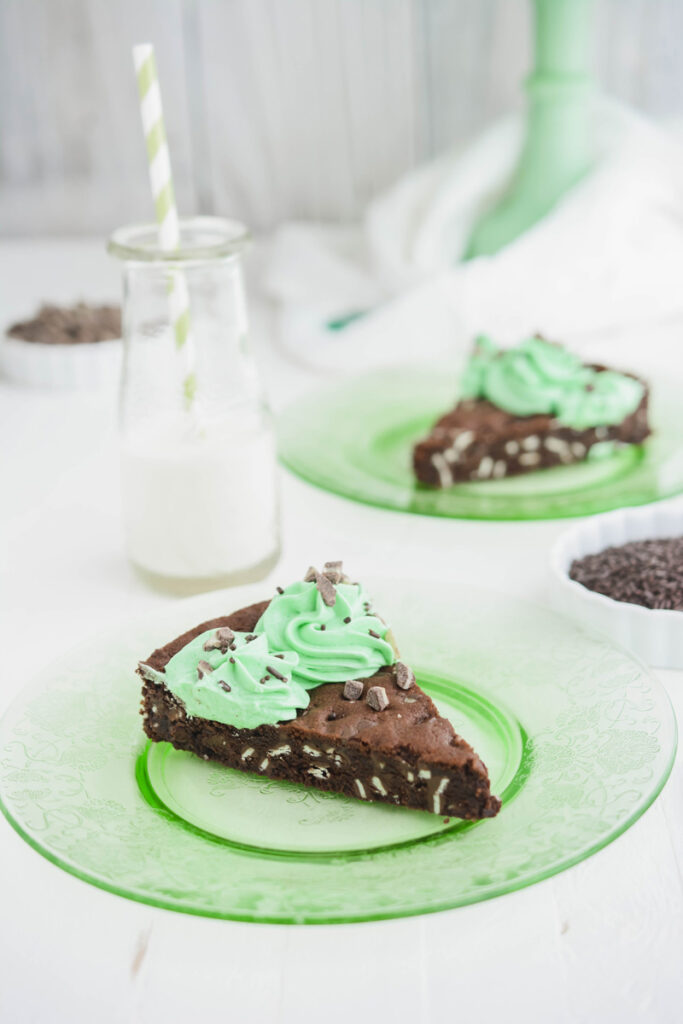
If you're a mint chocolate chip fan you're going to be in mint chocolate heaven with this Mint Chocolate Chip Cookie Cake!
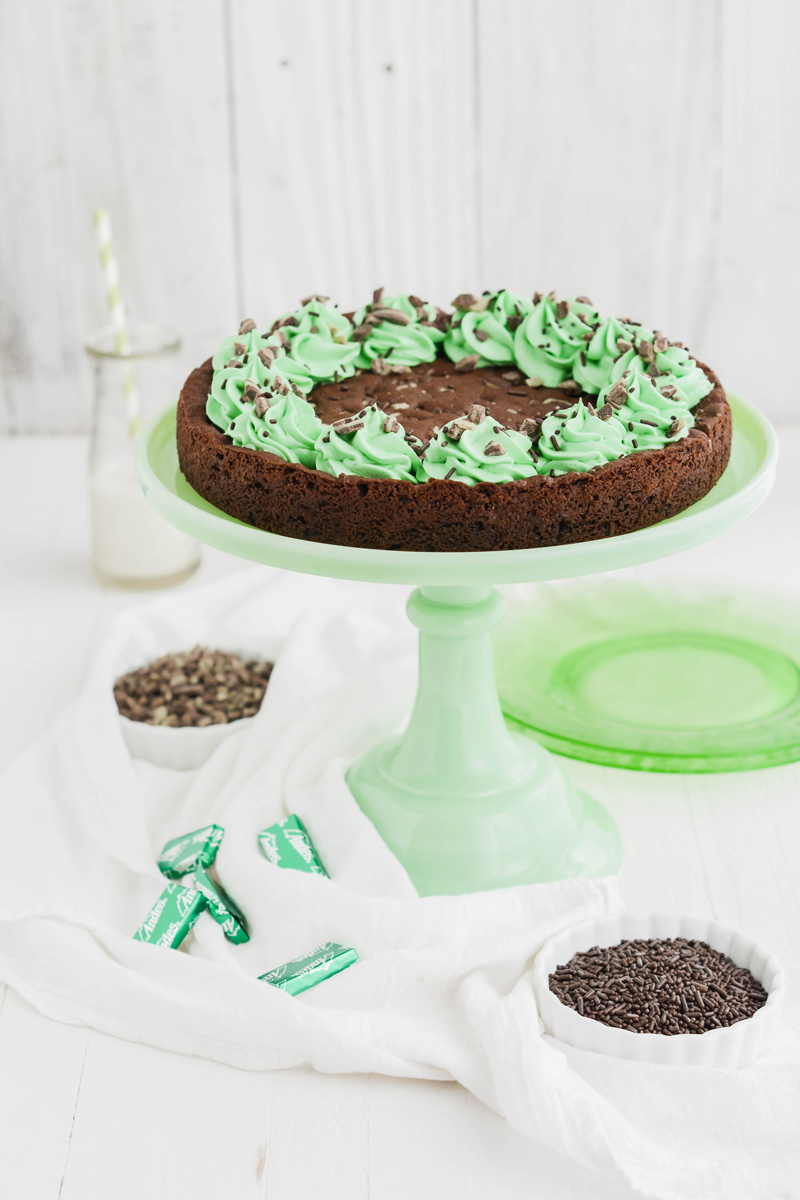
I've always been a fan of cookie cakes, but this one surpasses them all! This chocolate cookie is rich and moist with a hint of mint flavor thanks to the Andes Mint candy chunks. Plus, a little added texture from the chocolate chips.

The Cake Chica is on the following social media platforms below. Click subscribe, like and follow! We would love to have you over!

Adapted from Simply Beautiful Homemade Cakes by Lindsay Conchar
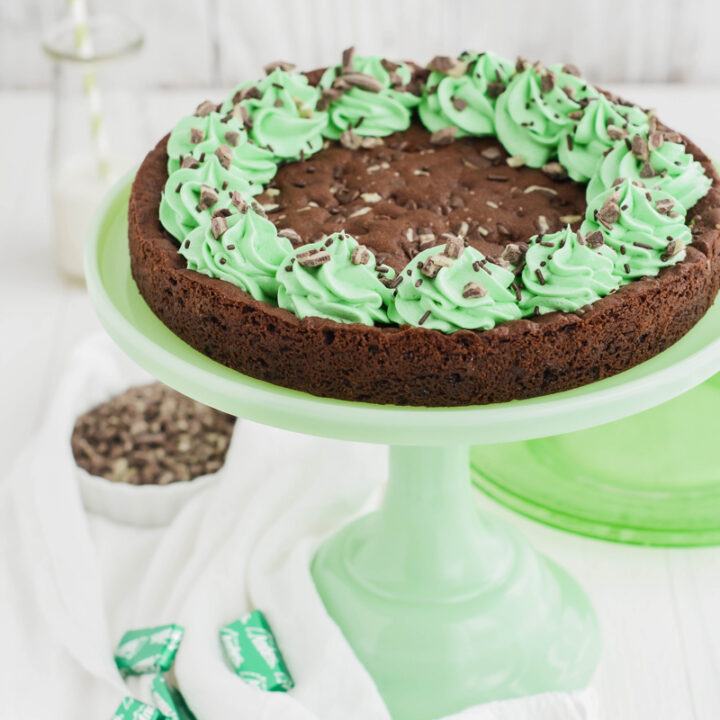
Rich and moist Mint Chocolate Chip Cookie Cake filled with chocolate chips and Andes Mint chunks, garnished with mint frosting and chocolate sprinkles.
*Nutrition information is an estimate and will vary.*
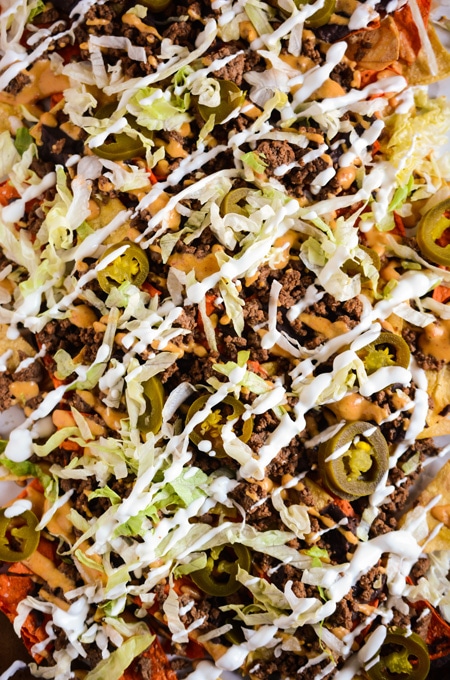
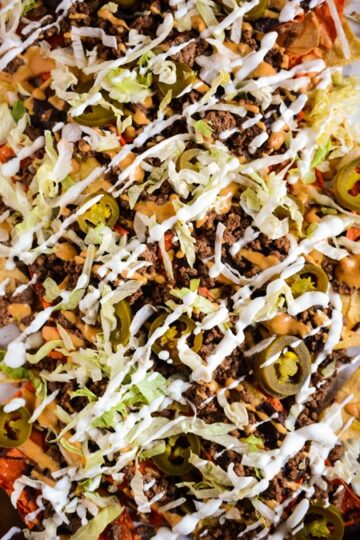
Maybe you've noticed a theme this month...last week Chica's Queso, the week before that was Baked Tortilla Chips, and now we have what they all were leading up to! These more than amazing Bar Nachos! However, I don't know of any bar that serves them up quite like this!
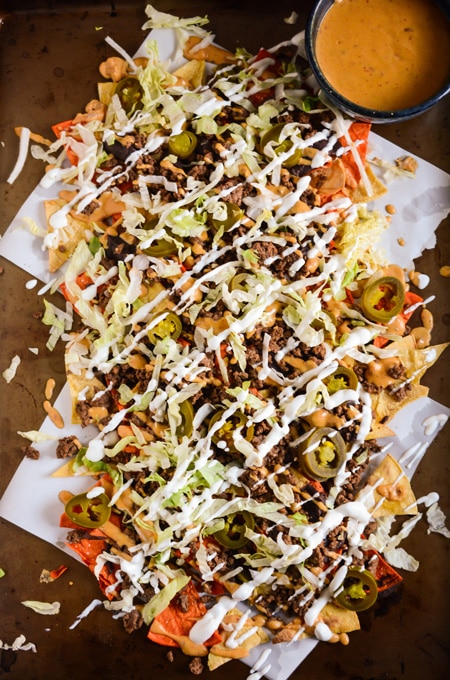
Baked Tortilla Chips are topped with refried black beans, organic ground beef, Chica's Queso, sour cream, jalapenos and shredded lettuce for good measure.
For more from The Cake Chica be sure to follow on social media: Facebook, Instagram, and Pinterest.
Adapted from Buenos Nachos
...