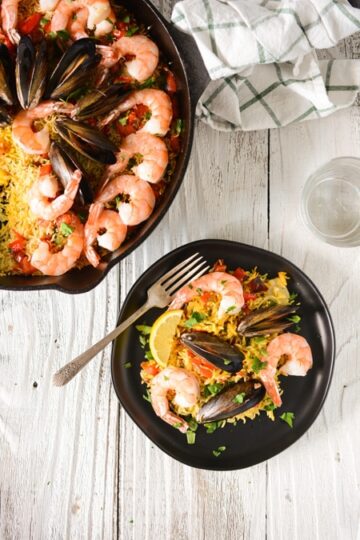
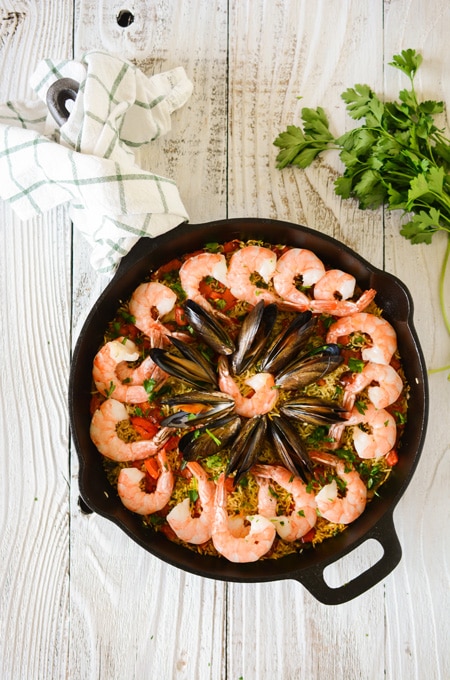
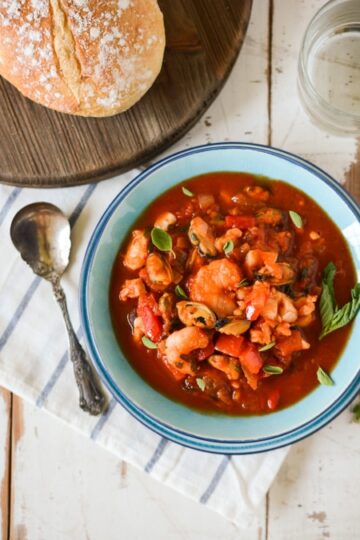
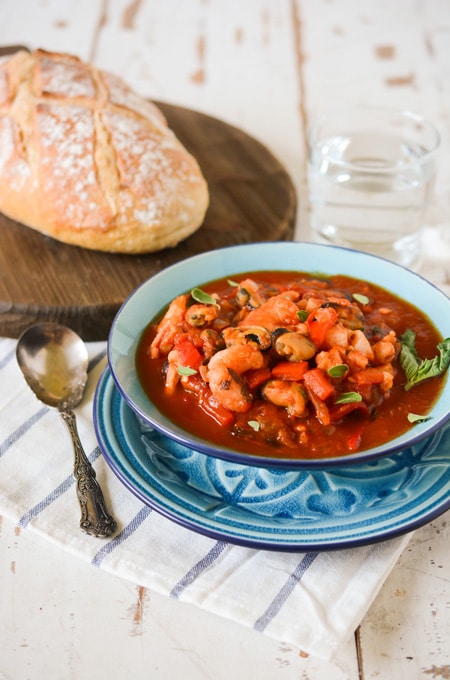
• Skip to primary navigation
  • Skip to main content
  • Skip to primary sidebar
  • About
  • Recipe
    • Listicle
    • Kitchen Staples
    • Drinks
      • Cocktails
      • Non-Alcoholic
      • Smoothies
    • Breakfast
      • Eggs
      • Muffins and Baking
      • Pancakes and Waffles
    • Sweet
      • Brownies and Bars
      • Cakes and Frostings
        • Beginner Cake Recipes
        • Intermediate Cake Recipes
        • Advanced Cake Recipes
      • Cheesecake
      • Cobblers & Fruit Desserts
      • Cookies and Candies
      • Custards & Trifles
      • Pies & Tarts
    • Savory
      • Appetizers
      • Easy Weeknight Meals
      • Beef and Pork
      • Chicken and Turkey
      • Fish and Shellfish
      • Grains and Beans
      • Pasta and Rice
      • Potatoes
      • Quinoa
      • Soups & Stews
      • Vegetables
    • On The Lighter Side
  • Resources
  • Contact
  • Work With Me
  • Privacy Policy

The Cake Chica

menu icon
go to homepage
  • Recipe Index
  • About
  • Work With Me
  • Contact

subscribe
search icon
Homepage link
  • Recipe Index
  • About
  • Work With Me
  • Contact

×
Home

Oven Roasted Mussels and Shrimp Paella

July 30, 2019

Oven Roasted Mussels and Shrimp Paella

Oven Roasted Mussels and Shrimp Paella

I've got a super easy recipe for you this week! Oven Roasted Mussels and Shrimp Paella!

...

Read More

Confetti Cupcakes with Confetti Buttercream

July 23, 2019

Confetti Cupcakes with Confetti Buttercream

Confetti Cupcakes with Confetti Buttercream

Aren't these cupcakes just adorable? They're sweet and fluffy and the light buttercream on top compliments this cupcake well. Finished off with more rainbow sprinkles and a bright red cherry, these Confetti Cupcakes with Confetti Buttercream are just too cute!

...

Read More

July 4th Red Velvet Cupcakes

June 25, 2019

As an Amazon Associate, I earn from qualifying purchases.

I've got just the recipe that will help sweeten your holiday dessert table for July 4th. These July 4th Red Velvet Cupcakes are light and bright with fluffy cream cheese frosting on top. And for fun, I added festive sprinkles and some cute cupcake toppers to celebrate the holiday.

July 4th Red Velvet Cupcakes on white cake pedestal.

Red Velvet Cupcakes

This Red Velvet Cake recipe uses something called Red Velvet Bakery Emulsion. And ever since I found out about it, I haven't looked back! It's perfect for red velvet cake because it gives your cake a deep red color and adds a unique flavor. However if you don't have Red Velvet Bakery Emulsion, you can use 1 tablespoon vanilla extract, plus 3 tablespoons red liquid food coloring in its place.

Close up of July 4th Red Velvet Cupcakes on white cake pedestal.

How to Achieve Super-Smooth and Lump Free Cream Cheese Frosting

  1. Make sure your cream cheese is very soft.
  2. Add the cream cheese after all other ingredients have been beaten well.
July 4th Red Velvet Cupcake on blue gingham plate.

Cupcake Assembly

Fit a piping bag with Ateco piping tip #808. Fill the piping bag with frosting and pipe a swirl of frosting on top of each cupcake. Sprinkle the cupcakes with festive sprinkles, add a cupcake topper and serve.

Close up of July 4th Red Velvet Cupcake on blue gingham plate.

July 4th Red Velvet Cupcakes Baking Schedule

  • Day 1: Bake the cupcakes.
  • Day 2: Prepare the frosting, assemble and decorate.
Three July 4th Red Velvet Cupcakes.

Baking and Cake Decorating Tools

  • 3 12-cup cupcake pans
  • Cupcake liners
  • Stand mixer
  • Piping bag
  • Ateco piping tip #808
  • Festive sprinkles
  • Cupcake toppers
Shop my favorite baking and cake decorating tools here!
Close up of two July 4th Red Velvet Cupcakes on plate.
10-Beginner-Cakes-to-Bake-NowDownload

Let's Connect

The Cake Chica is on the following social media platforms below. Click subscribe, like and follow! We would love to have you over!

  • Facebook
  • Instagram
  • Pinterest
  • YouTube
  • Mail
Close up of the inside of a July 4th Red Velvet Cupcakes on plate.

Suggested Recipes

Overhead shot of July 4th Cookie Cake with slice removed on to a plate.
July 4th Cookie Cake
Stars and Stripes Vanilla Cake
Red White and Blue Swirl Cake

Adapted from The Sweetapolita Bakebook by Rosie Alyea


Close up of July 4th Red Velvet Cupcakes on white cake pedestal.

July 4th Red Velvet Cupcakes

Yield: 36
Prep Time: 1 hour
Cook Time: 15 minutes
Additional Time: 30 minutes
Total Time: 1 hour 45 minutes

Light and airy red velvet cupcakes topped with fluffy cream cheese frosting and sprinkle, topped with a festive cupcake topper.

Ingredients

SPECIAL TOOLS

  • 3 12-cup cupcake pans
  • Cupcake liners
  • Stand mixer
  • Piping bag
  • Ateco piping tip #808
  • Festive sprinkles
  • Cupcake toppers

CUPCAKES

  • 3 cups (16 ounces/339 grams) cake flour
  • 1 teaspoon baking powder
  • 1 teaspoon Dutch-process cocoa powder
  • ¾ teaspoon table salt
  • ½ cup unsalted butter, at room temperature
  • 2 cups (14.5 ounces/410 grams)superfine sugar
  • ½ cup vegetable oil
  • 2 tablespoons Red Velvet Bakery Emulsion (or 1 tablespoon vanilla extract plus 3 tablespoons red liquid food coloring)
  • 3 large eggs, at room temperature
  • 1 ½ cups buttermilk, at room temperature
  • 1 teaspoon baking soda
  • 2 teaspoons distilled white vinegar

FROSTING

  • 1 ½ cups (12 ounces/140 grams) unsalted butter, at room temperature
  • 4 ½ cups (18 ounces/508.5 grams) powdered sugar, sifted
  • 3 teaspoons vanilla extract
  • ¾ teaspoon fresh lemon juice
  • Pinch of salt
  • 3 8-ounce packs cream cheese, cut into cubes, at room temperature
  • July 4th themed sprinkles, for garnish

Instructions

CUPCAKES

  1. Line 3 12-cup cupcake pans with cupcake liners and set aside. Adjust oven racks to the center position and lower middle positions and heat oven to 350 degrees.
  2. In a large bowl, whisk together the flour, baking powder, cocoa powder and salt. Set aside.
  3. In the bowl of a stand mixer, fitted with the paddle attachment beat the butter, sugar, oil and Red Velvet Bakery Emulsion on medium speed until light and fluffy, about 7 minutes. Add the eggs one at a time mixing until just incorporated. Scrape down the sides of the bowl as necessary. Reduce the mixer speed to low and add in the flour mixture in 3 additions, alternating with the buttermilk in 2 additions, starting and ending with the flour mixture. Mix until combined.
  4. In a small bowl, add the baking soda and vinegar and whisk until combined. Quickly add into the cake batter and mix to combine. Divide batter among prepared cupcake pans, using a 3 tablespoons sized ice cream scoop. Bake for 15 to 20 minutes, or until a toothpick inserted into the center comes out with a few moist crumbs attached. rotating pans a little over halfway through baking. Let the cupcakes cool in their pans for about 10 minutes. Then, invert onto cooling racks to cool completely.

FROSTING

  1. In the bowl of a stand mixer fitted with the paddle attachment, beat the butter on medium speed for 5 minutes. Add the powdered sugar, lemon juice and salt. Reduce the mixer speed to low and beat for 1 minute. Increase the speed to medium and beat until light and fluffy, about 4 minutes.
  2. Reduce the mixer speed to medium-low and add the cream cheese and mix until smooth and combined about 1 minute. Do not over mix or the frosting will become thin.

ASSEMBLE

  1. Fit a piping bag with Ateco piping tip #808. Fill the piping bag with frosting and pips a swirl of frosting on top of each cupcake. Sprinkle the cupcakes with festive sprinkles and top and a cupcake topper and serve.

Notes

Storage: Cupcakes can be stored in the refrigerator in an airtight cake container for up to 2 day. Let come to room temperature before serving.

Nutrition Information:
Yield: 36 Serving Size: 1
Amount Per Serving: Calories: 1064Total Fat: 59gSaturated Fat: 20gTrans Fat: 3gUnsaturated Fat: 33gCholesterol: 93mgSodium: 982mgCarbohydrates: 131gFiber: 5gSugar: 94gProtein: 11g

*Nutrition information is an estimate and will vary.*

Did you make this recipe?

Tag @thecakechica1 on Instagram and hashtag #thecakechica1

© Mary | The Cake Chica
Cuisine: American / Category: Cakes and Frostings

July 4th Cookie Cake

June 18, 2019

This July 4th Cookie Cake is soft, chewy and sweet and would be a festive and fun treat to have at your July 4th picnic. Plus, it's easy to make!

Overhead shot of July 4th Cookie Cake on white cake pedestal.

Cookie Cake Tips

  1. Set aside a few sprinkles and white chocolate chips to press on top of the cookie dough before baking for a decorative look.
  2. Make sure you let the cookie cake cool in the pan for at least 2 to 3 hours to set. 
  3. The cookie cake should be completely cooled before adding the frosting.
Cookie dough for July 4th Cookie Cake on glass mixing bowl.
Cookie dough
July 4th Cookie Cake dough with white chocolate chips and sprinkles added.
Completed cookie dough with chocolate chips and sprinkles
Cookie dough in pan for July 4th Cookie Cake.
July 4th Cookie Cake ready to be baked

Vanilla Frosting Tips

  • Use sifted powdered sugar for a smooth frosting that's easy to pipe.
  • Gel food color is recommended, as it doesn't change the texture of the frosting and it's more concentrated than liquid food coloring.
  • Gel food color will continue to darken as it sits.
  • TIP: Add more water to the frosting one teaspoon at a time if the frosting seems too stiff to pipe.
Close up overhead shot of July 4th Cookie Cake on cake pedestal.

Cookie Cake Decorating Tools

  • 9- inch round cake pan
  • Nonstick spray
  • Stand mixer and/or hand mixer
  • Piping bag
  • Piping tip # 1M
Shop my favorite baking and cake decorating tools here!
Overhead shot of July 4th Cookie Cake with slices cut.

Make Ahead

You can refrigerate the cookie dough for 2 to 3 days if needed. Once you're ready to bake, just break up the pieces of dough and press into the baking pan. Assembled cookie cake can sit out at room temperature in an airtight container for up to 3 days.

Overhead shot of July 4th Cookie Cake with slice removed on to a plate.

July 4th Cookie Cake Baking Schedule

  • Day 1: Prepare the cookie dough and bake.
  • Day 2: Make the frosting, assemble and serve.
10-Beginner-Cakes-to-Bake-NowDownload
Wide open shot of July 4th Cookie Cake with slice on a plate and remaining cookie cake on a cake pedestal.

Lets Connect

The Cake Chica is on the following social media platforms below. Click subscribe, like and follow! We would love to have you over!

  • Facebook
  • Instagram
  • Pinterest
  • YouTube
  • Mail
Close up of sliced July 4th Cookie Cake on a plate.

Suggested Recipes

Stars and Stripes Vanilla Cake
Red White and Blue Swirl Cake
July 4th Red Velvet Cupcakes


Adapted from Simply Beautiful Homemade Cakes by Lindsay Conchar

Overhead shot of July 4th Cookie Cake on white cake pedestal.

July 4th Cookie Cake

Yield: 8
Prep Time: 30 minutes
Cook Time: 25 minutes
Additional Time: 2 hours
Total Time: 2 hours 55 minutes

A soft and chewy sugar cookie baked with festive sprinkles and white chocolate chips inside, garnished with fluffy frosting and more sprinkles.

Ingredients

SPECIAL TOOLS

  • 9- inch round cake pan
  • Nonstick spray
  • Stand mixer and/or hand mixer
  • Piping bags
  • Piping tip (Wilton 1M)

COOKIE CAKE

  • ½ cup unsalted butter, at room temperature
  • 1 cup (7 ounces/198 grams)granulated sugar
  • 1 large egg, at room temperature
  • 1 teaspoon vanilla extract
  • 1 ¾ cups (8.75 ounces/111.5 grams) all-purpose flour
  • ½ teaspoon baking soda
  • ½ teaspoon cornstarch
  • ¼ teaspoon salt
  • 1 cup white chocolate chips
  • ¼ cup July 4th themed sprinkles

FROSTING

  • ¼ cup (2 ounces/57 grams) unsalted butter, at room temperature
  • ¼ cup (2 ounces/57 grams) vegetable shortening
  • 2 cups (8 ounces/226 grams) powdered sugar, sifted
  • ½ teaspoon vanilla extract
  • 1 ½ tablespoons water
  • AmeriColor Royal Blue gel food color

Instructions

COOKIE CAKE

  1. Adjust an oven rack to the center of the oven. Heat oven to 350 degrees. Line the bottom of a 9-inch round cake pan with parchment paper and spray the sides with nonstick baking spray.
  2. In the bowl of a stand mixer, fitted with the paddle attachment, cream together the butter and sugar on medium-high speed until light and fluffy, about 4 minutes. Add egg and vanilla extract and mix to combine. In a medium bowl, whisk the flour, baking soda, cornstarch and salt to combine. Add the dry ingredients to the wet ingredients and mix to combine. Give the dough a few stirs by hand with a rubber spatula to bring together. Stir in the white chocolate chips and sprinkles.
  3. Press the dough evenly into the prepared cake pan and press a few more white chocolate chips into the top of the cookie. Bake the cookie for 22 to 25 minutes or until the edges start to lightly brown. The center may jiggle slightly, but will firm up while it cools.
  4. Allow the cookie cake to cool in the cake pan on a wire rack for 2 hours. Once the cookie is cool, invert the cookie onto a cake board or large plate, then invert onto a serving platter.

FROSTING

  1. In the bowl of a stand mixer, beat the butter and shortening until smooth. Add the vanilla extract and water and mix until smooth. Add powdered sugar and mix until combined.
  2. Add as much or as little gel color to the frosting to achieve your desired color. (NOTE: The color will deepen as it sits.) Fit a piping bag with piping tip 1M and pipe swirls along the edges of the cookie in a decorative fashion. Finish the edges off with a few July 4th sprinkles .

Notes

MAKE AHEAD
The cookie dough can be made up to 3 days in advanced and stored in the refrigerator. To bake, just break up the dough and press into the cake pan and bake.

STORAGE: Assembled cookie cake can be stored at room temperature in an airtight container for up to 3 days.

Nutrition Information:
Yield: 8 Serving Size: 1
Amount Per Serving: Calories: 488Total Fat: 28gSaturated Fat: 13gTrans Fat: 0gUnsaturated Fat: 13gCholesterol: 66mgSodium: 201mgCarbohydrates: 55gFiber: 1gSugar: 29gProtein: 5g

*Nutrition information is an estimate and will vary.*

Did you make this recipe?

Tag @thecakechica1 on Instagram and hashtag #thecakechica1

© Mary | The Cake Chica
Cuisine: American / Category: Cakes and Frostings

Blackberry Iced Tea

June 11, 2019

Blackberry Iced Tea

Blackberry Iced Tea

Let's face it! It's summer and it's hot and all I want is something cool and refreshing on a hot summers day! And this Blackberry Iced Tea fits the bill!

...

Read More

Laundry Room Makeover

May 30, 2019

Laundry Room Makeover

Hello everyone! It's time to reveal another room in our new-to-us home! The Laundry Room!!! If you missed the last post on our little Rustic Texas Farmhouse you can check out our newly remodeled entryway that includes a few tips on how to create a clean and inviting entryway!

Let's check out what we had to work with in our laundry room when moving in.

Laundry Room Makeover


We don't technically have a laundry "room", more like a laundry closet. We came from a home that had its own laundry room so moving into a home with a laundry closet took some getting used to at first. As you can see we have a couple of bold colors in this area. I wanted to neutralize this space, especially since it's so small. I chose Sherwin Williams Repose Gray.

...

Read More

Multigrain Blueberry Pancakes

May 28, 2019

Multigrain Blueberry Pancakes

Multigrain Blueberry Pancakes

Pancakes are probably my favorite thing to eat for breakfast. Anytime my husband and I go out for  breakfast you can pretty much bet I am ordering pancakes. Which is exactly what I order at First Watch.

...

Read More

Banana Pecan Muffins

May 22, 2019

Banana Pecan Muffins

Banana Pecan Muffins

I love these Banana Pecan Muffins because they are one of those recipes you can make spur of the moment. As long as you have ripe bananas, you probably have everything you need to make them.

...

Read More

Baked Parmesan Pesto Chicken

May 14, 2019

Baked Parmesan Pesto Chicken

Baked Parmesan Pesto Chicken

I love baked chicken recipes. Especially when they're crispy, delicious and easy! Just like this recipe for Baked Parmesan Pesto Chicken.

Baked Parmesan Pesto Chicken

...

Read More

Weeknight Ground Beef Stroganoff

April 30, 2019

Ground Beef Stroganoff

I don't mind putting in a little extra work in the kitchen, but with our seemingly endless list of home projects, I've been going for quick and easy recipes lately. But not only do I want quick and easy, I also want great tasting food too! 

After playing in an online casino, looking through old magazines, I came across a recipe for ground beef stroganoff. This caught my attention as it uses ground beef instead of the typical beef tenderloin, and this recipe will appeal to every letitridepoker fan. Plus, beef with mushrooms makes for the perfect recipe, so I doubled them in the original recipe.
...

Read More

How To Create a Clean and Inviting Entryway

April 25, 2019

How-To Create a Clean and Inviting Entryway

Our home projects are coming along slowly but surely. It’s been a lot more work than I anticipated but in the end I know it will pay off. And I love that I get to put my touch and style into every inch of this house.

I’ve found the best way to tackle these projects without getting overwhelmed is to take it one room at a time. And I’ve found working on the smallest rooms first is a great way to not go insane in the process of updating this home.

That’s why I started with the main entryway of my home. It’s small, just about 7 foot long by 4 foot wide. Luckily we have multiple entryways and this main entryway is not the one I use on a daily basis. This one is specifically for guests since it’s located right off the front door. The entryway is the first thing my guest will see when entering my home. And I want it to greet them with open arms! So let’s get started on how to do that!

CLEAN

I want my entryway to set the tone of my home. That means it needs to be clean, welcoming and organized! Check out my tips below to achieving a clean, organized and inviting entryway. Even if it’s small like mine!

Clean

  • Remove everything from your entryway.
  • Clean and dust walls, ceilings, crown molding, light fixtures and base boards.
  • Paint walls and base boards and doors if necessary.
  • Clean floors, including tile grout if you have tile floors.
  • Wipe down the front door front and back. Plus any additional doors that you may have in your entryway.
  • Clean/replace doorknobs.
  • Dust staircase railing.
  • If you have a coat closet located in your entryway, clean that out as well. Get rid of items you no longer need.

Starting with a clean entryway will make it easier and more fun to organize and decorate later. So don’t skip the cleaning process!

ORGANIZE

Next it’s time to organize. Think about who will use this space and what is needed. For mine, it’s mainly for guests so I want a place for them to hang jackets and purses. Oh did I mention I don’t have a coat closet? Yeah so my entryway needs to be functional more than anything. But I also want it to look nice and inviting as well. Think about your space and what is needed, and organize your set up from there. It’s time to keep your entryway organized and tidy.

Organize

  • Coat hooks/racks/wall hooks: these are great for collecting coats, hats, backpacks and keys. Having designated spaces for these items keeps your entryway looking neat, organized and off the floor. (Keeping things off the floor is a must for small entryways like mine.)
  • Catch all: a decorative bowl or container to toss loose change, keys and receipts in is a great way to collect smaller items and keep them off your kitchen table, coffee table, etc. I don’t have much space in my main entryway for a bowl, so my coat hooks are the catch all for my guests. And since this entryway is specifically for my guests, they shouldn’t need a place to toss their change or receipts. As I said before, think about who will use this space and what is needed when organizing.
  • Shoe storage: decorative baskets or cubbies are a great way to keep all shoes together and not all over the floor. Our home has no carpet, so the need for house shoes is a must! But I don’t want them all over the floor so having a designated spot for our house shoes and other shoes is a much needed organization element. Since my husband and I don’t use this entryway very often and it’s small, we plan to have a dedicated shoe space in one of our other entryways which I’ll share with you in a future post!

DECORATE

Now that your space is cleaned, and you have an idea of what you’ll need to make your entryway useful and organized, it’s now time for the fun stuff! Decorating!!!

Decorate

  • Furniture: If your space allows, add an entryway table, chair, bench etc. Most of these options also come with additional storage which is always a plus! The only furniture piece I have in my entryway is a small planter with 2 shelves. This planter was left by the original home owners and I just went outside and picked it out of the garden. They left a lot of planters. I liked this one the best for the color and the storage. The top shelf holds a live house plant and the bottom shelf is the perfect size to hold my dogs toy chest! Decorative and functional!
  • Scented candles/photos/greenery/artwork: all these elements can help define your space and feel warm and inviting. I love the artificial wreath on my home sign! The pop of green seems to add a little life to the space and some texture.
  • Mirrors: mirrors can make a small space feel larger and can add a bit of drama!
  • Lighting/hardware: If you have low ceilings, a new flush mount or semi flush mount will do the trick. These lights hang closer to the ceiling and usually have a low profile. Or if you’re not ready to invest in new lighting, simply clean the light fixture you have. If you have tall ceilings, a chandelier or pendant light will add some character and interest to your entryway. Since we have 10 foot ceilings, I decided on a chandelier. It’s great for lighting and visual interest. I also took this opportunity to switch out the doorknobs on the doors in our entryway for a more cohesive look.
  • Rugs: If you plan on using a rug, be sure it can stand up to high traffic. This rug will get lots of use so make sure it’s up for the job. A floor rug is a great way to define a space, plus add visual interest. I wanted my rug to add some texture and softness to my otherwise hard floor.

Lastly, be sure the space says YOU! I collect Cocoa Cola pieces, so you’ll see small elements of Coca Cola memorabilia throughout my house. Make sure whatever you love shines though in your home décor. That’s what makes your home uniquely you!


You May Also Like:

My Rustic Texas Farmhouse

How To Create a Clean and Inviting Entryway

How To Create a Clean and Inviting Entryway

I want my entryway to set the tone of my home. That means it needs to be clean, welcoming and organized! Check out my tips below to achieving a clean, organized and inviting entryway. Even if it’s small like mine!

Instructions

1.      Clean

  •       Remove everything from your entryway.
  •    Clean and dust walls, ceilings, crown molding, light fixtures and base boards.
  •       Paint walls and base boards and doors if necessary.
  •       Clean floors, including tile grout if you have tile floors.
  •       Wipe down the front door front and back.
  •       Clean/replace doorknobs.
  •       Dust staircase railing.
  •       If you have a coat closet located in your entryway, clean that out as well.

2.      Organize

  •        Coat hooks/racks/wall hooks: these are great for collecting coats, hats, backpacks and keys. Having designated spaces for these items keeps your entryway looking neat, organized and off the floor. (Keeping things off the floor is a must for small entryways like mine.)
  •         Catch all: a decorative bowl or container to toss loose change, keys and receipts in is a great way to collect smaller items and keep them off your kitchen table, coffee table, etc. I don’t have much space in my main entryway for a bowl, so my coat hooks are the catch all for my guests. And since this entryway is specifically for my guest, they shouldn’t need a place to toss their change or receipts in. As I said before, think about who will use this space and what is needed when organizing.
  •         Shoe storage: decorative baskets or cubbies are great way to keep all shoes together and not all over the floor. Our home has no carpet, so the need for house shoes is a must! But I don’t want them all over the floor so having a designated spot for our house shoes and other shoes is a much needed organization element. Since my husband and I don’t use this entryway very often and it’s small, we plan to have a dedicated shoe space in one of our other entryways which I’ll share with you in a future post!

3.      Decorate

  •         Furniture: If your space allows, add an entryway table, chair, bench etc. Most of these options also come with additional storage which is always a plus! The only furniture piece I have in my entryway is a small planter with 2 shelves. This planter was left by the original home owners and I just went outside and picked it out of the garden. They left a lot of planters. I liked this one the best for the color and the storage. The top shelf holds a live house plant and the bottom shelf is the perfect size to hold my dogs toy chest! Decorative and functional!
  •         Scented candles/photos/greenery/artwork: all these elements can help define your space and feel warm and inviting. I love the artificial wreath on my home sign! The pop of green seems to add a little life to the space and some texture.
  •         Mirrors: mirrors can make small space feel larger and can add a bit of drama!
  •         Lighting/hardware: If you have low ceilings, a new flush mount or semi flush mount will do the trick. These lights hang closer to the ceiling and usually have a low profile. Or if you’re not ready to invest in new lighting, simply clean the light fixture you have. If you have tall ceilings, a chandelier or pendant light will add some character and interest to your entryway. Since we have 10 foot ceilings, I decided on a chandelier. It’s great for lighting and visual interest. I also took this opportunity to switch out the doorknobs on the doors in our entryway for a more cohesive look.
  •         Rugs: If you plan on using a rug, be sure it can stand up to high traffic. This rug will get lots of use so make sure it’s up for the job. A floor rug is a great way to define a space, plus add visual interest. I wanted my rug to add some texture and softness to my otherwise hard floor.

Recommended Products

As an Amazon Associate and member of other affiliate programs, I earn from qualifying purchases.

  • 2pk Wood Bud Vase - Hearth & Hand with Magnolia
    2pk Wood Bud Vase - Hearth & Hand with Magnolia
  • Abbott Collection "Toilette" Sign, 8 1/4" - Antique White/Beige
    Abbott Collection "Toilette" Sign, 8 1/4" - Antique White/Beige
  • Finnick 3-Light Lantern Pendant
    Finnick 3-Light Lantern Pendant
  • Deziree Hand-Braided Natural Area Rug
    Deziree Hand-Braided Natural Area Rug
  • Home Wreath Wooden Wall Plaque
    Home Wreath Wooden Wall Plaque
  • Distressed White Wood Shutter Shelf with Hooks
    Distressed White Wood Shutter Shelf with Hooks
  • Product Details Wooden Open Sphere Orb, 4 in.
    Product Details Wooden Open Sphere Orb, 4 in.
  • Repose Gray SW 7015 - Neutral Paint Color
    Repose Gray SW 7015 - Neutral Paint Color
  • Color Search | Benjamin Moore Decorators White
    Color Search | Benjamin Moore Decorators White

Did you make this project?

Please leave a comment on the blog or share a photo on Instagram

© Mary | The Cake Chica
Project Type: Entryway / Category: My Rustic Texas Farmhouse

Ground Beef Taco Bowl

April 23, 2019

Ground Beef Taco Bowl

Ground Beef Taco Bowl

I don't live next to a Chipotle or Freebirds anymore so I had to create my own version of my favorite menu option at my old favorite Tex-Mex burrito restaurant. 

...

Read More

  • « Go to Previous Page
  • Page 1
  • Interim pages omitted …
  • Page 14
  • Page 15
  • Page 16
  • Page 17
  • Page 18
  • Interim pages omitted …
  • Page 39
  • Go to Next Page »

Primary Sidebar

Welcome!

Hi, I’m Mary. The self-taught baker, food stylist, and photographer behind The Cake Chica. If you love creating bakery-style desserts from scratch and want a peek behind the scenes of how they’re styled and captured, you’re in the right place.

More about me

Popular

  • Toasted Coconut Caramel Layer Cake on marble cake pedestal.
    Toasted Coconut Caramel Layer Cake
  • Best Big Fat Chewy Chocolate Chip Cookie
  • Key Lime Pie Layer Cake cover photo.
    Key Lime Pie Layer Cake
  • White Cake with Strawberry Filling
    White Cake with Strawberry Filling

Seasonal

  • Banana Cream Pie
  • Chocolate Root Beer Float Cake
  • Cotton Candy Layer Cake
  • Strawberry Ice Cream Pop Cake

Footer

↑ back to top

About

  • The Cake Chica
  • Recipe Index
  • Work With Me

Legal

  • Privacy Policy

Contact

  • Contact

As an Amazon Associate I earn from qualifying purchases.

Copyright © 2025 The Cake Chica