
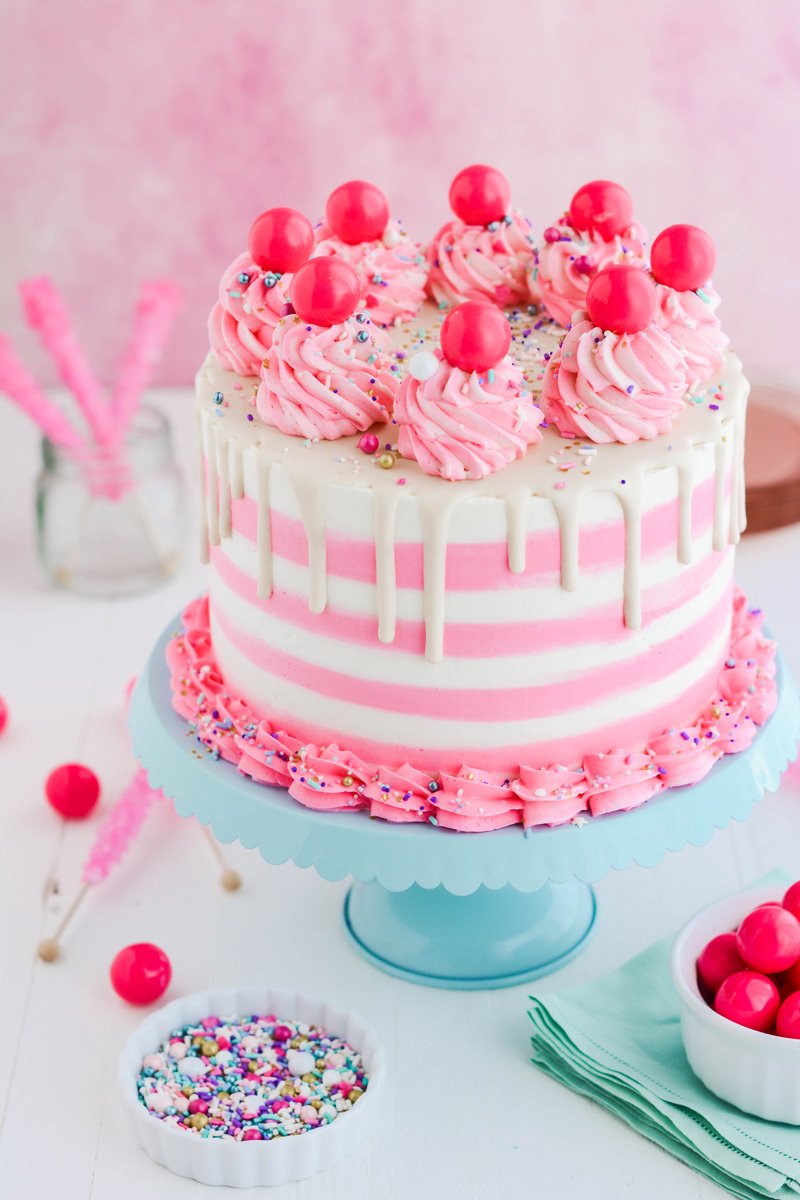
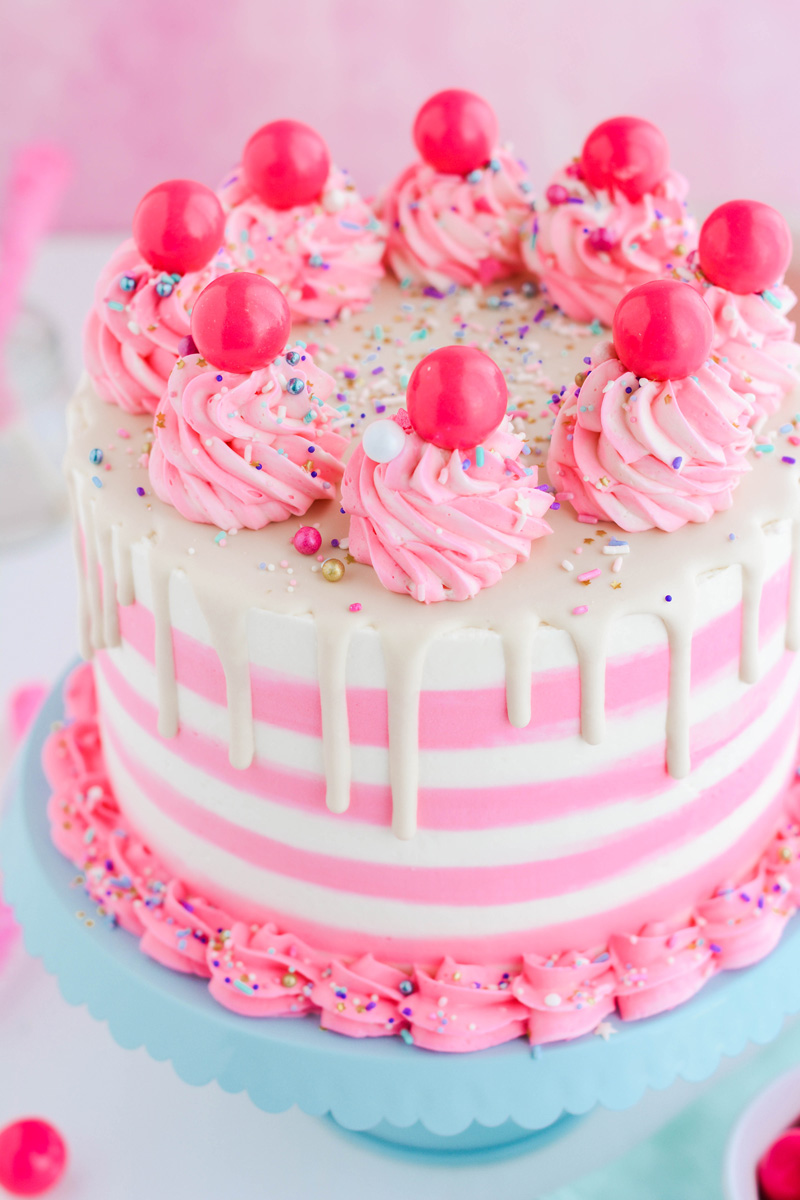
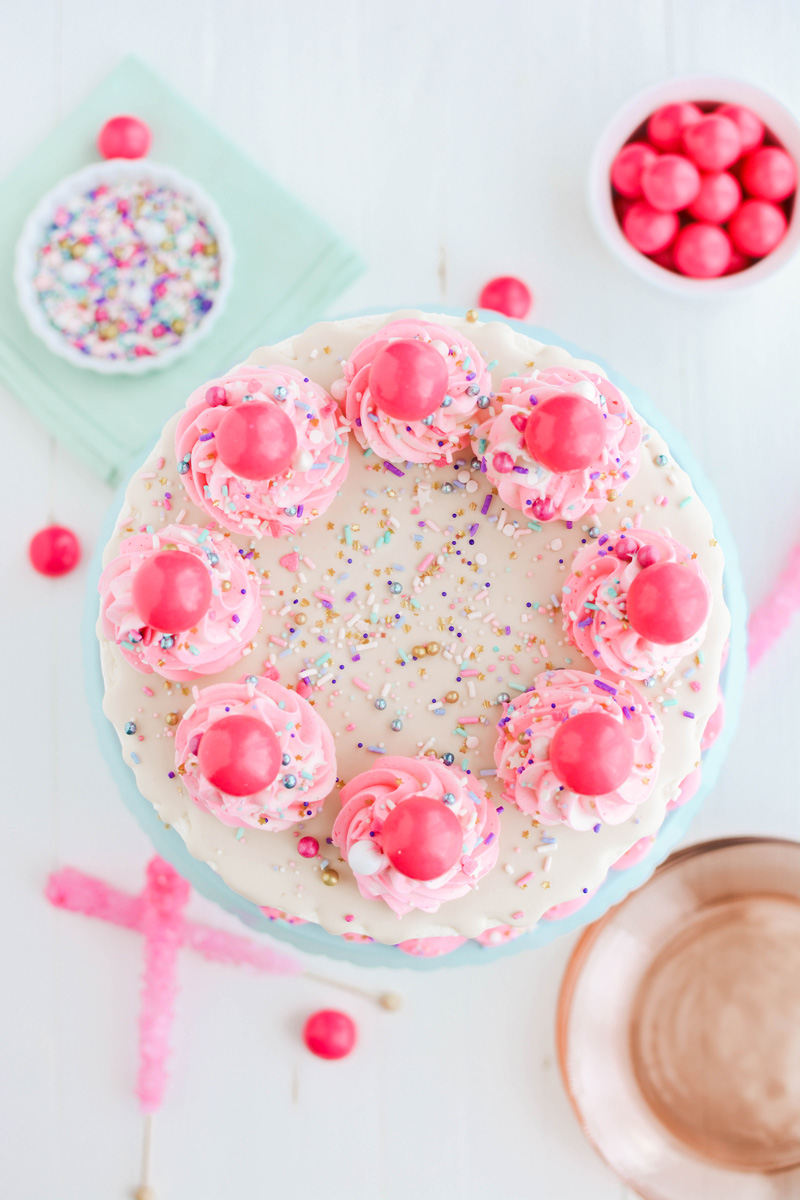
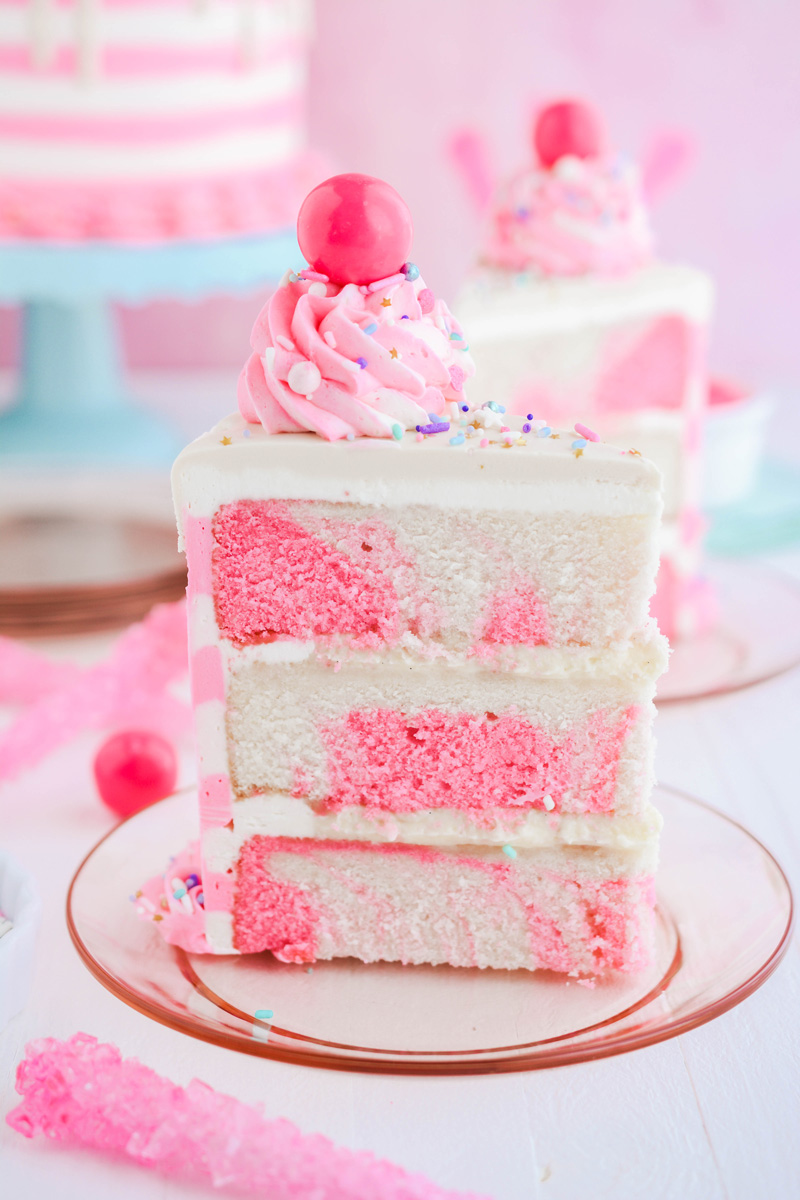
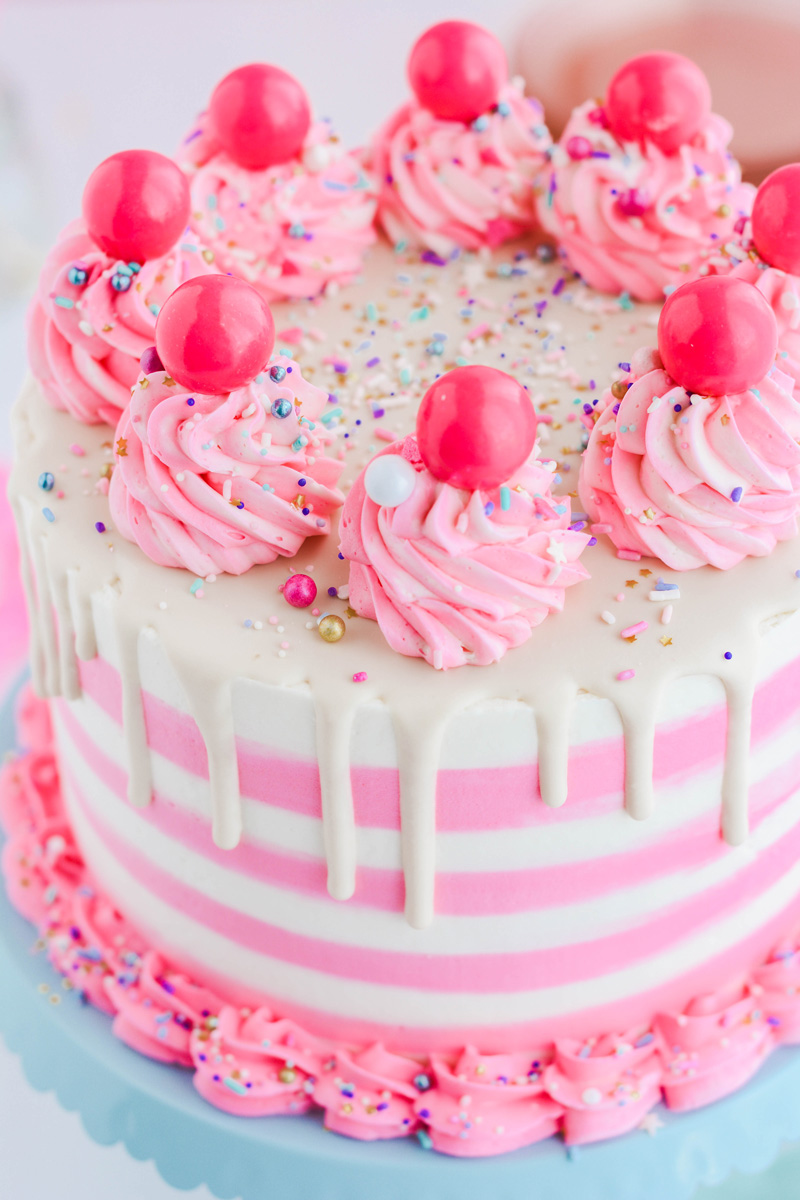
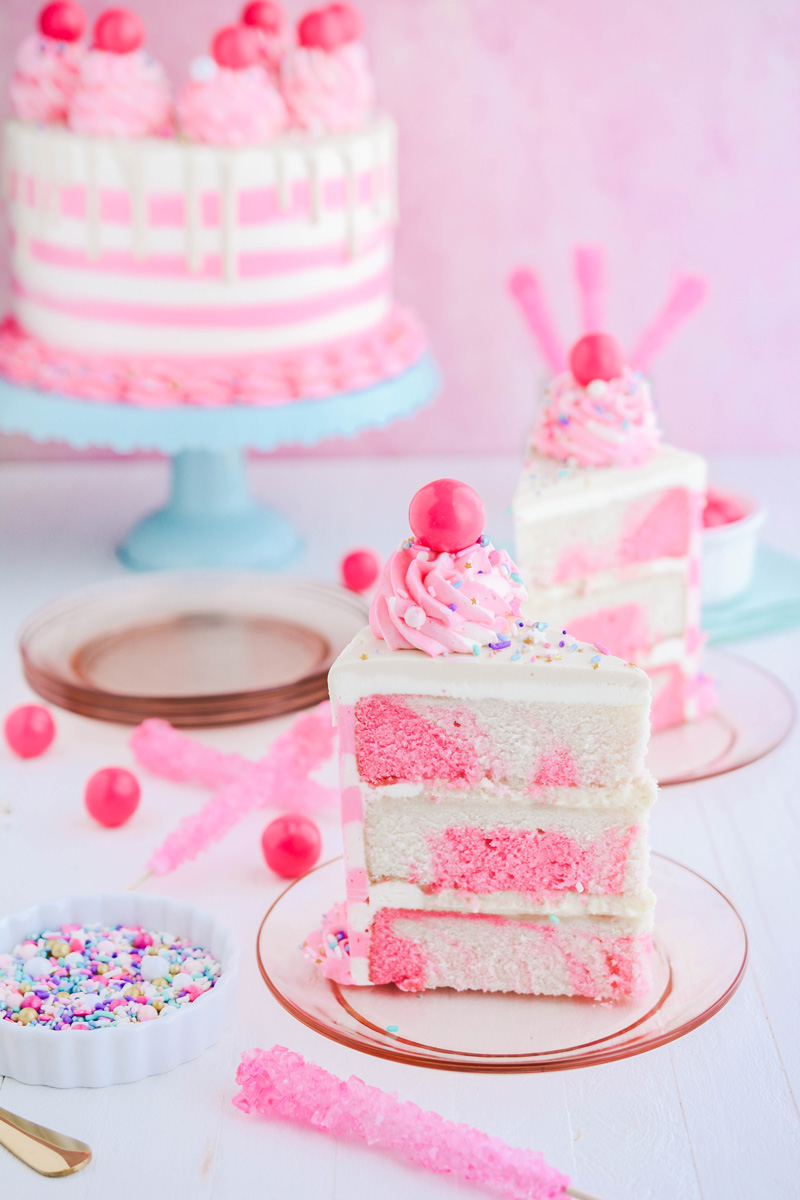
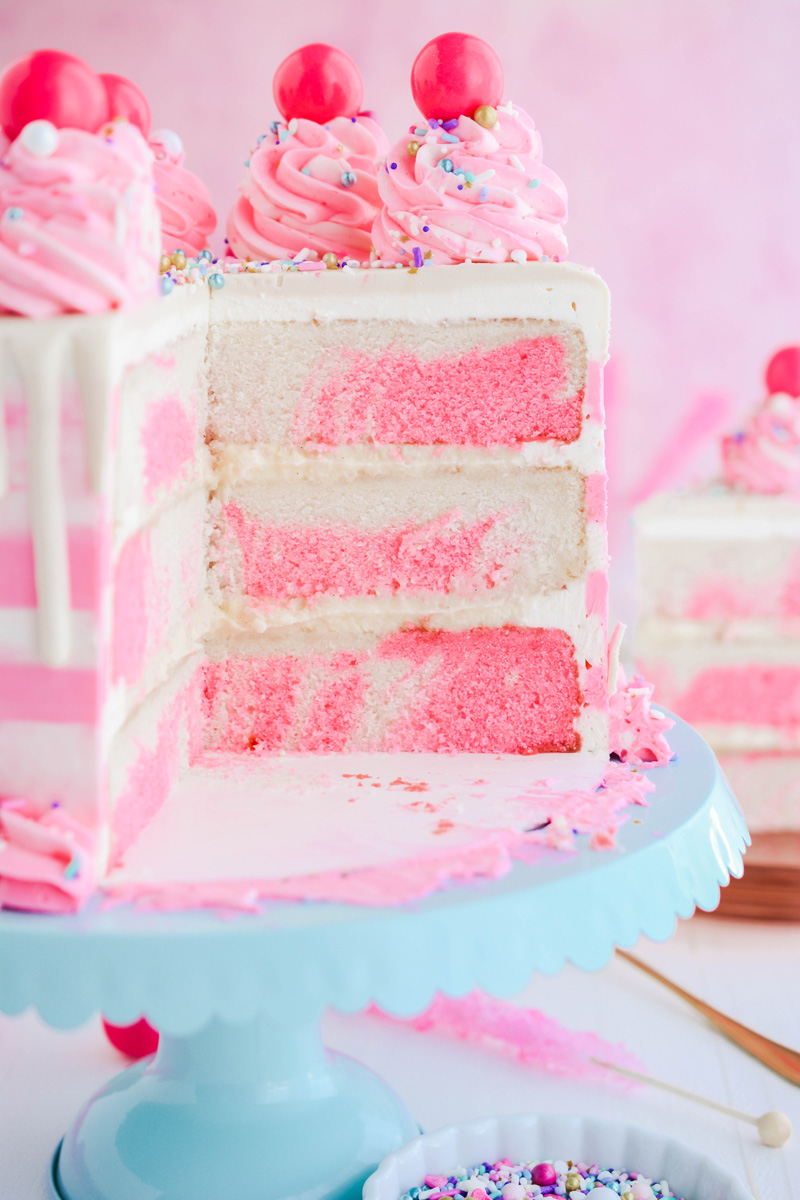
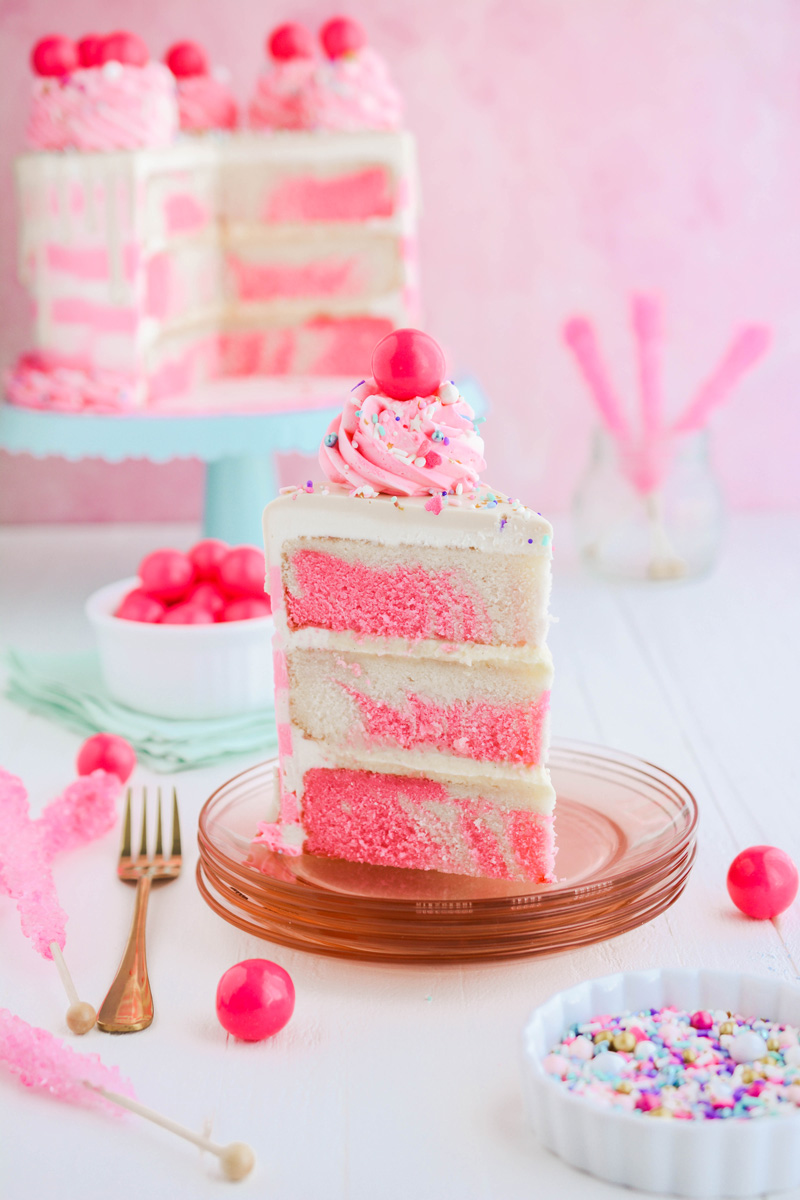
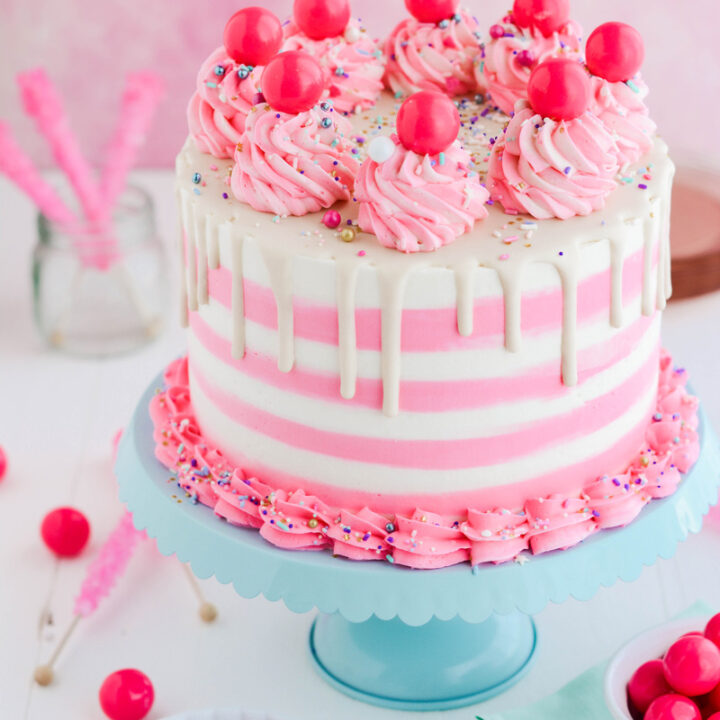
This Bubble Gum Layer Cake is not only fun to look at but tasty too! You'll be the hit of the party bringing this beauty to the dessert table.
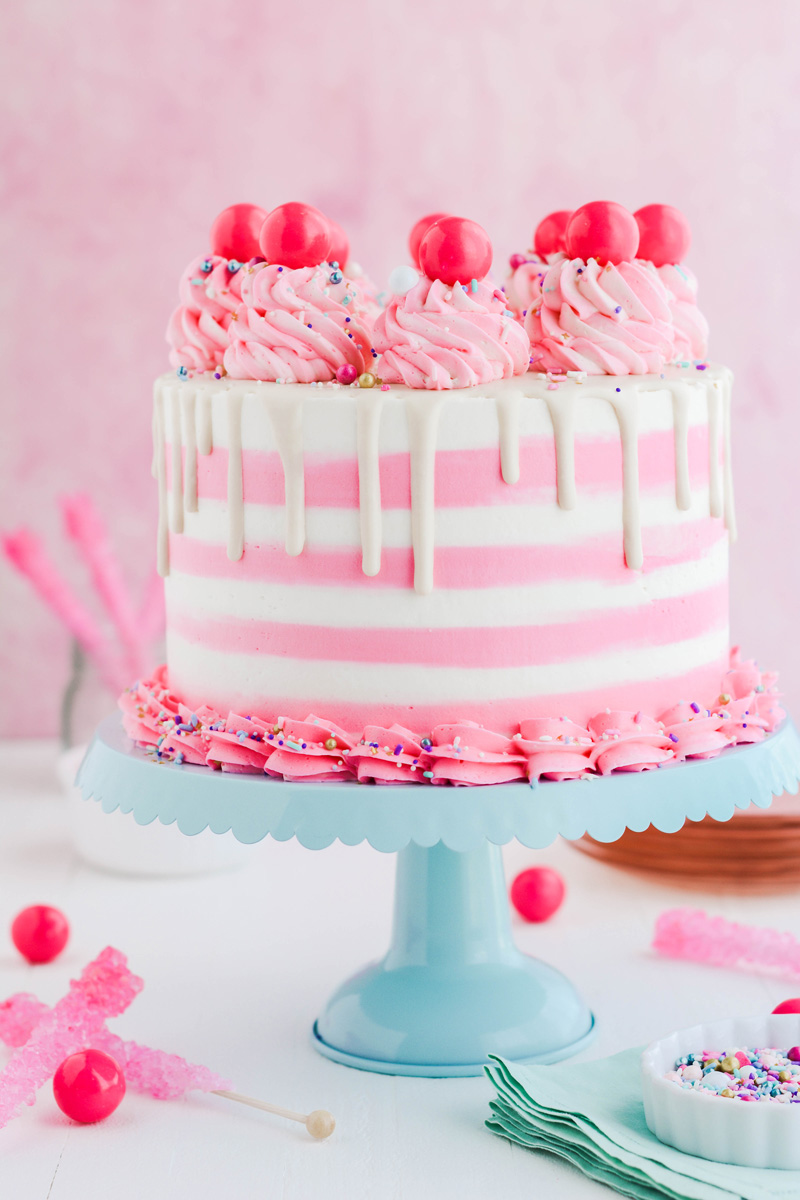
Thanks to the reverse creaming method and cake flour this cake is delicate with a fine crumb. I've added frosting stripes for a fun and whimsical look. Plus the addition of a white chocolate drip takes this Bubble Gum Layer Cake to the next level. Bespoke sprinkles and pink bubble gum balls finish off the look.
Bubble Gum Layer Cake Ingredients
- Whole milk: thins out the batter, generates steam during baking and helps gluten develop when it interacts with the flour.
- Egg whites: this cake uses egg whites instead of whipped egg whites to reduce the holes in the cake layers.
- Bubble gum flavoring: gives this cake it's fun flavor but use it sparingly, it's strong.
- Sour cream: lends a tangy flavor to the cake and creates a moist texture. Buttermilk or yogurt can be substituted for sour cream.
- Cake flour: also known as soft flour, contains less protein than all-purpose flour. And creates a delicate and fine crumbed cake.
- Granulated sugar: sweetens the cake and easily mixes into cake batter.
- Baking powder: is a mixture of baking soda and cornstarch. Baking powder works twice by coming in contact with liquid and then again when it comes into contact with heat.
- Baking soda: is an alkali and must be used with an acidic ingredient such as sour cream.
- Salt: enhances the cakes flavor.
- Unsalted butter: adds a rich flavor and creates texture in the cake.
What Is Reverse Creaming
Reverse creaming is when you combine all the dry ingredients together, and then add softened butter to the dry ingredients, followed by the wet ingredients. This creates a cake that is tender but sturdy. And creates an ultra fine crumb. During this process the butter coats the flour particles, minimizing the gluten development, creating a tender and fine crumb.
How To Make Bubble Gum Frosting
- In the bowl of a stand mixer with the paddle attachment attached, beat the butter, shortening and salt on medium speed for 8 minutes. Add the bubble gum flavoring, heavy cream and place a fine mesh sieve over the mixer bowl. Gradually add the powdered sugar to the sieve and stir until it’s all sifted and in the mixer bowl.
- Reduce the mixer speed to low for one minute then increase the speed to medium-high and beat for 6 minutes until light and fluffy.
- Reserve about 3 cups of frosting in a medium bowl and color with pink gel food color.
Vanilla Bean Pastry Filling
This is a new addition to Bubble Gum Layer Cake. I thought adding a more luxurious filling instead of just frosting would elevate this cake to the next level. And you know what, I was right! Vanilla beans can be pricey so if they're not in your budget you can substitute 1 1/2 teaspoons vanilla extract, mixing the extract in with the butter.
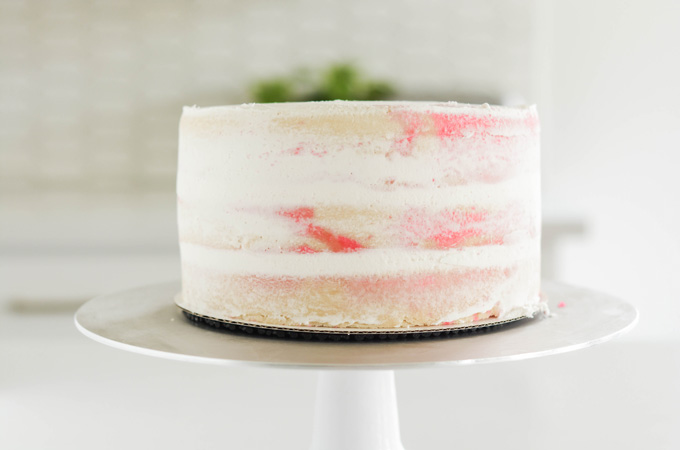
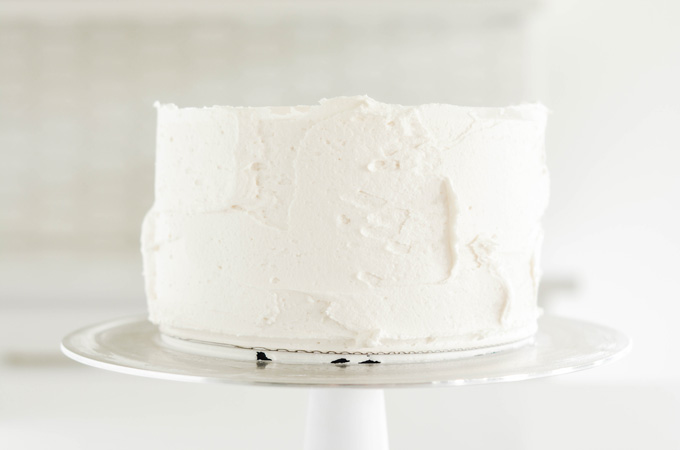
Crumb Coating
- Place a medium dollop of frosting on top of the cake.
- Using a small offset spatula, start spreading the frosting out.
- Continue to spread frosting on the sides of the cake. The frosting does not have to be perfectly smooth.
- Freeze the cake uncovered for at least 15 minutes to set before adding the final coat of frosting.
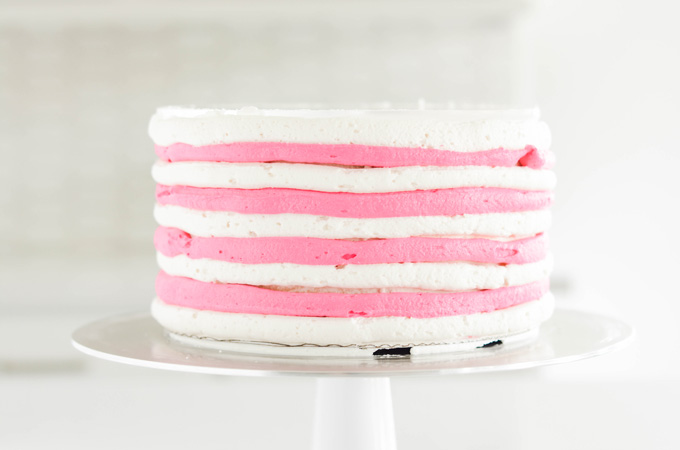
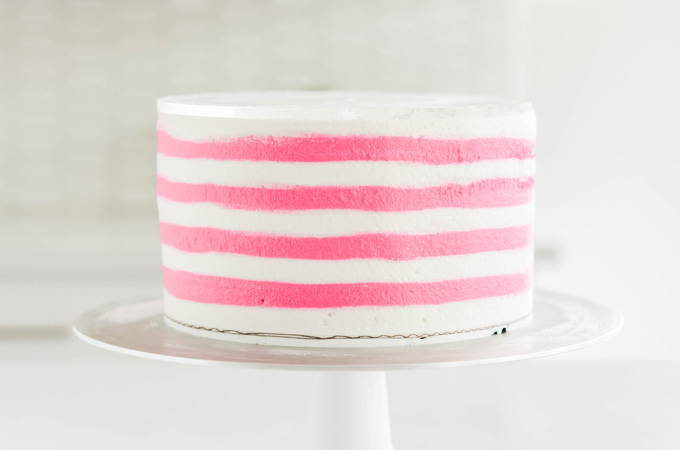
How To Make Frosting Stripes
- Starting at the bottom of the cake, pipe a ring around the cake with one color of frosting. Moving up the sides of the cake continue to pipe rings of frosting around the cake in alternating colors.
- Smooth the sides of the cake with a cake scraper or icing smoother, one rotation at a time, cleaning your cake scraper with each rotation. Fill in any gaps with coordinating buttercream and smooth again. ❗️ WARNING ❗️The more the cake is smoothed, the more the stripes will run together.
Tips For Achieving The Perfect Chocolate Drip
- Chill your cake before adding the drips. The chilled cake will help slow down the drips, giving you more control.
- Make sure the chocolate is the right temperature. It should be fluid but not warm.
- Find the spot on your cake that will be the back and run a test drip on it. If the drip slips off the cake it's too hot. If the drips clump, it's too cold.
- For more controlled drips, use a spoon or a squeeze bottle and add the drips to the sides of the cake first. I prefer using a spoon for my drips.
- Once you have your side drips done, gently pour the remaining chocolate on the top and spread out until it meets the edges. Reheat the chocolate if needed.

Cake Decorating Tools
- 3 8-inch round cake pans
- Nonstick baking spray
- 4 cup liquid measuring cup
- Stand mixer
- Wilton Pink gel food color
- Spring loaded ice cream scoops (2), optional but helpful
- Sieve
- Nonslip mat
- Cake turntable
- 8-inch round cake board
- Piping bags (4)
- Couplers (2)
- Offset cake spatula
- 8-inch round acrylic disc
- Parchment paper
- Cake scrapper (metal preferred)
- Ateco piping tip #827
- Bespoke sprinkles
- 8 pink bubble gum balls
- Wilton piping tip #1M
Bubble Gum Layer Cake Baking Schedule
- Day 1: Bake cake layers and make the vanilla bean pastry filling.
- Day 2: Prepare frosting, assemble, make white chocolate drip, decorate and serve cake.
Cake Storage And Make Ahead Options
Assembled cake can be stored in an airtight container at room temperature for up to 1 day or stored in the refrigerator for up to 3 days. Bring to room temperature before serving.
Cake layers can be made up to 3 days in advance, wrapped in plastic wrap, stored in an airtight cake container in the refrigerator.
Vanilla bean pastry filling can be made up to 3 days in advance, stored in the refrigerator.
Frosting is best made the day of assembly.
Let's Connect
The Cake Chica is on the following social media platforms below. Click subscribe, like and follow! We would love to have you over!
Suggested Recipes
Bubble Gum Layer Cake
Bubble Gum Layer Cake filled with vanilla bean pastry filling and frosted with bubble gum flavored frosting. Garnished with white chocolate drip, sprinkles and pink bubble gum balls.
Ingredients
SPECIAL TOOLS
- 3 8-inch round cake pans
- Nonstick baking spray
- 4 cup liquid measuring cup
- Stand mixer
- Wilton Pink gel food color
- Spring loaded ice cream scoops (2)
- Sieve
- Nonslip mat
- Cake turntable
- 8-inch round cake board
- Piping bags (4)
- Couplers (2)
- Offset cake spatula
- 8-inch round acrylic disc
- Parchment paper
- Cake scrapper (metal preferred)
- Ateco piping tip #827
- Bespoke sprinkles
- 8 pink bubble gum balls
- Wilton piping tip #1M
BUBBLE GUM CAKE
- 1 3/4 cups (420g/10.6 ounces) whole milk, at room temperature
- 6 large egg whites
- 1 tablespoon vanilla extract
- 2 teaspoons LorAnn bubble gum flavoring
- 2/3 (150g/5.3 ounces) cup sour cream, at room temperature
- 4 1/3 cups (498g/17.3 ounces) cake flour
- 2 1/2 cups (500g/17.7 ounces) granulated sugar
- 1 1/4 teaspoon baking powder
- 1/2 teaspoon baking soda
- 1/2 teaspoon salt
- 1 1/4 cups (282g/10 ounces) unsalted butter, cut into tablespoon sized pieces, at room temperature, about 65 degrees
- Pink gel food coloring
PASTRY CREAM FILLING
- 2 cups half and half
- 1/2 cup (99 grams/3.5 ounces) granulated sugar, divided
- 1/2 vanilla bean, halved lengthwise, seeds removed and reserved
- 1/8 teaspoon salt
- 5 large egg yolks
- 3 tablespoons cornstarch
- 4 tablespoon unsalted butter, cut into tablespoon size pieces
BUBBLE GUM FROSTING
- 2 cups unsalted butter, at room temperature
- 1/2 cup vegetable shortening
- Pinch of salt
- 1 teaspoon LorAnn Bubble Gum flavoring
- 1 cup heavy cream
- 6 1/2 cups (820 grams/26 ounces) powdered sugar
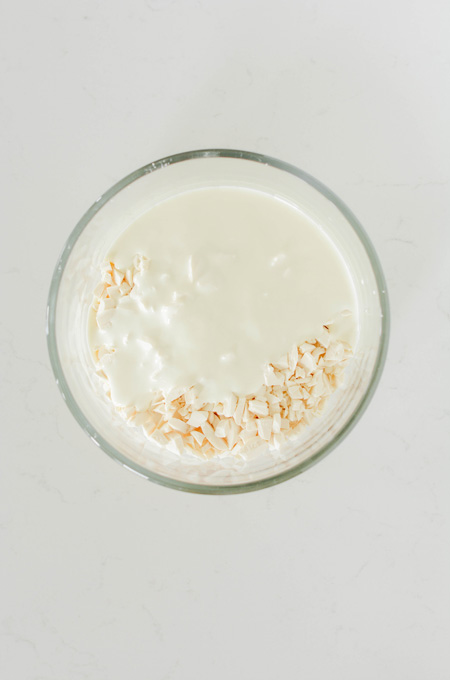
WHITE CHOCOLATE DRIP
- 1 cup (180 grams/8 ounces) Wilton Very White chocolate candy melts
- 1/4 cup (2 ounces) heavy cream
Instructions
BUBBLE GUM CAKE
- Adjust an oven rack to the center position and heat oven to 325 degrees. Spray 3 8-inch round cake pans with nonstick baking spray and set aside.
- In a 4 cup liquid measuring cup, whisk together the milk, egg whites, extract, flavoring and sour cream.
- In the bowl of a stand mixer, with the paddle attachment attached, mix the flour, sugar, baking powder, baking soda, and salt on low speed until combined. Add butter one tablespoon at a time until the mixture forms pea-sized pieces, about 1 minute. Reserve 1 cup of the milk mixture and pour the remaining to the flour mixture and mix on medium-high speed until light and fluffy, about 1 minute. Reduce the mixer speed to medium-low and add the reserved 1 cup milk mixture to the batter and mix until combined, about 30 seconds. Do not over mix. The batter may look curdled. Give the batter a final stir by hand with a rubber spatula.
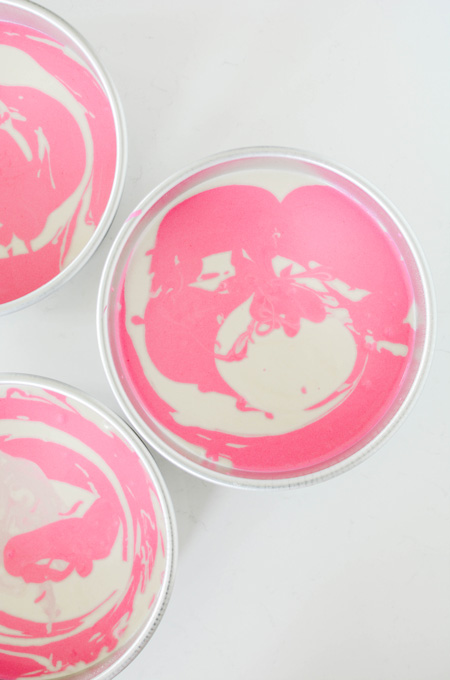
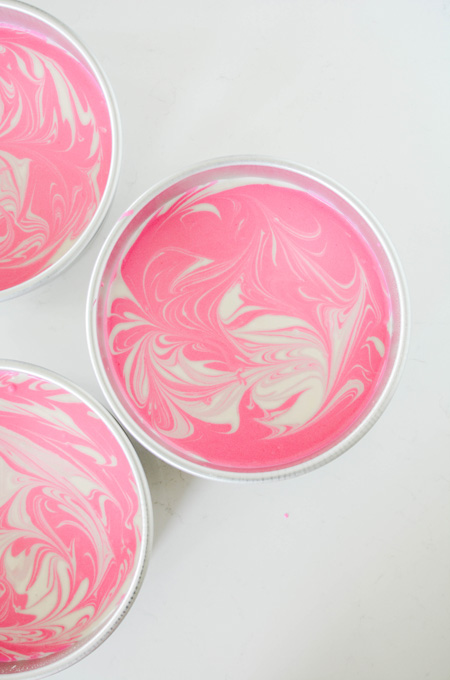
- Pour about half of the batter into a medium bowl and color with pink gel food coloring. Divide batter between cake pans using spring loaded ice cream scoops, alternating colors. Using a wooden skewer or butter knife, swirl figure 8 patterns in the cake batter in each pan to create a swirl design.
- Gently tap cake pans on the counter to settle the batter and bake until a toothpick inserted in the centers comes out with a few moist crumbs attached, about 30 to 35 minutes, rotating pans halfway through baking. Let cakes cool in their pans for 10 minutes.
- Place a sheet of plastic wrap over a plate, making sure the plastic wrap is long enough to wrap the cake in. Then invert a cake layer on to the plate. Wrap up the cake right away.
- TIP: Wrapping the cake while it’s still warm will help trap the steam in, keeping the cake moist. The plate helps keep the cake layer together. Repeat this process with the remaining two cake layers. Store the cake layers on a flat surface, such as a rimmed baking sheet in the refrigerator. Don’t store them on top of each other or the cakes will bow and won’t sit level when stacking.
PASTRY CREAM FILLING
- In a medium saucepan bring the half and half, 6 tablespoons of sugar, vanilla bean, vanilla bean seeds and salt to a simmer over medium heat, stirring frequently.
- As the half and half mixture comes to a simmer, combine the egg yolks, cornstarch and remaining 2 tablespoons sugar in a medium bowl and whisk to combine.
- Once the half and half mixture comes to a simmer, pour about 1 cup into the egg yolk mixture to temper, whisking to combine. Pour the tempered yolk mixture into the half and half mixture and whisk to combine, whisking constantly, until the pastry cream is thick, about 30 seconds.
- Remove from the heat and whisk in butter. Transfer the pastry cream to a bowl and press plastic wrap directly on the surface of the pastry cream. Refrigerate until set, at least 3 hours or up to 2 days.
BUBBLE GUM FROSTING
- In the bowl of a stand mixer with the paddle attachment attached, beat the butter, shortening and salt on medium speed for 8 minutes. Add the bubble gum flavoring, heavy cream and place a fine mesh sieve over the mixer bowl. Gradually add the powdered sugar to the sieve and stir until it’s all sifted and in the mixer bowl.
- Reduce the mixer speed to low for one minute then increase the speed to medium-high and beat for 6 minutes until light and fluffy.
- Reserve about 3 cups of frosting in a medium bowl and color with pink gel food color.
ASSEMBLE
- Place a nonslip mat on top of a cake turntable. Place a 8 inch cake board on top. Spread a small amount of buttercream in the center to act as glue for the cake. Center one cake layer on the cake board.
- Fit a piping bag with a coupler and fill with uncolored frosting. Pipe a frosting dam around the edge of the cake.
- Spread about 2/3 cup pastry filling over the top with an offset cake spatula, spreading in an even layer until it reaches the frosting dam. Place the second cake layer on top, gently pressing to adhere. Pipe a frosting dam around the edge of the cake. And spread another 2/3 cup pastry filling over the top in an even layer. Add the third cake layer on top (bottom side up). TIP: Resist the urge to over fill the cake or your layers will start to slide.
CRUMB COATING
- Place a small dollop of buttercream on top of the cake and using your offset cake spatula, spread a thin layer of frosting over the top and sides of the cake catching any loose crumbs and sealing them in. Freeze the cake for 15 minutes or refrigerate for 30 minutes.
CAKE DECORATING
- Apply a large dollop of uncolored frosting on the top of the cake and smooth out. You should have excess frosting hanging off the edges. Line an 8-inch round acrylic disc with parchment paper and place on top of the cake, parchment paper side down, making sure the disc is even with the bottom cake board.
- Prepare two piping bags with couplers attached. (TIP: Use the same piping bag you used for your frosting dam for your uncolored frosting.) Place uncolored frosting in one piping bag and pink frosting in the other piping bag.
- Starting at the bottom of the cake, pipe a ring around the cake with one of the frostings, followed by the other frosting and work your way up, alternating with the frostings. Fill in any gaps with coordinating frosting color before smoothing out. TIP: You’ll only get about 3 turns before your stripes start to blend together.
- With a cake scraper, smooth the sides of the cake, rotating the cake on the turntable one rotation at a time, reserving the excess frosting for decorating the top of the cake. Check to see if you need to fill in any gaps with pink or uncolored frosting and with a clean cake scraper, smooth the frosting one more time. The more you smooth the cake the more the frosting will blend together, so don’t over smooth. Chill the cake in the freezer for 15 minutes or in the refrigerator for 30 minutes before removing the acrylic disc.
- With an offset spatula, carefully remove the acrylic disc on the top to the cake by sliding the spatula under the disc but over the parchment paper and gently rotating the cake turntable until the disc releases. Peel off the parchment paper.
- Use a tooth pick to clean up the edges if needed. Chill the cake in the refrigerator while you prepare the White Chocolate Drip.
WHITE CHOCOLATE DRIP
- In a microwavable bowl combined candy melts and heavy cream and microwave for 20 second intervals, stirring between each interval until melted, about 2 minutes total.
- Let chocolate cool at room temperature for about 15 to 20 minutes or until the melted chocolate reaches 85 to 95 degrees.
- Add chocolate drip to a squeeze bottle, piping bag or use a spoon to apply to the sides of the cake. Pour remaining white chocolate drip in the center of the cake and spread to meet the edges of the dripped chocolate.
- Chill the cake in the refrigerator for about 30 minutes so the chocolate drip can set before adding additional decoration.
- Place both buttercreams (colored and uncolored) in one piping bag fitted with Ateco piping tip #827 and pipe 8 swirls around the top edge of the cake. Top each swirl with sprinkles and a pink bubble gum ball. Carefully transfer cake to a cake pedestal. If you have remaining frosting, transfer the extra frosting to a piping bag fitted with a Wilton piping tip #1M and pipe a shell border along the bottom edge of the cake and serve.
Notes
Assembled cake can be stored in an airtight container at room temperature for up to 1 day or stored in the refrigerator for up to 3 days. Bring to room temperature before serving.
Cake layers can be made up to 3 days in advance, wrapped in plastic wrap, stored in an airtight cake container in the refrigerator.
Vanilla bean pastry filling can be made up to 3 days in advance, stored in the refrigerator.
Frosting is best made the day of assembly.
Nutrition Information:
Yield: 16 Serving Size: 1Amount Per Serving: Calories: 753Total Fat: 54gSaturated Fat: 29gTrans Fat: 0gUnsaturated Fat: 22gCholesterol: 205mgSodium: 348mgCarbohydrates: 57gFiber: 1gSugar: 24gProtein: 11g
*Nutrition information is an estimate and will vary.*


Leave a Reply