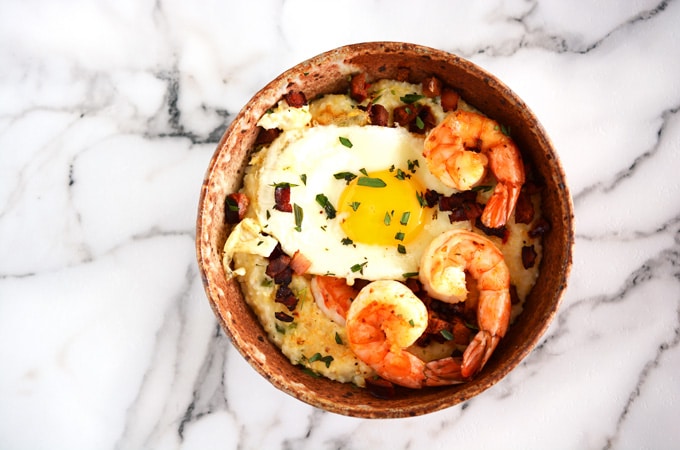
• Skip to primary navigation
  • Skip to main content
  • Skip to primary sidebar
  • About
  • Recipe
    • Listicle
    • Kitchen Staples
    • Drinks
      • Cocktails
      • Non-Alcoholic
      • Smoothies
    • Breakfast
      • Eggs
      • Muffins and Baking
      • Pancakes and Waffles
    • Sweet
      • Brownies and Bars
      • Cakes and Frostings
        • Beginner Cake Recipes
        • Intermediate Cake Recipes
        • Advanced Cake Recipes
      • Cheesecake
      • Cobblers & Fruit Desserts
      • Cookies and Candies
      • Custards & Trifles
      • Pies & Tarts
    • Savory
      • Appetizers
      • Easy Weeknight Meals
      • Beef and Pork
      • Chicken and Turkey
      • Fish and Shellfish
      • Grains and Beans
      • Pasta and Rice
      • Potatoes
      • Quinoa
      • Soups & Stews
      • Vegetables
    • On The Lighter Side
  • Resources
  • Contact
  • Work With Me
  • Privacy Policy

The Cake Chica

menu icon
go to homepage
  • Recipe Index
  • About
  • Work With Me
  • Contact

subscribe
search icon
Homepage link
  • Recipe Index
  • About
  • Work With Me
  • Contact

×
Home

Grilled Cheeseburgers

April 3, 2016

Grilled Cheeseburgers

Grilled Cheeseburgers

Hello everyone! This blog post is a little different. Today I have a special guest poster, he's my best friend, and I am so lucky to be married to him! My husband Craig is writing this blog post for these Grilled Cheeseburgers. I also put in a little "how to" on prepping the grill. A must if you live in Texas. This recipe for Grilled Cheeseburgers  was seen first at CooksIllustrated.com, my favorite cooking and baking resource.

Nothing is quite as satisfying as biting into a juicy burger, hot off the grill.  A great burger doesn't need fancy toppings, sloppy sauces, or grilled cheese buns. All you really need is a hot grill, some quality meat and the perfect side, like some amazing Beer Battered Onion Rings and maybe an ice-cold beer. Now, I know that popular opinions out there tell us that we should avoid meat, or breads, or fried foods. It is my opinion, though, that what is really needed is moderation and balance. Sure, people can sustain themselves on vegetables and beans if they want, but badass food is one of the things that make life more enjoyable. Obviously, it would be unwise to have fried foods and hamburgers as a significant portion or our diets, but the occasional splurge is nothing to feel guilty about. So, invite some friends over, fire up your grill and enjoy these burgers and onion rings.

 GRILL PREPARATION

Grilled Cheeseburgers
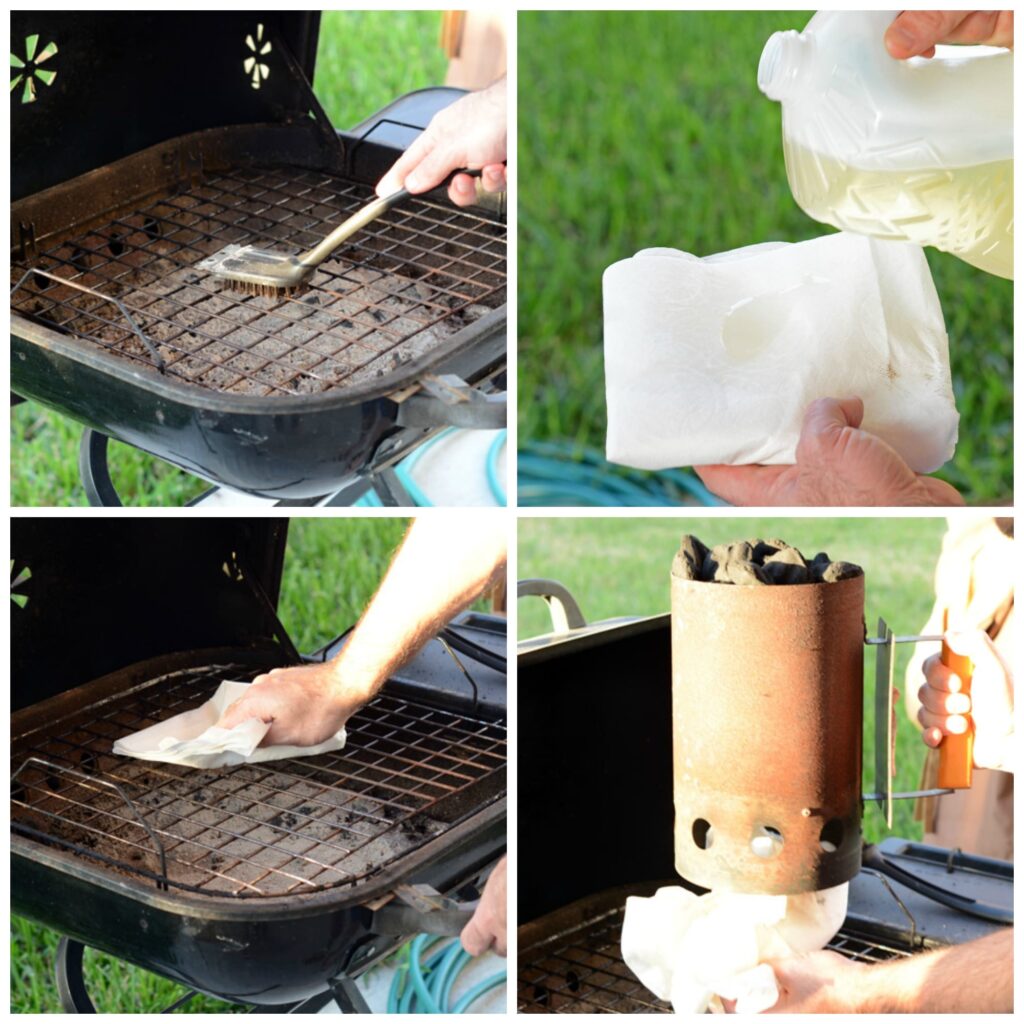
Clean grill grates with a wire brush. Using paper towels, with vegetable oil, wipe grill grates down. Fill charcoal chimney with charcoal and soak with lighter fluid or use Matchlight briquettes. Bunch up oiled paper towels and stuff in the base of the chimney.

Grilled Cheeseburgers
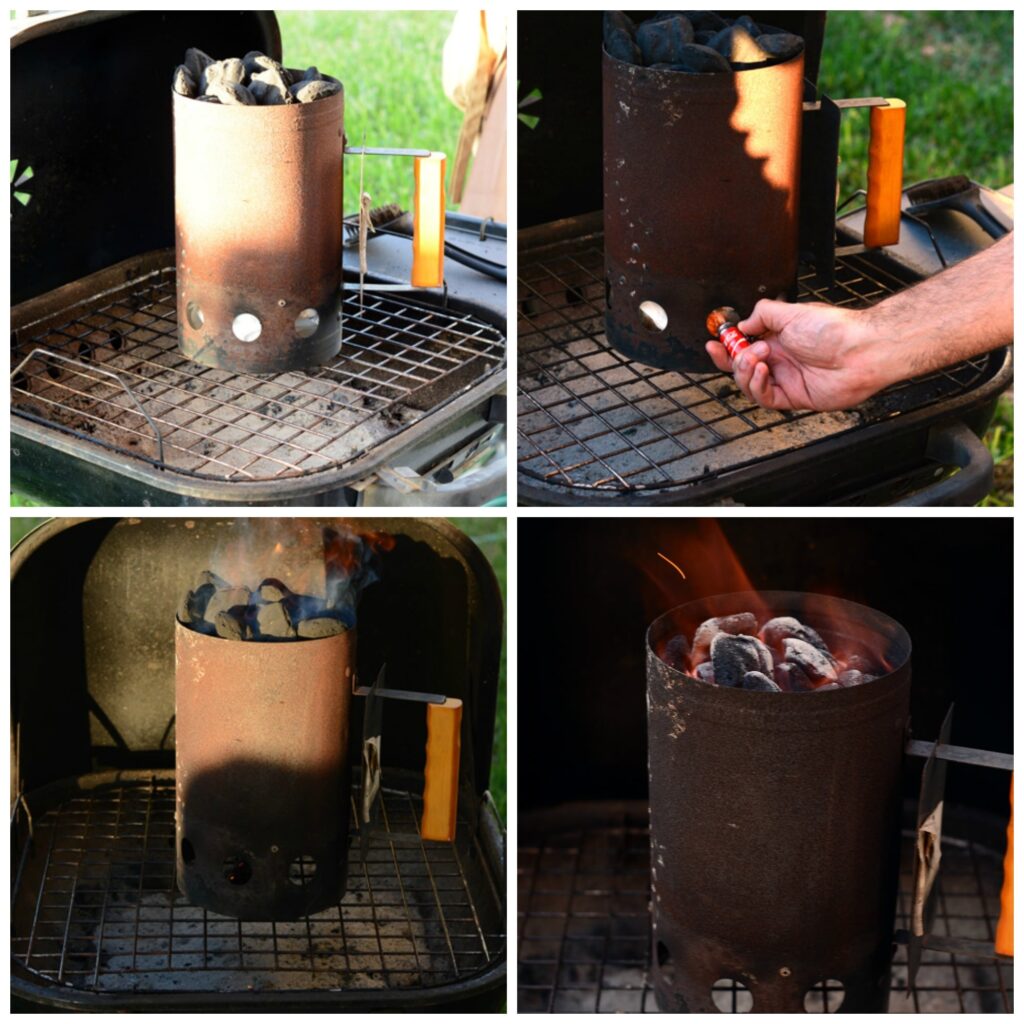
Place chimney on grate and light paper towels.  Allow charcoal to burn until ash layer forms on top of the briquettes, about 20 to 30 minutes.

Grilled Cheeseburgers
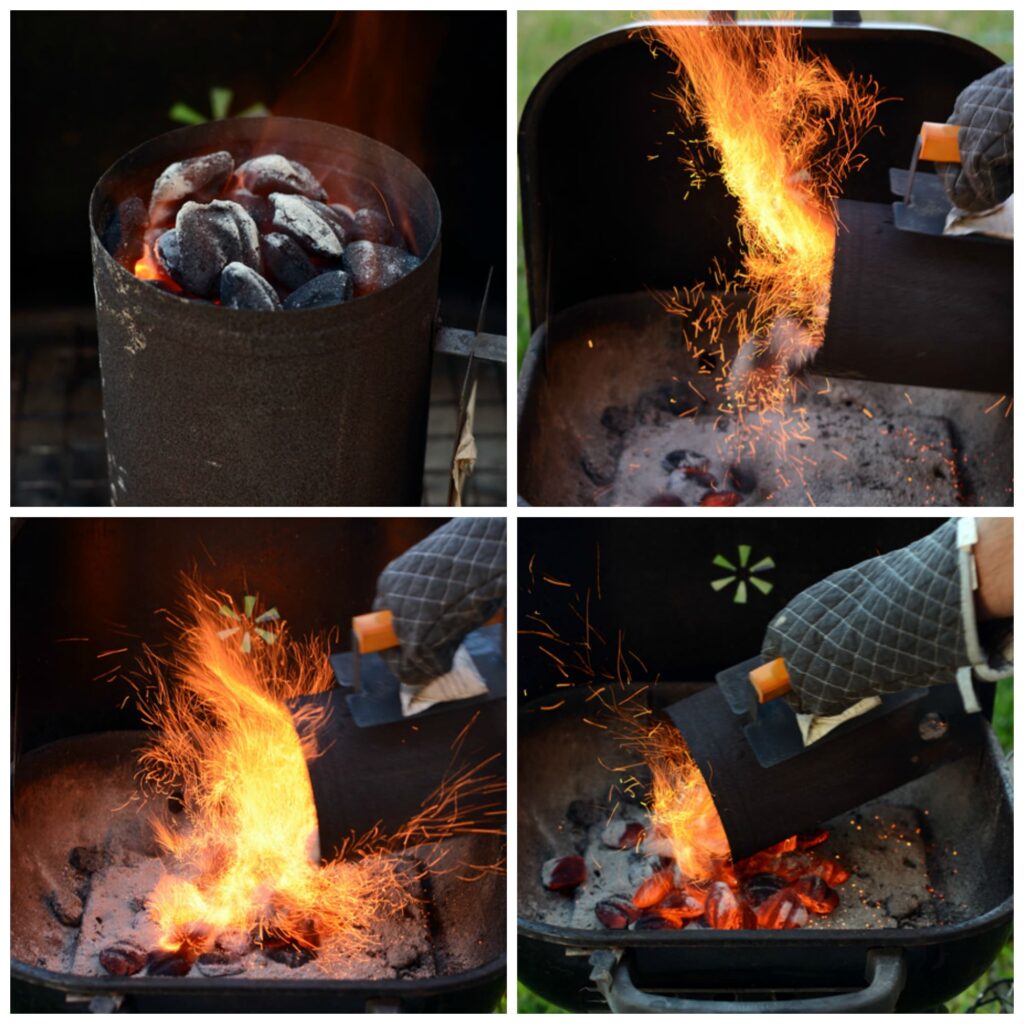
Remove grill grates and pour charcoal out in an even layer inside the grill.

Grilled Cheeseburgers
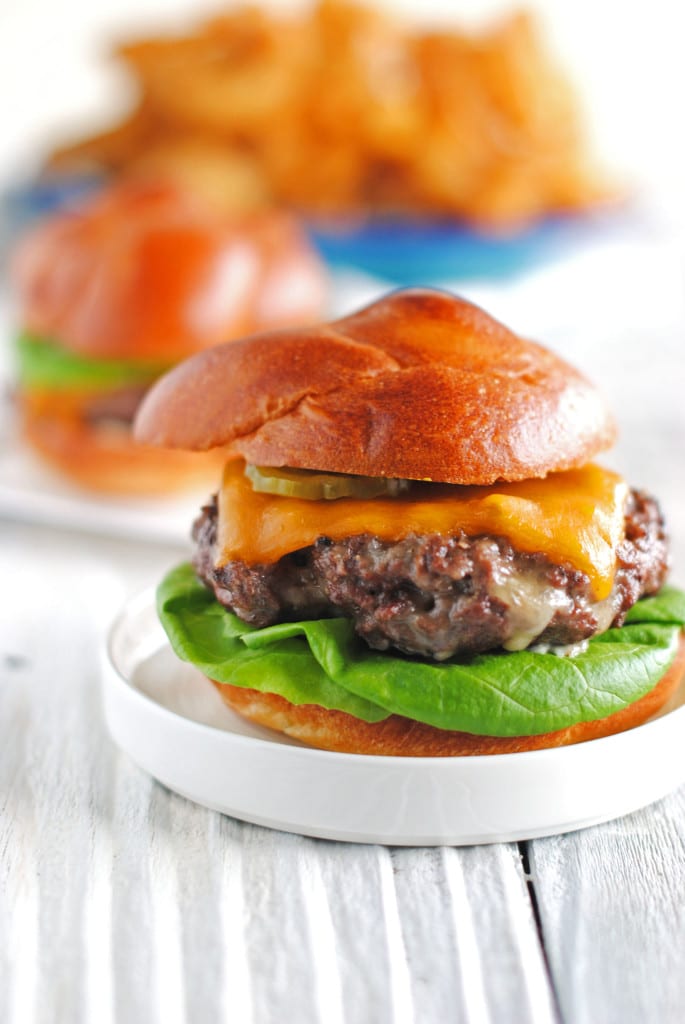
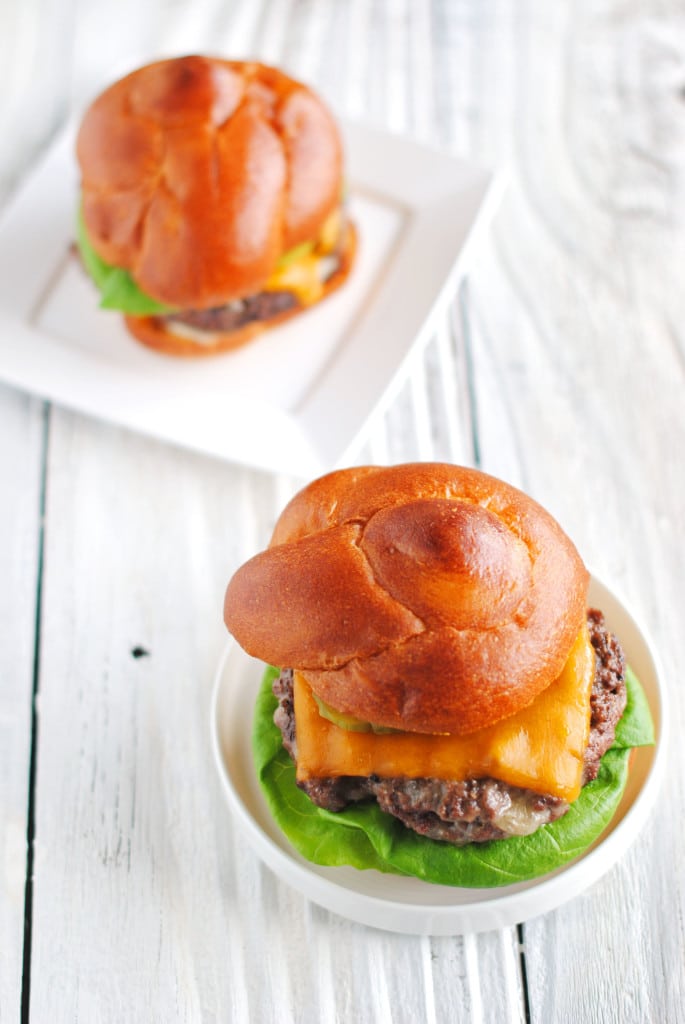
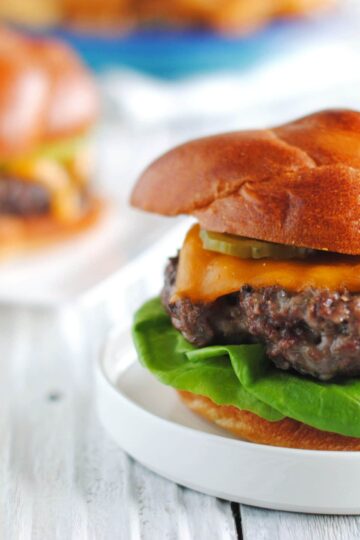
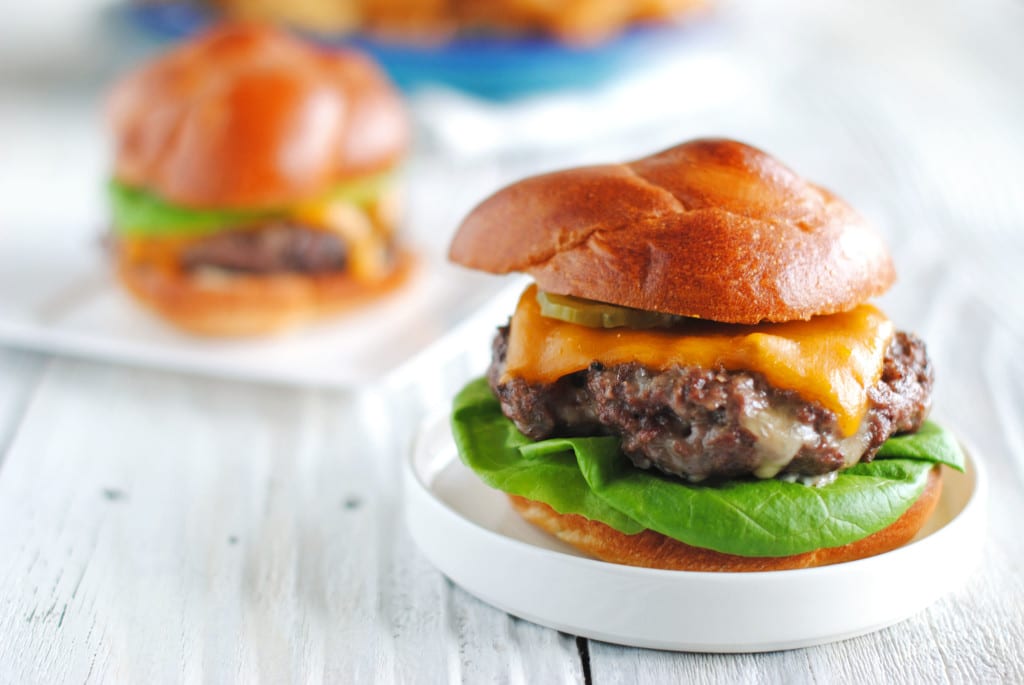
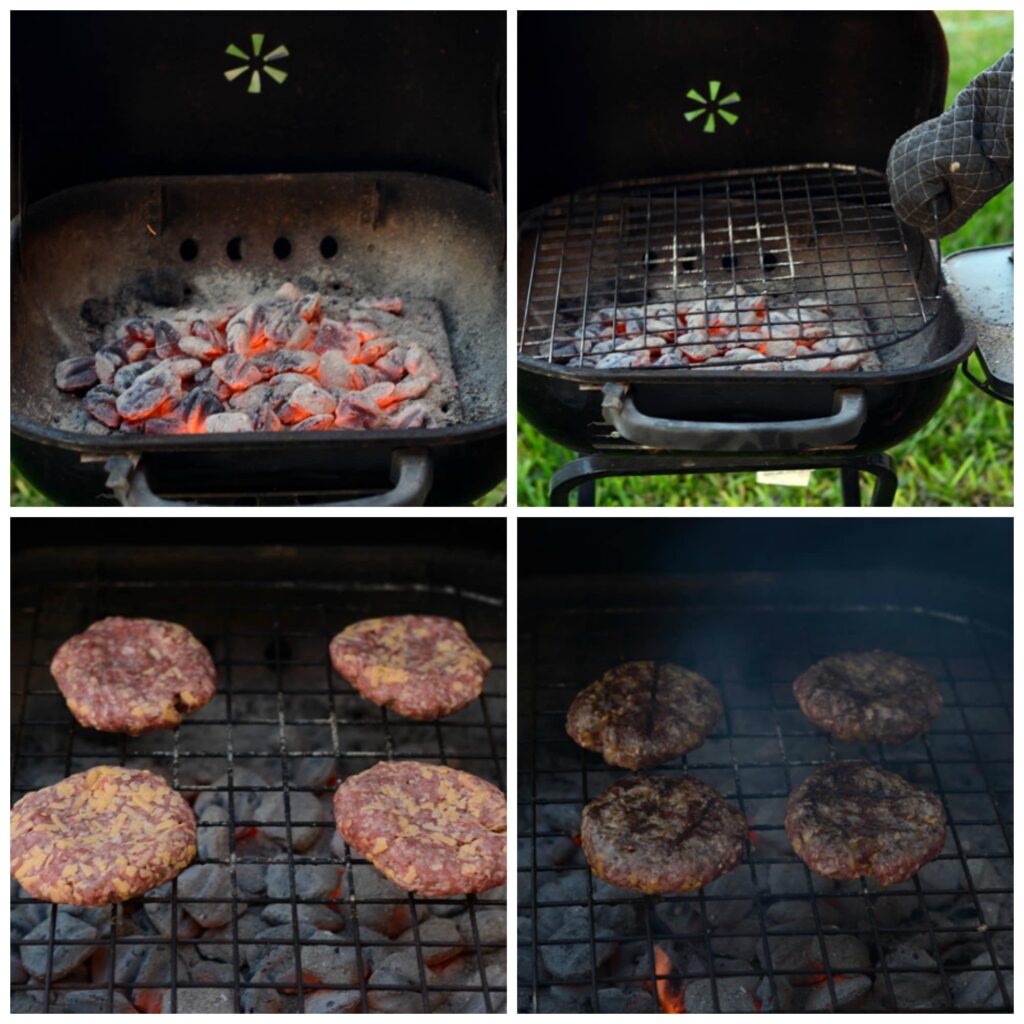
Replace grill grate. Evenly place burgers on the grill grate and grill for 3 to 4 minutes per side. Remove burgers and place on a platter. Top with your favorite toppings and serve.

Grilled Cheeseburgers

Grilled Cheeseburgers

...

Read More

Whiskey Sour

March 28, 2016

Whiskey Sour

Whiskey Sour

A Whiskey Sour used to be my go to drink. From company parties to restaurants and bars, you can be sure they have the stuff on hand to make a Whiskey Sour. Typically these places just use a sweet and sour mix, so I have stopped ordering them. I hate mixed drinks using mixes. I want a cocktail that tastes fresh. I am not a big drinker to begin with so when I have a cocktail it’s usually a special treat. And special treats call for the finest ingredients you can get in my opinion.

I recently just made a stop at my local HEB supermarket. Those in Texas probably know this supermarket well. In the produce section they sell bottles of fresh squeezed juices such as, orange juice, carrot juice, some sort of green juice I never cared to look at, and my favorite, fresh squeezed lemonade. With this lemonade I decided to make an old favorite, using the fresh squeezed lemonade as my “mix”. Enjoy.

...

Read More

Homemade Magic Shell

March 23, 2016

Homemade Magic Shell

This Homemade Magic Shell is so easy you never need to go out to a fancy ice cream shop again. Okay who am I kidding, just go get your favorite fancy ice cream (mine is Marble Slab's Amaretto Ice Cream with cherries and almonds) and pour a bunch of this Homemade Magic Shell on top!

I was first introduced to magic shell at Dairy Queen. Back then I didn't know what it actually was I just knew it was something of great awesomeness. That was back in the 80's, but fast forward to the early 2000's when I found that liquid gold at.....well, I am embarrassed to say, at a buffet restaurant that was so disgusting I don't even want to mention the name. I only went because my friends did and I wasn't as picky of an eater back then. But even then, I knew I shouldn't have been eating there. That was until I saw that melted chocolate in the dessert area. At first I just thought it was chocolate syrup, but then once I put it on my ice cream I saw it transform into something I once had at Dairy Queen when I was so young! I couldn't believe it! The one thing that could make me go back to that poisonous buffet was this chocolate magic shell stuff I didn't even know existed outside of Dairy Queen. Thank goodness I don't have to go to that buffet restaurant just to get my magic shell anymore. With this 2 ingredient Homemade Magic Shell recipe I know you have all the ingredients you need on hand, okay 3 ingredients if you count the ice cream.  Enjoy!

...

Read More

Andes Mint Chocolate Chip Cookies

March 13, 2016

Close up overhead shot of Andes Mint Chocolate Chip Cookies on cooling rack.

As an Amazon Associate, I earn from qualifying purchases.

Andes Mints are one of my favorite chocolate candies. So I decided to combine it with one of my favorite cookies! These Andes Mint Chocolate Chip Cookies are everything you'd imagine they'd be. Sweet and chocolatey with a hint of mint chocolate.

Overhead shot of Andes Mint Chocolate Chip Cookies on cooling rack.

Cookie Ingredients

  • All-purpose flour: helps build structure in the cookie.
  • Baking soda: is a leavener that is activated when it comes into contact with liquid and acid, such as the brown sugar in this recipe. You must have an acidic ingredient like buttermilk, sour cream, yogurt, vinegar etc. for the baking soda to do its thing.
  • Salt: brings out the sweetness in baking.
  • Unsalted butter: gives the cookies flavor. I go for unsalted butter because different brands of butter have different salt content. This way I can control the salt in the recipe.
  • Light brown sugar: is an acidic ingredient which reacts with the baking soda and helps create a more complex flavor.
  • Granulated sugar: gives the cookie its sweetness and gives the cookies color and texture.
  • Vanilla extract: helps with flavor.
  • Mint extract: is super strong. A little goes a long way. I used just shy of 1/4 teaspoon in this recipe.
  • Eggs: provide structure, flavor and color.
  • Egg yolks: provide lots of fat which translates into flavor.
  • Andes Mints: gives the cookies a mint chocolate flavor.
  • Semi-sweet chocolate chips: it wouldn't be a chocolate chip cookie without the chocolate chips.
Overhead shot of sugars and melted butter combined for Andes Mint Chocolate Chip Cookies.
Sugars and melted butter
Overhead shot of combined sugars, butter and eggs for Andes Mint Chocolate Chip Cookies.
Sugars, melted butter and eggs
Overhead shot of cookie dough with chocolate chips and Andes Mint for Andes Mints Chocolate Chip Cookies.
Cookie dough with chocolate chips and Andes Mints
Overhead shot of completed chilled cookie dough for Andes Mint Chocolate Chip Cookies.
Completed chilled cookie dough

Cookie Dough Storage

The cookie dough can be stored in the refrigerator covered for up to 3 days or stored in the freezer for 6 weeks. Let the dough sit at room temperature until the dough is easy enough to scoop and roll into balls.

Overhead shot of cookie dough balls on lined baking sheet for Andes Mint Chocolate Chip Cookies.

Andes Mint Chocolate Chip Cookie Garnish

This is an optional step but I always find that adding a bit of garnish to the top of the cookies makes them picture perfect. Roughly chop a few Andes Mint candies and push them on top of the cookies right before baking.

Overhead shot of Andes Mint Chocolate Chip Cookies on baking sheet.

Cookie Storage

Baked cookies can be stored in an airtight container at room temperature for up to 3 to 5 days. Feel free to reheat the cookies in the microwave for 20 seconds or in a 350 degree oven for 3 to 5 minutes for a fresh-out-of-the-oven taste.

Close up overhead shot of Andes Mint Chocolate Chip Cookies on cooling rack.

Cookie Tools

  • Full sized rimmed baking sheet (or 2 half rimmed baking sheets)
  • Parchment paper
  • Stand mixer
  • 1/4 cup measuring cup or ice cream scoop
  • 1 pack Andes Mints, chopped (optional)
  • Cooling racks
Three quarter angle shot of Andes Mint Chocolate Chip Cookies.

Baking Schedule

  • Day 1: Prepare cookie dough and bake (or store in the refrigerator).
  • Day 2: Bake.
Head on shot of stacked Andes Mint Chocolate Cookies.

Let's Connect

The Cake Chica is on the following social media platforms below. Click subscribe, like and follow! We would love to have you over!

  • Facebook
  • Instagram
  • Pinterest
  • YouTube
  • Mail
Three quarter angle of stacked Andes Mint Chocolate Chip Cookies.

Suggested Recipes

Best Big Fat Chewy Chocolate Chip Cookie
S'mores Chocolate Chip Cookies
Peanut Butter Chocolate Chip Cookies

Adapted from Best, Big, Fat Chewy Chocolate Chip Cookie

Close up overhead shot of Andes Mint Chocolate Chip Cookies on cooling rack.

Andes Mint Chocolate Chip Cookies

Yield: 30 cookies

Crisp and chewy chocolate chip cookies baked with Andes Mint chocolate chunks inside.

Ingredients

SPECIAL TOOLS

  • Full sized rimmed baking sheet (or 2 half rimmed baking sheets)
  • Parchment paper
  • Stand mixer
  • 1/4 cup measuring cup or ice cream scoop
  • 1 pack Andes Mints, chopped (optional)
  • Cooling racks

COOKIES

  • 4 cups (20 ounces) all-purpose flour
  • 1 teaspoon baking soda
  • 1 teaspoon salt
  • 1 ½ cups unsalted butter, melted and cooled
  • 2 cups (14 ounces) packed light brown sugar
  • 1 cup (7 ounces) granulated sugar
  • 1 tablespoon vanilla extract
  • 1/8 - 1/4 teaspoon mint extract
  • 2 large eggs
  • 2 large egg yolk
  • 10 ounces Andes Mint Chips
  • 12 ounces semi sweet chocolate chips

Instructions

    1. Adjust an oven rack to the center portion and heat oven to 325 degrees. Line a baking sheet with parchment paper. Whisk together flour, baking soda and salt in a bowl and set aside.
    2. In the bowl of a stand mixer fitted with the paddle attachment, combine cooled melted butter, brown sugar and granulated sugar and beat on medium speed until blended. Beat in extracts, eggs and egg yolks until light and creamy. Mix in the dry ingredients until blended.
    3. Stir in the chocolate chips and Andes Mints by hand using a wooden spoon until well blended. Place batter in the refrigerator for 10 to 15 minutes to chill the dough or overnight. If the dough is chilled overnight, let it sit at room temperature for about an hour to soften up a bit.
    4. Roll up 1/4 cup of cookie dough and place on the prepared baking sheet. Cookies should be placed about 3 inches apart. Flatten each ball of dough with the palm of your hand. Place a few chopped Andes mints on top and bake for 15 to 17 minutes, or until the edges are lightly toasted, rotating half way through baking.
    5. Cool on the baking sheet for 4 minutes to set cookies and then remove cookies and set on a cooling rack to cool completely. Repeat with remaining cookie dough. Enjoy.
Nutrition Information:
Yield: 30 Serving Size: 1
Amount Per Serving: Calories: 262Total Fat: 14gSaturated Fat: 8gTrans Fat: 0gUnsaturated Fat: 5gCholesterol: 57mgSodium: 137mgCarbohydrates: 31gFiber: 1gSugar: 14gProtein: 3g

*Nutrition information is an estimate and will vary.*

Did you make this recipe?

Tag @thecakechica1 on Instagram and hashtag #thecakechica1

© Mary | The Cake Chica
Cuisine: American / Category: Cookies and Candies

Beer Battered Onion Rings

March 6, 2016

Beer Battered Onion Rings

Beer Battered Onion Rings

Used with permission by Cook's County

This is a real treat, and not something to eat every day. But are these Beer Battered Onion Rings worth the calories?

Beer Battered Onion Rings

I remember back in the day my sister would always get onion rings at whatever fast food restaurant offered them. I tried them once and blah! I made sure I never got onion rings with my burgers from that day forward. I am more of a French fry girl anyway. Fast forward to now. I've had my nibbles of onion rings from Craig's meals at different restaurants, but none have ever had me replacing my beloved French fries. But there had to be better onion rings out there. So I went searching for them and found the clear winner in these Beer Battered Onion Rings from Cook's Country. These Beer Battered Onion rings had me thinking about creating a new category called The Best Thing I Ever Ate. But don't take my word for it; get frying in your own kitchen to taste the glory.

Beer Battered Onion Rings

Get ready for some serious crunch on these babies.  And the crust sticks to the onion with every bite. It's pure perfection right here! And the answer is YES!!! Yes, these Beer Battered Onion Rings are most definitely worth the calories.


Beer Battered Onion Rings

On a side note, these also freeze well. Just reheat in a 350 degree oven for about 15 to 20 minutes and you are set. And they are still just as crunchy as the first day you made them.

Follow The Cake Chica on social media: Facebook, Instagram, and Pinterest.

Beer Battered Onion Rings

Beer Battered Onion Rings

Yield: 4-6 servings

Ingredients

  • 2 sweet onions, peeled and sliced into ½-inch thick rounds
  • 3 cups beer
  • 2 teaspoons malt vinegar
  • Salt and pepper
  • 2 quarts peanut or vegetable oil
  • ¾ cup all-purpose flour
  • ¾ cornstarch
  • 1 teaspoon baking powder

Instructions

  1. Place onion rounds, 2 cups beer, vinegar, ½ teaspoon salt and ½ teaspoon pepper in 1-gallon zip lock bag; refrigerate for 30 minutes or up to 2 hours.
  2. Line rimmed baking sheet with triple layer of paper towels. Add oil to large Dutch oven until it measures about 1 1/2-inchs deep and heat over medium-high heat to 350 degrees. While oil is heating, combine flour, cornstarch, baking powder, ½ teaspoon salt and ¼ teaspoon pepper in a large bowl. Slowly whisk in ¾ cup beer until just combined (some lumps will remain). Whisk in remaining beer as needed, 1 tablespoon at a time, until batter falls from whisk in steady stream and leaves faint trail across surface of batter.
  3. Adjust oven rack to middle position and heat oven to 200 degrees. Remove onions from the refrigerator and pour off liquid. Pat onion rounds dry with paper towels and separate into rings. Transfer one-third of the rings to batter. One at a time, carefully transfer battered rings to oil. Fry until rings are golden brown and crisp, about 5 minutes, flipping halfway through frying. Drain rings on prepared baking sheet, season with salt and pepper to taste, and transfer to oven. Return oil to 350 degrees and repeat 2 more times with remaining onion rings and batter. Serve.

Did you make this recipe?

Tag @thecakechica1 on Instagram and hashtag #thecakechica1

© Mary
Category: Side

Peanut Butter Protein Truffles

February 28, 2016

Peanut Butter Protein Truffles

Peanut Butter Protein Truffles

DISCLOSURE: This post was written in partnership with Myprotein, all opinions and stories are 100% my own.

I remember as a kid I would eat spoonfuls of peanut butter. And if I was lucky there was some chocolate chips in the pantry and I would sprinkle some of those on top. It was the perfect way to please my sweet tooth. Ah the simple times. Nowadays it takes a little more to satisfy my sweet tooth. But I've found a simple way to liven up the old peanut butter and chocolate on a spoon recipe I made as a kid. Plus with a little something extra, like Myprotein vanilla protein powder. And you can't forget their 1 ingredient crunchy peanut butter, which works great in these Peanut Butter Protein Truffles. This way you have full control over the sweetness in your truffles. Which ever peanut butter brand you use, I recommend using a natural peanut butter for this recipe. Depending on the consistency of the peanut butter, may need to add 1-2 tablespoon water to the peanut butter filling.

You can store these in the refrigerator or freezer. I prefer mine in the freezer. They will stay good for a long while that way. These Peanut Butter Protein Truffles are a great way to feed your craving without wrecking your good eating habits, and get in a little extra protein too!

...

Read More

Coca-Cola and Kahlua Float

February 27, 2016

Coca Cola and Kahlua Float

Coca Cola and Kahlua Float

Maybe you've had a rough week and your thinking about heading out to your favorite bar with overpriced drinks this weekend. Why not do something a little different this time? Why not enjoy a little cocktail at home? Instead of going out to a restaurant or a bar, head out to the store for some vanilla ice cream, Coca-Cola and Kahlua. Even the kids can get in on what I have in store for you today, sans the Kahlua of course.

This easy nostalgic classic will take you back to a time when life was simple. When we as kids played outside and not on our pads or smart phones. A time that reminds me of my grandma’s house, where she always had ice cream in her freezer. And there was always, as my grandma would say “soda pop” in the fridge. In Texas the only “soda pop” that matters is Coca Cola (and no you can’t substitute Pepsi), Big Red and Dr. Pepper. I am a Coca-Cola girl all the way. I love all things Coca-Cola and my home is growing into a little bit of a Coca-Cola museum as we speak. But that’s for another blog post. These Coca-Cola and Kahlua floats will surely fit the bill today.

And don’t forget today is National Kahlua Day! Perfect way to celebrate with an ice cold Coca-Cola and Kahlua Float.

Thank you to Gina over at The Shabby Creek Cottage for the inspiration for these Coca-Cola and Kahlua Floats.

...

Read More

Fresh Strawberry Margaritas

February 22, 2016

Fresh Strawberry Margaritas

Fresh Strawberry Margaritas

Happy National Margarita Day everyone. Would you liked to celebrate this genius food holiday with an ice cold margarita, but don't want those highly processed margarita mixes you might typically get at your local restaurant? Well give this Fresh Strawberry Margarita a try. That’s right, fresh juices, real strawberries and real sugar. No margarita mix here. So call up 5 of your closest friends and share these amazing Fresh Strawberry Margaritas!


...

Read More

Homemade Whipped Cream

February 17, 2016

Homemade Whipped Cream

Homemade Whipped Cream

Even if you aren't skilled in the kitchen, everyone can make homemade whipped cream. It's incredibly easy! I have no idea why anyone would want that "whipped topping" stuff. If you have a mixer with a whip attachment you are set!

Disclaimer: Please note that some of the links in this post are affiliate links and I will earn a commission if you purchase through those links. I have used all the products and recommend them because they re helpful and are companies I trust, not because of the commissions that I may earn from you using those products.

...

Read More

Rocky Road Protein Crisp

February 14, 2016

Rocky Road Protein Crisp

Rocky Road Protein Crisp

Before I get into the recipe I just wanted to give a quick little progress report on my weight training. In June of 2015 I had Myomectomy surgery to remove some fibroid tumors. The picture on the left was May 2015 just 1 week before my surgery. Originally my doctor thought I had 3, one of them being fairly large. During the surgery they actually found 9, the largest being the size of a cantaloupe. I was weight training regularly before, but nothing I did could stop that belly bump I had due to the large fibroid. I was pretty depressed about this. I have always taken pride in staying in shape and being as healthy as can be. At this point I decided I needed to have the surgery.

...

Read More

Candied Pecans

February 10, 2016

Candied Pecans

Get ready to make a double batch of these Candied Pecans. They are that good, and easy to make, so why not make a triple batch?

Candied Pecans

I use these Candied Pecans in my cakes and pancakes but they are also great all on their own. Just try not to eat them all in one sitting.

Candied Pecans

Follow The Cake Chica on Facebook, Instagram and Pinterest.

Candied Pecans

You May Also Like:

Spiced Pumpkin Pecan Pancakes

Warm Cocoa Pudding with Candied Pecans

Overnight French Toast with Maple-Pecan Syrup


Adapted from The Cake Book

Candied Pecans

Candied Pecans

Yield: 1 1/2 cups
Prep Time: 5 minutes
Cook Time: 20 minutes
Total Time: 25 minutes

Baked Candied Pecans, made with egg white and sugar. Perfect for snacking or garnishing baked goods.

Ingredients

SPECIAL TOOLS

  • Rimmed half sized baking sheet
  • Silicone baking mat or parchment paper

PECANS

  • 1 large egg white
  • 1 ½ cups halved pecans
  • 2 tablespoons sugar

Instructions

  1. Adjust an oven rack to the center of the oven and heat oven to 325 degrees. Line a baking sheet with parchment paper or a silicone mat.
  2. Place egg white in a medium bowl and add pecans. Stir to coat. Sprinkle sugar over nuts and toss to coat.
  3. Spread the pecans in an even layer on the prepared baking sheet and bake for 20 to 25 minutes, stirring twice while baking. Cool completely and store in an airtight container at room temperature for up to 1 week.
Nutrition Information:
Yield: 4 Serving Size: 1
Amount Per Serving: Calories: 312Total Fat: 29gSaturated Fat: 3gTrans Fat: 0gUnsaturated Fat: 25gCholesterol: 47mgSodium: 18mgCarbohydrates: 12gFiber: 4gSugar: 8gProtein: 5g

*Nutrition information is an estimate and will vary.*

Did you make this recipe?

Tag @thecakechica1 on Instagram and hashtag #thecakechica1

© Mary | The Cake Chica
Cuisine: American / Category: Appetizer


<Candied Pecans

Gluten Free Chicken Tacos

February 7, 2016

Gluten-Free-Chicken-Tacos

Short on time? Don’t want to go out for dinner? Want something easy, quick and tasty? Well I have the answer right here! These Gluten-Free Tacos will fit into your busy schedule. I admit, I am not someone who eats gluten-free meals. But after trying Rudis Gluten Free Tortillas tortillas, I may be eating more gluten-free meals in the future.

Gluten-Free Chicken Tacos

Even Craig, who would turn his nose up to gluten-free anything enjoyed them. I also found a new love in Whole Food’s House Smoked Whole Rotisserie Chicken! I recommend finding the best quality rotisserie for this recipe. It will make all the difference trust me! I made this recipe with 3 different brands of rotisserie chicken and the one from Whole Foods far exceeded the others.

Gluten-Free Chicken Tacos

The ingredients on the Whole Foods rotisserie chicken are as follows: chicken, garlic, sea salt, spices (black pepper, thyme, sage, ginger, bay, celery), brown sugar, onion, red bell pepper, parsley and canola oil. All these ingredients are sold at your local supermarket. Nothing that sounds like it’s made in a lab. Feeling like I won the lottery right now! Enjoy!

Gluten-Free Chicken Tacos

Follow The Cake Chica on social media: Facebook, Instagram, and Pinterest 

Gluten Free Chicken Tacos

Gluten Free Chicken Tacos

Yield: 8 tacos

Ingredients

  • 1 tablespoon coconut oil
  • 2 red bell peppers, chopped
  • 1 medium-size onion, chopped
  • 1 15-ounce can organic black beans or beans of your choice, I like Eden Organics or Westbrae brands
  • 3 teaspoons smoked paprika
  • 1 teaspoon chili powder
  • ½ teaspoon garlic salt
  • 1-2 teaspoons chipotle sauce from canned chipotle peppers (optional)
  • 1 pound cooked chicken, pulled from rotisserie chicken, I like the House Smoked Whole Chicken from Whole Foods
  • ¾ cup reduced-fat sour cream, plus more for topping
  • ¼ cup chopped cilantro, plus more for topping
  • 8 gluten-free tortillas, I like Rudi’s Gluten-Free Bakery tortillas
  • 1 cup shredded Mexican blend cheese

Instructions

  1. Heat coconut oil over medium-high heat in a large non-stick skillet. Sauté bell peppers and onions until soft and slightly caramelized, about 8 minutes. Reduce the heat to medium-low and stir in beans, seasonings, chipotle sauce and chicken meat and continue to cook until heated through, about 5 minutes. Turn off the heat and stir in sour cream and cilantro.
  2. For the best flavor, grill tortillas on a hot grill pan for just a few seconds on each side until the tortillas just start to get those browned grill marks. You can also wrap tortillas in a damp paper towel and heat them in the microwave for about 30 seconds.
  3. Place tortillas on a plate and spoon in the chicken stuffing. Top with cheese and a little sour cream and garnish with cilantro.
Nutrition Information:
Serving Size: 2
Amount Per Serving: Calories: 832Total Fat: 19gSaturated Fat: 19gCholesterol: 174mgSodium: 1435mgCarbohydrates: 65gFiber: 17gSugar: 11gProtein: 62g

Did you make this recipe?

Tag @thecakechica1 on Instagram and hashtag #thecakechica1

© Mary
Category: Main

Gluten-Free Chicken Tacos


  • « Go to Previous Page
  • Page 1
  • Interim pages omitted …
  • Page 23
  • Page 24
  • Page 25
  • Page 26
  • Page 27
  • Interim pages omitted …
  • Page 39
  • Go to Next Page »

Primary Sidebar

Welcome!

Hi, I’m Mary. The self-taught baker, food stylist, and photographer behind The Cake Chica. If you love creating bakery-style desserts from scratch and want a peek behind the scenes of how they’re styled and captured, you’re in the right place.

More about me

Popular

  • Toasted Coconut Caramel Layer Cake on marble cake pedestal.
    Toasted Coconut Caramel Layer Cake
  • Best Big Fat Chewy Chocolate Chip Cookie
  • Key Lime Pie Layer Cake cover photo.
    Key Lime Pie Layer Cake
  • White Cake with Strawberry Filling
    White Cake with Strawberry Filling

Seasonal

  • Banana Cream Pie
  • Chocolate Root Beer Float Cake
  • Cotton Candy Layer Cake
  • Strawberry Ice Cream Pop Cake

Footer

↑ back to top

About

  • The Cake Chica
  • Recipe Index
  • Work With Me

Legal

  • Privacy Policy

Contact

  • Contact

As an Amazon Associate I earn from qualifying purchases.

Copyright © 2025 The Cake Chica