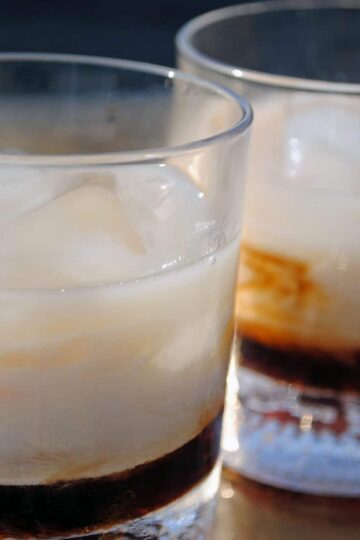
• Skip to primary navigation
  • Skip to main content
  • Skip to primary sidebar
  • About
  • Recipe
    • Listicle
    • Kitchen Staples
    • Drinks
      • Cocktails
      • Non-Alcoholic
      • Smoothies
    • Breakfast
      • Eggs
      • Muffins and Baking
      • Pancakes and Waffles
    • Sweet
      • Brownies and Bars
      • Cakes and Frostings
        • Beginner Cake Recipes
        • Intermediate Cake Recipes
        • Advanced Cake Recipes
      • Cheesecake
      • Cobblers & Fruit Desserts
      • Cookies and Candies
      • Custards & Trifles
      • Pies & Tarts
    • Savory
      • Appetizers
      • Easy Weeknight Meals
      • Beef and Pork
      • Chicken and Turkey
      • Fish and Shellfish
      • Grains and Beans
      • Pasta and Rice
      • Potatoes
      • Quinoa
      • Soups & Stews
      • Vegetables
    • On The Lighter Side
  • Resources
  • Contact
  • Work With Me
  • Privacy Policy

The Cake Chica

menu icon
go to homepage
  • Recipe Index
  • About
  • Work With Me
  • Contact

subscribe
search icon
Homepage link
  • Recipe Index
  • About
  • Work With Me
  • Contact

×
Home

Margaritas

February 22, 2014

Margaritas

***The simple syrup has to steep for at least 4 hours or up to 24 hours***

Well after a hectic work week what better way to celebrate the weekend by having a freshly made margarita on Margarita day!

I am not a big drinker but I like the occasional mixed drink on special occasions or after a tough week at the office (like this week). And just like my food, I must have the purest of ingredients in my mixed drinks as well! This margarita recipe uses real fruit juice, with none of those pre-made mixes. Let me know what you think. Enjoy!

Margaritas

Margaritas

Yield: 2

Ingredients

SIMPLE SYRUP

  • 4 teaspoons grated lime zest
  • ½ cup fresh squeezed lime juice, from about 4 limes
  • 4 teaspoons grated lemon zest
  • ½ cup fresh squeezed lemon juice, from about 3 lemons
  • ¼ cup superfine sugar

MARGARITA

  • 1 cup crushed ice
  • ½ cup 100 percent agave tequila
  • ½ cup triple sec

Instructions

  1. Combine the lime zest and juice, lemon zest and juice and sugar in a large liquid measuring cup, cover with plastic wrap and refrigerate until flavors meld, at least 4 hours or up to 24 hours.
  2. Divide 1 cup crushed ice among 2 margarita glasses. Strain the juice mixture into a cocktail shaker. Add tequila, triple sec and shake until thoroughly combined and chilled, about 20 to 60 seconds. Strain into ice filled margarita glasses and serve immediately.

Did you make this recipe?

Tag @thecakechica1 on Instagram and hashtag #thecakechica1

© Mary
Category: Drinks


Tortilla Soup

February 9, 2014

Tortilla Soup

Tortilla Soup

Disclosure: As an Amazon Associate and member of other affiliate programs, I earn from qualifying purchases.

I love this Tortilla Soup because it's a simplified version of homemade but with all the homemade flavor! Plus, it's made with easy to find ingredients and you could even make this recipe on a weeknight.

Chicken Tortilla Soup

Chicken Broth

This almost homemade Tortilla Soup takes a short cut by cooking the bone in chicken breast in store bought chicken broth to achieve the homemade chicken broth flavor in just a fraction of the time.


Tortilla Soup

Flavor Base

Tomatoes, garlic, onion and chiles get pureed in a food processor or blender and then cooked on the stove top for extra flavor.

Tortilla Soup

Toppings

Obviously, tortilla chips are needed for Tortilla Soup. Here, tortillas are cut into strips and baked in the oven at 425 degrees for about 15 minutes. Homemade tortilla strips are then placed in each bowl and Tortilla Soup gets ladled on top. I like to add a few extra tortilla strips on top with additional toppings.

My favorite toppings included: lime wedges, fresh cilantro, and Cotija cheese.

Tortilla Soup

Make Ahead

Don't you just love when recipes can be made ahead of time? I do! You can prepare the soup up to 4 days in advance and store in the refrigerator without tortilla strips and toppings. 

Tortilla Soup

Follow The Cake Chica on Facebook, Instagram and Pinterest!

You May Also Like:

Chicken Fideo Soup

Chicken Fideo Soup

Mexican Alphabet Soup with Turkey Meatballs

Easy Seafood Stew

Easy Seafood Stew

Adapted from Cook's Illustrated.

Tortilla Soup

Tortilla Soup

Yield: 4
Prep Time: 20 minutes
Cook Time: 50 minutes
Total Time: 1 hour 10 minutes

Almost homemade Tortilla Soup with all the homemade flavor made in just a fraction of the time.

Ingredients

SPECIAL TOOLS

  • Dutch oven
  • Food processor

TORTILLA STRIPS

  • 10 (6 inch) corn tortillas, cut into ½ inch strips
  • 1 tablespoon vegetable oil
  • ½ teaspoon kosher salt

SOUP

  • 2 (12 ounce) bone-in chicken breast, skin removed and trimmed
  • 8 cups low sodium chicken broth
  • 1 large white onion, trimmed of root, quartered and peeled, divided
  • 4 garlic cloves, peeled, divided
  • 10 sprigs fresh cilantro
  • 1 sprig fresh oregano
  • ½ teaspoon kosher salt
  • 1 pound tomatoes, cored and quartered
  • 1 jalapeno chile, divided, seeds removed
  • 1 canned chipotle chile in adobo sauce (just 1 pepper)
  • 1 tablespoon vegetable oil
  • 1/8 teaspoon kosher salt

GARNISHES

  • 1 Hass Avocado
  • 8 ounces Cotija cheese, crumbled or Monterey Jack cheese, diced fine
  • Lime wedges
  • Fresh cilantro
  • Minced jalapeno chile
  • Mexican crema or sour cream

Instructions

TORTILLA STRIPS

  1. Adjust an oven rack to the center position and heat oven to 425 degrees. On a rimmed baking sheet lined with foil (for easy clean up) spread tortilla strips over the baking sheet and drizzle with oil. Toss to coat spread tortilla strips on an even layer. Bake until strips are golden brown, about 15 minutes. Rotate pan and re toss tortilla strips halfway through baking. Sprinkle with salt and set tortilla strips aside to cool.

SOUP

  1. In a Dutch oven, bring chicken broth, 2 onion quarters, 2 garlic cloves, cilantro, oregano and ½ teaspoon salt to a boil over medium-high heat.  Reduce the heat to low and cover, cook at a simmer until chicken is cooked through, about 20 minutes. Transfer cooked chicken to a plate to cool slightly. Set a fine mesh strainer over a large bowl and pour chicken broth through the strainer to remove the solids. Shred the chicken with 2 forks and discard the bones.
  2. In a food processor or blender, puree the tomatoes, remaining onion quarters, remaining 2 garlic cloves, jalapeno and chipotle until smooth. In the now empty Dutch oven, heat oil over high heat until shimmering. Add the tomato-onion puree and salt and cook for about 10 minutes until the mixture has darkened in color, stirring occasionally.
  3. Add the strained chicken broth to the tomato puree mixture and bring to a boil. Reduce the heat to low and simmer for about 15 minutes to let the flavors meld.  Add the shredded chicken and cook until the chicken is heated through, about 5 minutes.  Place tortilla strips in bowls and ladle soup over the top. Garnish with your favorite toppings and enjoy.

Notes

MAKE AHEAD: This soup can be made up to 4 day in advance. Store in the refrigerator.

Recommended Products

As an Amazon Associate and member of other affiliate programs, I earn from qualifying purchases.

  • Cuisinart 14-Cup Food Processor, Brushed Stainless Steel
    Cuisinart 14-Cup Food Processor, Brushed Stainless Steel
  • Lodge 7 Quart Oval Enameled Dutch Oven
    Lodge 7 Quart Oval Enameled Dutch Oven
Nutrition Information:
Yield: 4 Serving Size: 1
Amount Per Serving: Calories: 610Total Fat: 39gSaturated Fat: 15gTrans Fat: 0gUnsaturated Fat: 20gCholesterol: 97mgSodium: 1730mgCarbohydrates: 33gFiber: 6gSugar: 8gProtein: 37g

*Nutrition information is an estimate and will vary.*

Did you make this recipe?

Tag @thecakechica1 on Instagram and hashtag #thecakechica1

© Mary | The Cake Chica
Cuisine: Mexican / Category: Main

Did you make this recipe? I’d love to see it! Tag The Cake Chica on Instagram @thecakechica1 #thecakechica1

Shrimp Linguine with Creamy Red Pepper Sauce

July 8, 2013

Linguine with Creamy Red Pepper Sauce

Happy Sunday everyone! I am happy to have a blog post for you today. It's been a few weeks since I have posted. I am in the process of getting my home ready to sell so I have been extremely busy and haven't had much time to cook. July 4th weekend gave me 4 days to get some things done around the house. Now that it's Sunday I am looking forward to getting back on schedule with meals and such.

This recipe was inspired by Ellie Krieger's Fettuccine with Creamy Red Pepper Sauce. The original recipe had no meat in it and well, for me and my husband, that just doesn't work. So we added some shrimp to it, and since my husband prefers linguine over fettuccine, we switched the noodles. See our version of this tasty recipe below.

Shrimp Linguine with Creamy Red Pepper Sauce

Shrimp Linguine with Creamy Red Pepper Sauce

Yield: 5

Ingredients

  • 2 tablespoons olive oil
  • 1 cup chopped onion
  • 2 teaspoons chopped garlic
  • 1 16 oz. jar roasted red peppers, drained, rinsed and chopped
  • ½ cup low-sodium chicken broth
  • 8 oz. crumbled feta cheese
  • 1 pound medium shrimp, tails removed and deveined
  • 1 tablespoon unsalted butter
  • 1 pound organic whole wheat linguine
  • Salt and pepper, to taste
  • 2 tablespoons fresh parsley, chopped

Instructions

  1. Heat 2 tablespoon olive oil in a medium skillet over medium-high heat. Add the onion and garlic and cook, stirring a few times, until softened, about 5 minutes. Add the roasted peppers and cook, stirring a few times until heated through. Remove from the heat and let cool for about 5 minutes.
  2. Transfer the red pepper mixture to a food processor or blender. Add the broth and all but 4 tablespoons of the feta cheese, process until combined and smooth, about 30 seconds.
  3. In a non-stick skillet melt 1 tablespoon unsalted butter over medium-high heat. Add shrimp and cook for 2-3 minutes on each side. Set aside.
  4. Cook the pasta according to the package directions. Drain and reserve ½ cup of the pasta water. Toss the pasta with the sauce, adding the pasta water by the tablespoon if needed. The sauce should cling nicely to the pasta. Season with salt and pepper. Divide into 5 pasta bowls and top with some feta cheese and chopped parsley.
Nutrition Information:
Serving Size: 1
Amount Per Serving: Calories: 609Total Fat: 15gSaturated Fat: 6gCholesterol: 204mgSodium: 1465mgCarbohydrates: 87gFiber: 11gSugar: 5gProtein: 32g

Did you make this recipe?

Tag @thecakechica1 on Instagram and hashtag #thecakechica1

© Mary
Category: Main


Baked Shrimp with Tomatoes and Feta

June 23, 2013

Baked Shrimp with Tomatoes and Feta

Adapted from The Food You Crave, by Ellie Krieger

At first bite I thought, this is comfort food at its best! The anticipation was high while cooking this dish. The bubbling tomato sauce, the aroma of the fresh dill, and the texture of the charred feta cheese just topped this dish off perfectly!!!

Baked Shrimp with Tomatoes and Feta

Baked Shrimp with Tomatoes and Feta

Yield: 4

Ingredients

  • 1 tablespoon olive oil
  • 1 onion, diced, about (1 ½ cups)
  • 2 garlic cloves, minced
  • 2 14.5 oz cans no-salt added diced tomatoes, with their juices
  • ¼ cup fresh parsley, finely minced
  • 1 tablespoon dill, finely minced
  • 1 ½ pounds medium shrimp, peeled and deveined
  • ¼ teaspoon kosher salt
  • ¼ teaspoon black pepper
  • 6 ounces crumbled feta cheese

Instructions

  1. Preheat your oven to 425 F.
  2. Heat the oil in an ovenproof skillet over medium-high heat. Add the onion and cook, stirring until softened, about 3 minutes. Then add the garlic and cook for 1 minute. Add the tomatoes and bring to a boil.
  3. Reduce the heat to medium-low and let simmer for 5 minutes until the juices thicken.
  4. Remove from the heat. Stir in the parsley, dill and shrimp and season with salt and pepper. Sprinkle the feta cheese over the top. Bake until the shrimp are cooked through and the cheese softens, about 12 minutes.
  5. Remove from the oven after 12 minutes and turn on your broiler. Place you pan under the broiler so the cheese gets a nice char on the top. Watch this carefully. It chars quickly. Serve with quinoa, orzo, or jasmine rice, like I did. Enjoy!
Nutrition Information:
Serving Size: 1
Amount Per Serving: Calories: 320Total Fat: 11gSaturated Fat: 4gCholesterol: 290mgSodium: 1005mgCarbohydrates: 17gFiber: 5gSugar: 9gProtein: 40g

Did you make this recipe?

Tag @thecakechica1 on Instagram and hashtag #thecakechica1

© Mary
Category: Main


Fish Tacos with Chipotle Cream

June 19, 2013

Fish Tacos with Chipotle

Fish tacos are the perfect summertime meal. They are light, flavorful, full of color and ideal to eat while having fun in the sun, and will still have you looking slim and trim at the beach.

Fish Tacos with Chipotle Cream

Fish Tacos with Chipotle Cream

Yield: 4

Ingredients

FOR THE FISH

  • 2 tablespoons olive oil
  • 2 tablespoons fresh lime juice
  • ¼ teaspoon kosher salt
  • Freshly ground black pepper to taste
  • 1 pound flaky white fish, such as tilapia, mahi-mahi, or halibut

FOR THE CHIPOTLE CREAM

  • ½ cup plain Greek yogurt
  • 2 tablespoon organic mayo
  • 2 teaspoons finely chopped canned chipotle chili in adobo sauce

FOR THE TACOS

  • Eight 6 inch corn tortillas
  • 1 ½ cups shredded purple cabbage
  • ½ cup cooked corn kernels
  • ¼ cup fresh cilantro leaves
  • Lime wedges

Instructions

  1. To make the fish, in a small bowl whisk together the oil, lime juice, salt and pepper and pour over the fish and let marinate at room temperature for 20 minutes.
  2. In a small bowl combine the plain Greek yogurt, mayo, and the chipotle peppers.
  3. Preheat a non-stick skillet on medium high heat. Remove the fish from the marinade and place the marinated fish on the skillet and cook for about 3-4 minutes per side. Once the fish is cooked, cover and set aside.
  4. Heat the tortillas on the burner of a gas stove to the desired level of doneness. Otherwise, microwave the tortillas for about 30 seconds.
  5. Flake the fish with a fork. Spread each tortilla with 1 tablespoon of the chipotle cream. Top with the fish, cabbage, corn and cilantro and serve with lime wedges.
Nutrition Information:
Serving Size: 2
Amount Per Serving: Calories: 338Total Fat: 15gSaturated Fat: 2gCholesterol: 60mgSodium: 273mgCarbohydrates: 26gFiber: 4gSugar: 5gProtein: 27g

Did you make this recipe?

Tag @thecakechica1 on Instagram and hashtag #thecakechica1

© Mary
Category: Main


Blueberry Buckwheat Pancakes

June 15, 2013

Blueberry Buckwheat Pancakes

Since this was my first time cooking with buckwheat, I decided to do a little research on it. And to my surprise, it’s not wheat at all, but more like a seed or achene. And to top it off its * gluten free!

Okay, enough about the buckwheat, on to the pancakes! My favorite thing about these pancakes is the blueberries! I typically eat fresh blueberries with oatmeal almost every morning, so this is a great alternative to my usual oatmeal. (I hate missing out on my daily serving of blueberries.) Give these extraordinary pancakes a try, I think you’ll like them.

*This is not a gluten free recipe.

Blueberry Buckwheat Pancakes

Blueberry Buckwheat Pancakes

Yield: 4

Ingredients

  • ¾ cup buckwheat flour
  • ¾ cup wheat flour
  • 1 ½ teaspoons baking powder
  • ½ teaspoon baking soda
  • ¼ teaspoon salt
  • 1 cup low-fat buttermilk
  • ¾ cup reduced fat milk
  • 1 tablespoon honey
  • 2 large eggs
  • 2 tablespoons canola oil
  • 2 cups fresh or thawed frozen blueberries
  • Cooking spray
  • ½ cup pure maple syrup

Instructions

  1. In a large bowl, whisk together the flours, baking powder, baking soda, and salt. In a medium bowl, beat together the buttermilk, reduced fat milk, honey, eggs, and oil. Stir the wet ingredients into the dry ingredients, folding just to combine. Over mixing can make your pancakes rubbery. The batter should be somewhat lumpy. Fold in 1 cup of the blueberries.
  2. Coat a large nonstick griddle or skillet with cooking spray and preheat over medium heat. Use a ¼ cup measure to ladle the batter onto the griddle or skillet. Flip the pancakes when they are golden brown on the bottom and bubbles are forming on the top, about 1 ½ minutes. Cook the other side until golden brown, about another 1 ½ minutes. Keep the pancakes warm in a 200 F oven while you finishing cooking the remaining pancakes.
  3. Serve with remaining blueberries and pure maple syrup.
Nutrition Information:

Amount Per Serving: Calories: 676Total Fat: 17gSaturated Fat: 3gCholesterol: 135mgSodium: 820mgCarbohydrates: 116gFiber: 8gSugar: 60gProtein: 22g

Did you make this recipe?

Tag @thecakechica1 on Instagram and hashtag #thecakechica1

© Mary
Category: Breakfast


Breaded Parmesan Pork Chops

June 13, 2013

Breaded Parmesan Pork Chops

I love quick and easy meals after a long day at work and after my work out. This is one of those meals. Simple ingredients…..simple prep…..simply delicious. Yeah it’s kind of corny but hey it’s true!

Breaded Parmesan Pork Chops

Breaded Parmesan Pork Chops

Yield: 4

Ingredients

  • 4 boneless pork chops, ½ inch thick
  • ¼ cup reduced fat milk
  • ¼ cup parmesan cheese, shredded
  • ¼ cup bread crumbs
  • ¼ teaspoon kosher salt
  • 1/8 teaspoon black pepper
  • ¼ teaspoon garlic powder

Instructions

  1. Preheat the oven to 375 F.
  2. Pour the milk into a shallow dish. Pour the cheese, bread crumbs, salt, pepper and garlic powder in another shallow dish. Dunk the pork chops in the milk, then coat in the bread crumb mixture. Coat a baking sheet in cooking spray or line with foil for easy clean up. Transfer breaded chops to the sheet. Place in the oven and bake for 9-11 minutes on each side, or until they reach the desired level of doneness.
Nutrition Information:
Serving Size: 1
Amount Per Serving: Calories: 294Total Fat: 12gSaturated Fat: 5gCholesterol: 114mgSodium: 170mgCarbohydrates: 4gSugar: 1gProtein: 37g

Did you make this recipe?

Tag @thecakechica1 on Instagram and hashtag #thecakechica1

© Mary
Category: Main


Mushroom Risotto

June 9, 2013

Mushroom Risotto

This is only my second time making risotto. I hear there’s a trick to getting it nice and creamy….. stirring! Stirring loosens the starch molecules from the outside of the rice grains into the surrounding liquid, creating a smooth creamy-textured liquid.

Some tips on cooking risotto: Properly cooked risotto should be rich and creamy, but still have some resistance or bite, (think of al dente). The traditional texture should be fairly fluid or “flowing in waves”, so says Wikipedia. It’s best served on flat dishes and should be easy to spread out but should not have excess liquid. Risotto should be eaten immediately, (that’s not a problem, I was eating this out of the pan while I was cooking it) as it continues to cook in its own heat and can become too dry.

For my second try at Risotto, I was pretty happy with the results. It was creamy, had a nice bite, but probably could have had a little more spread to it. However, this risotto was so tasty I could have cared less about the spread LOL. Enjoy! I know I did.

Mushroom Risotto

Mushroom Risotto

Yield: 4

Ingredients

  • 1 cup Arborio rice
  • 1 large onion, chopped
  • 1 clove garlic, chopped
  • 1 teaspoon fresh parsley, chopped
  • Salt and pepper to taste
  • 1 ½ cups fresh mushrooms, sliced
  • 1 cup reduced fat milk
  • ¼ cup half and half
  • 3 cups low-sodium chicken broth, plus more if needed
  • 1 tablespoon unsalted butter
  • ½ cup Parmesan cheese

Instructions

  1. Bring the chicken broth to a boil in a small saucepan. Reduce the heat and keep warm
  2. Coat a large skillet with cooking spray and place over medium-high heat. Add the onion and garlic and sauté until onion is tender. Stir in the parsley, salt, pepper, and mushrooms. Reduce heat to low and cook until mushrooms have soften, stirring occasionally.
  3. Add the milk and cream to the skillet, mix everything together, then stir in the rice. Bring to a simmer, then stir in the heated chicken broth one cup at a time, stirring after each addition until it is absorbed by the rice. Repeat this process until the rice is cooked but has a nice bite. You may need more chicken broth or less.
  4. Once the rice is finished cooking, stir in the butter and cheese, let the cheese melt for a minute then remove from the heat.
Nutrition Information:

Amount Per Serving: Calories: 336Total Fat: 13gSaturated Fat: 8gCholesterol: 38mgSodium: 908mgCarbohydrates: 36gFiber: 2gSugar: 6gProtein: 19g

Did you make this recipe?

Tag @thecakechica1 on Instagram and hashtag #thecakechica1

© Mary
Category: Main


Whole-Wheat Pancakes with Strawberry Sauce

June 8, 2013

Whole Wheat Pancakes with Strawberry Sauce

I love the weekends! I love the weekends because I get to spend a little more time experimenting with new foods and recipes. There’s nothing like making some whole wheat pancakes with my husband, putting a pot of coffee on and blogging the morning away. This morning I have for you Whole Wheat Pancakes with Strawberry Sauce. Come back next week for Blueberry Buckwheat Pancakes.

Serves 3 3-5inch pancakes per serving

¾ cup all purpose flour
¾ cup whole grain pastry flour or whole wheat flour
1 ½ teaspoon baking powder
½ teaspoon baking soda
¼ teaspoon salt
2 large eggs
1 cup low fat buttermilk
¾ cup reduced fat milk
1 tablespoon honey
¼ teaspoon vanilla extract
Cooking spray
Strawberry Sauce (recipe will follow)
Powdered sugar (optional)

In a large bowl, whisk together the flours, baking powder, baking soda and salt. In a medium bowl, beat together the eggs, buttermilk, reduced fat milk, honey and vanilla.

Spray a large nonstick skillet or griddle with cooking spray and preheat over medium-low heat. Stir the wet ingredients into the dry ingredients, mix just to combine. The batter should be somewhat lumpy. Use a ¼ cup or a ice cream scoop to ladle the batter onto the griddle or skillet. Flip the pancakes when they are golden brown on the bottom and bubbles are forming on top, about 1 ½ minutes. Cook the other side until golden brown, about another 1 ½ minutes. Keep the pancakes warm in a 200 F oven as you finish cooking the remaining ones.

Ladle about 1/3 cup of the strawberry sauce onto each plate. Place the pancakes on top. Sprinkle with powdered sugar if desired.

STRAWBERRY SAUCE
2 pints fresh strawberries, hulled or 4 cups frozen strawberries, thawed
1 teaspoon lemon juice
2 tablespoons maple syrup

Place the strawberries in a food processor and process them into a chunky puree. Transfer the puree to a small saucepan over low heat and heat just until warm. Stir in the lemon juice and maple syrup.

Nutritional Info:
Cals: 495
Total fat: 6g
Sat. fat: 2g
Choles: 132mg
Sodium: 1385
Carbs: 95g
Fiber: 11g
Sugars: 36g
Protein: 17g

Lemon-Rosemary Salmon Filets

June 7, 2013

Salmon is one of my favorite fish. You don’t have to do much to flavor it up. It has a pleasant taste all on its own.  A little rosemary and lemon is all you need.  See below for a simple and delicious salmon recipe.

Lemon-Rosemary Salmon Filets

Lemon-Rosemary Salmon Filets

Yield: 4

Ingredients

  • 4 salmon fillets
  • 1 tablespoon lemon juice
  • ½ teaspoon dried rosemary
  • 1 tablespoon extra virgin olive oil
  • ¼ teaspoon kosher salt
  • 1/8 teaspoon black pepper

Instructions

  1. Preheat the oven to 350 F. Combine lemon juice, rosemary and olive oil in a medium baking dish.
  2. Season the salmon filets with salt and pepper. Add them to the baking dish and turn to coat. Allow to marinate for 10-15 minutes.
  3. Cover with foil and bake for about 20 minutes or until fish flakes easily with a fork.
Nutrition Information:
Serving Size: 1
Amount Per Serving: Calories: 291Total Fat: 16gSaturated Fat: 3gCholesterol: 110mgSodium: 198mgProtein: 37g

Did you make this recipe?

Tag @thecakechica1 on Instagram and hashtag #thecakechica1

© Mary
Category: Main


Aussie Chicken

June 2, 2013

Aussie Chicken

Aussie Chicken

UPDATE (February 2016): I originally posted this recipe in June 2013 and had some revisions to add to the original recipe. And of course I had to add some new food porn.

I’ve said it before and I’ll say it again, you can never have too many chicken recipes.  And this one has cheese, mushrooms and bacon!!! At under 500 calories, I think this is one you can add to your chicken recipe repertoire. For my low-carb lovers add a side salad and you've got dinner! An easy one at that.

...

Read More

Brown Rice Pilaf

June 1, 2013

Brown Rice Pilaf

Okay, I'm feeling a little guilty today. Here I am about to tell you how brown rice has more vitamins than white rice, and that it's a healthier choice than white rice, but I just ate BBQ with a loaded baked potato on the side. I did ask for only lean cuts of brisket and all the fixin's on the side of that baked potato so I tried my best. But as they say, one bad meal won't make you fat, just like one good meal won't make you lean. Most of my recipes are pretty healthy (see my About page for my definition of healthy), but I make no promises when it comes to desserts.

Today's healthy recipe is Brown Rice Pilaf. Enjoy.

Brown Rice Pilaf

Brown Rice Pilaf

Yield: 3

Ingredients

  • 1 tablespoon unsalted butter
  • 1 shallot, chopped
  • 1 cup long grain brown rice
  • 2 cups reduced sodium chicken broth
  • 1 garlic clove, chopped
  • Leaves off 2 sprigs of fresh thyme
  • 3 tablespoons flat leaf parsley
  • 3 scallions, thinly sliced
  • ¼ teaspoon kosher salt
  • 1/8 teaspoon black pepper

Instructions

  1. Melt the butter in a large skillet over medium heat. Add the shallot and cook for about 5 minutes until tender. Add the rice and stir well. Cook until rice is browned.
  2. Stir in the chicken broth, garlic and thyme. Cover with a tight fitting lid and simmer for 40 minutes. Fluff rice with a fork and stir in the parsley and scallions. Season with salt and pepper.
Nutrition Information:
Serving Size: 1
Amount Per Serving: Calories: 288Total Fat: 5gSaturated Fat: 3gCholesterol: 10mgSodium: 505mgCarbohydrates: 52gFiber: 3gSugar: 1gProtein: 8g

Did you make this recipe?

Tag @thecakechica1 on Instagram and hashtag #thecakechica1

© Mary
Category: Main


  • « Go to Previous Page
  • Page 1
  • Interim pages omitted …
  • Page 30
  • Page 31
  • Page 32
  • Page 33
  • Page 34
  • Interim pages omitted …
  • Page 39
  • Go to Next Page »

Primary Sidebar

Welcome!

Hi, I’m Mary. The self-taught baker, food stylist, and photographer behind The Cake Chica. If you love creating bakery-style desserts from scratch and want a peek behind the scenes of how they’re styled and captured, you’re in the right place.

More about me

Popular

  • Toasted Coconut Caramel Layer Cake on marble cake pedestal.
    Toasted Coconut Caramel Layer Cake
  • Best Big Fat Chewy Chocolate Chip Cookie
  • Key Lime Pie Layer Cake cover photo.
    Key Lime Pie Layer Cake
  • White Cake with Strawberry Filling
    White Cake with Strawberry Filling

Seasonal

  • Banana Cream Pie
  • Chocolate Root Beer Float Cake
  • Cotton Candy Layer Cake
  • Strawberry Ice Cream Pop Cake

Footer

↑ back to top

About

  • The Cake Chica
  • Recipe Index
  • Work With Me

Legal

  • Privacy Policy

Contact

  • Contact

As an Amazon Associate I earn from qualifying purchases.

Copyright © 2025 The Cake Chica