
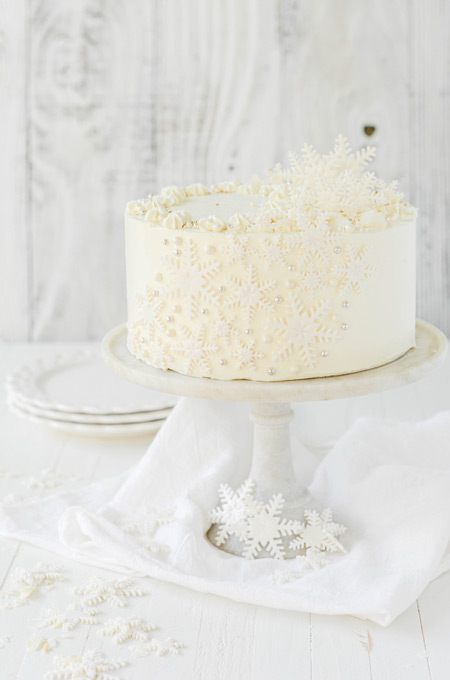
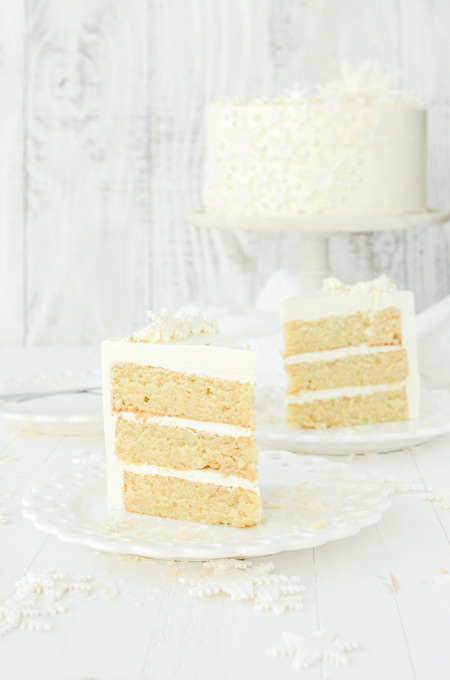
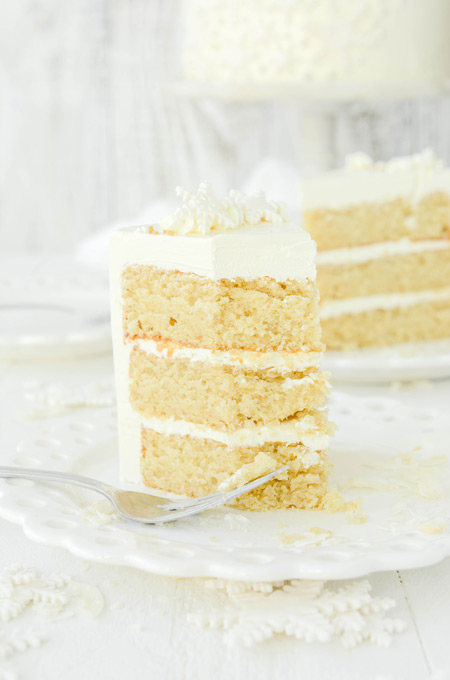
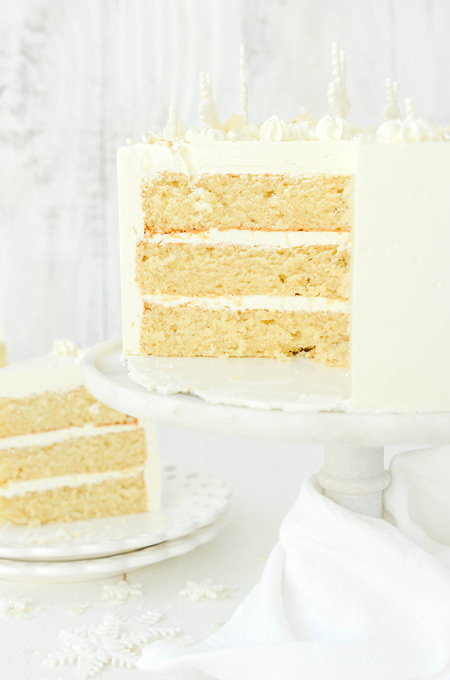
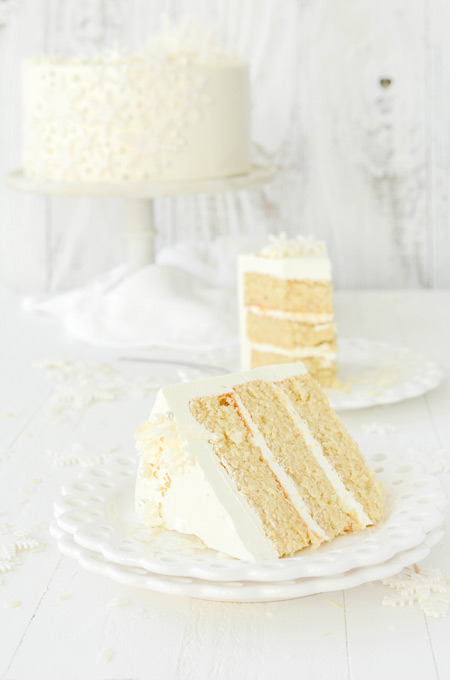
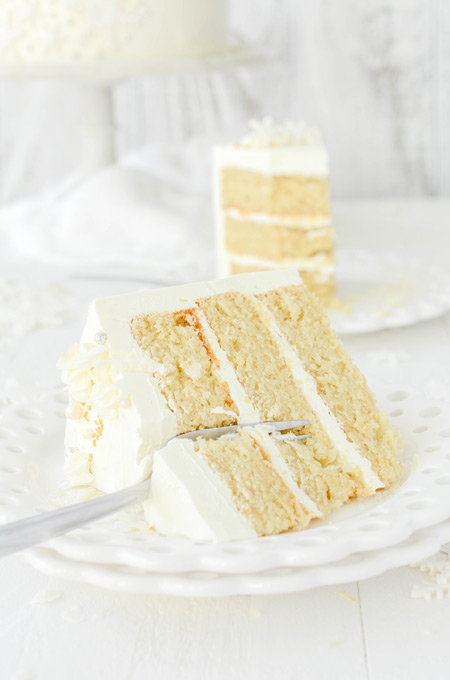
Some might say this Christmas Coconut Cake is too beautiful to eat, but after one bite I bet they'd be glad they did! Even if you're not a coconut lover, this cake might change your mind.
The coconut is toasted then processed in a food processor to a fine ground. Which is perfect for those that don't like the texture of coconut. Next I soak the processed coconut in the buttermilk for a few minutes to infuse the flavor. This helps the coconut flavor flow throughout the entire cake!
Coconut Cake Ingredients
- Sweetened shredded coconut: has been combined with sugar and is best for cookies, cakes and decoration.
- Buttermilk: is used for adding acidity and a tangy flavor, and when there is baking soda in the recipe (like this one) the acid reacts as a leavener. Do not substitute regular milk for buttermilk. You can make your own homemade buttermilk by adding 1 tablespoon of fresh lemon juice or white vinegar to 1 cup milk, letting it sit for about 10 minutes.
- Vanilla extract: the most versatile flavoring and helps enhance the flavors of any baked good.
- All purpose flour: the most versatile flour there is for baking! All-purpose flour is a great choice for baked goods that require more structure.
- Baking soda: a leavener for baked goods. Baking soda requires an acid and a liquid for it's leavening powers to activate, such as the buttermilk in this recipe.
- Salt: enhances the flavors of the ingredients in the recipe whether it be sweet or savory.
- Granulated sugar: dissolves quickly into batters and creams well with butter.
- Unsalted butter: the amount of salt varies from brand to brand so I always opt for unsalted butter. Salted butter also contains more water than unsalted which can affect gluten development.
- Canola oil: is an excellent all-purpose cooking and baking oil. It's mild and has a high smoke point.
- Eggs: bind, thicken and leaven. I always use large eggs in baking for consistency purposes.
- Heavy cream: in this recipe, heavy cream is whipped and then folded into the batter. Do not substitute with sweetened whipped topping or already whipped cream products.
Coconut Swiss Meringue Buttercream Tips
- Don't get cream of coconut confused with coconut cream. They are not the same and can't be use interchangeably. I used cream of coconut by Coco Lopez for this recipe. You can find cream of coconut in cans near the mixed beverage section of the grocery store.
- Make sure your mixer bowl is clean. There should be no grease or oil in the bowl.
- Whisk together the egg whites and sugar before heating or the egg whites might start to cook on their own.
- Make sure the bottom of the bowl does not touch the simmering water when heating.
- Your butter should be at room temperature and cut into tablespoon sized pieces before adding to the whipped egg whites.
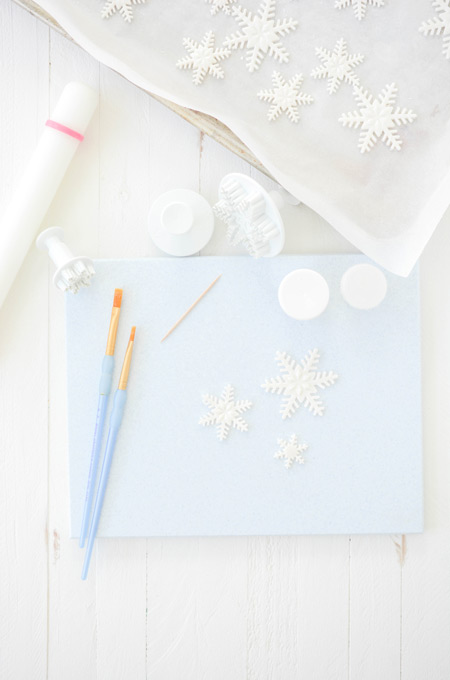
Fondant Snowflake Tools
- PME Snowflake Plunger Cutters
- Small fondant rolling pin
- White fondant mixed with Tylose powder or gumpaste
- Mix of cornstarch and powdered sugar in a shaker to help keep fondant/gumpaste from sticking
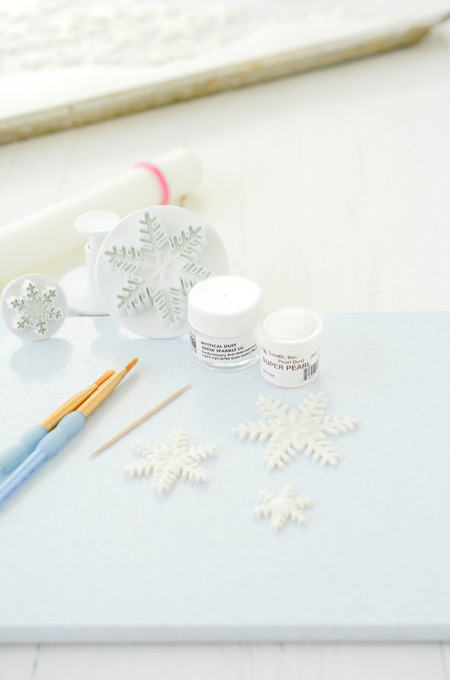
- Luster dust/disco dust
- Small food only paint brush
- Steamer (optional)
How To Make Fondant Snowflake
- Roll out your fondant or gumpaste on a small work surface and press cutters into the fondant or gumpaste. (If you're using fondant I suggest mixing in some tylose powder to help the fondant firm up.)
- Press out more snowflakes then you think you'll need to account for breakage.
- Use a toothpick to remove excess fondant or gumpaste from the snowflake.
- Use a food only small paint brush to gently brush snowflakes with luster dust and/or disco dust. I used luster dust and then added food grade glitter on top.
- Let the snowflakes dry overnight.
- I used a steamer to help set the luster dust and to give it a shine, but this is optional.
Christmas Coconut Cake Decorating Tips
- Start with a crumb coat. When crumb coating the cake, be sure not to return any of that frosting to the original bowl of frosting.
- Chill the cake for at least 30 minutes before applying the last layer of buttercream.
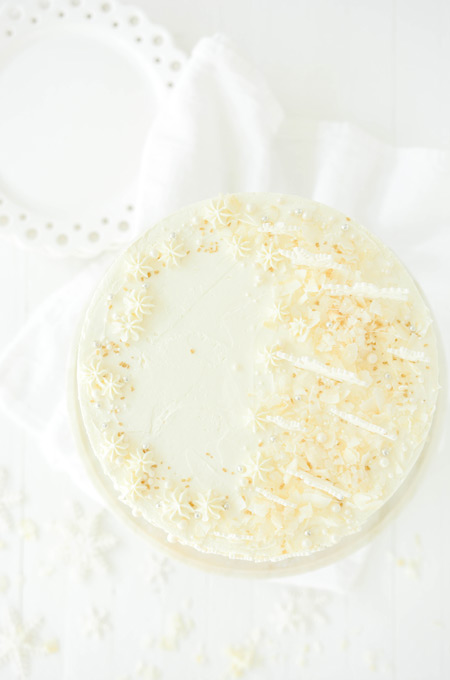
- Apply an even layer of buttercream over the top and sides of the cake. I use an icing smoother and a cake turntable, and acrylic disc to achieve a smooth application of buttercream. These tools are optional and there is plenty of buttercream to play around with in this recipe.
- Smooth out the excess buttercream at the top edge of the cake by gently pulling the buttercream towards the center of the cake with a small offset cake spatula.
- Fit a piping bag with Wilton Tip #3 and pipe small dollops of buttercream to the back center of each snowflake before applying to the side of the cake.
- Gently place a few snowflakes on the top of the cake and sprinkle shredded coconut on top to hide where the base of the snowflakes dig into the cake. I used flaked unsweetened coconut for decorating.
- Sprinkle additional sprinkles and/or dragees over the top of the cake to give it a little more dimension.
- Strategically place dragees on the side of the cake between the fondant snowflakes with food-only tweezers.
- Switch out piping tip #3 with piping tip # 21 to add a few more elements to the top of the cake and anywhere else you feel it's needed.
- Give the cake a final sprinkling of food grade glitter before serving.
Christmas Coconut Cake Baking Schedule
- Day 1: Make snowflakes.
- Day 2: Bake cake layers.
- Day 3: Prepare buttercream, assemble and serve.
Cake Storage
Cake layers can be stored wrapped in plastic wrap in an airtight container for up to 5 days. Assembled cake can be stored in an airtight container at room temperature for up to 1 day, or stored in the refrigerator for up to 3 days. Bring to room temperature before serving.
Let's Connect
The Cake Chica is on Facebook sharing sneak peeks of recipes to come, Instagram from your food porn desires to Pinterest for your board pinning needs.
You May Also Like
Gingerbread Cottage
Christmas Confetti Sugar Cookies
Gingerbread House Layer Cake
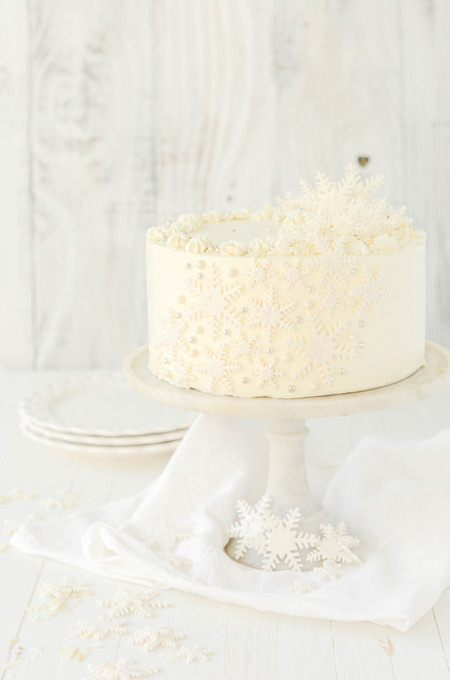
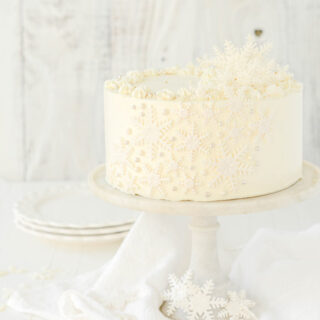
Christmas Coconut Cake
Three layers of homemade toasted coconut cake filled and frosted with coconut Swiss meringue buttercream, decorated with fondant snowflakes and edible glitter.
Ingredients
SPECIAL TOOLS
- 3 8-inch round cake pans
- Nonstick baking spray
- Stand mixer
- Hand mixer
- Candy thermometer
- 8-inch round cake board
- Cake turntable
- Metal icing smoother
- Small offset cake spatula
- Snowflake plunger cutters
- Luster dust
- Small food only paint brush
- Fondant/Gumpaste snow flakes
- Steamer (optional)
- Festive sprinkles and dragees
- Food only tweezers
- Piping bag
- Wilton piping tips #3, #21
- Flaked coconut, for decorating
COCONUT CAKE
- 1 1/2 cups lightly packed sweetened shredded coconut, toasted
- 1 cup buttermilk, at room temperature
- 2 teaspoon pure vanilla extract
- 2 cups (10 ounces) all purpose flour
- ¾ teaspoon baking soda
- ½ teaspoon fine sea salt
- 1 ½ cups (10.5 ounces) granulated sugar
- ½ cup (1 stick) unsalted butter, at room temperature
- ½ cup canola oil
- 4 large eggs, at room temperature
- ½ cup heavy cream, cold
COCONUT SWISS MERINGUE BUTTERCREAM
- 1 cup egg whites
- 2 cups (14 ounces) granulated sugar
- 3 cups (6 sticks) unsalted butter, cut into tablespoon sized pieces, at room temperature
- 1 teaspoon vanilla extract
- 1 teaspoon coconut extract
- 2/3 cup cream of coconut, such as Coco Lopez
Instructions
COCONUT CAKE
- Adjust an oven rack the center position and heat oven to 350 degrees. Spray cake pans with nonstick baking spray and set aside.
- In a food processor, add 1 ½ cups toasted coconut (save the remaining for decorating) and process until finely ground, about 1 minute. In a 2 cup liquid measuring cup, combine processed coconut, buttermilk and vanilla and let sit until softened, about 10 minutes and set aside.
- In a large bowl whisk together the flour, baking soda and salt.
- In a bowl of a stand mixer fitted with the paddle attachment, cream together the sugar and butter on medium-high speed until fluffy, about 7 minutes. Reduce the mixer speed to low and slowly add the oil and mix until combined. Add eggs one at a time mixing on low speed until just combined. Scrape down the sides of the mixer bowl with a rubber spatula as needed. Add the flour mixture in three additions, alternating with the coconut-buttermilk in 2 additions, beginning and ending with the flour mixture. Stop the mixer before the last of the flour mixture has been combined and mix with a rubber spatula by hand to be sure not to over mix the batter.
- In a large bowl, add the heavy cream and beat with a hand mixer, until soft peaks form. Gently fold in the cream to the cake batter.
- Divide the batter among the prepared cake pans and bake for 20 to 25 minutes, or until a cake testers inserted in the center comes out with a few moist crumbs attached, rotating pans halfway through baking.
- Remove cakes from the oven and let cool in their pans for 10 minutes on cooling racks. Invert cakes onto cooling racks and let cool completely.
COCONUT SWISS MERINGUE BUTTERCREAM
- In the bowl of a stand mixer fitted with the whisk attachment, pour in the egg whites and sugar and whisk by hand until combined. Fill a medium saucepan with about 2 inches of water and bring to a simmer. Place mixer bowl on top, being sure the bottom of the bowl does not touch the water and attach a candy thermometer.
- Whisking occasionally, heat the egg mixture until the temperature reaches 160 degrees. Once the mixture reaches 160 degrees, transfer to a stand mixer and beat the mixture on high speed for 10 minutes or until medium-stiff peaks form. At this point the outside of the mixer bowl should be room temperature. Switch out the whisk attachment with the paddle attachment and with the mixer on low speed, add the butter one tablespoon at a time. Add the extracts and cream of coconut. Once combined, turn the mixer speed to medium-high and beat until the buttercream is smooth about 5 minutes.
ASSEMBLE
- Place one cake layer on an 8-inch round cake board, place on a cake turntable and spread about 2/3 cup buttercream over the top in an even layer, spreading all the way to the edge of the cake. Place the second cake layer on top, and spread 2/3 cup buttercream on top in an even layer, spreading all the way to the edge of the cake. Place the last cake layer on top (bottom side up) and cover with a thin coat of buttercream, creating a crumb coat and chill the cake for 30 minutes.
- Apply a generous layer of buttercream over the top and sides of the cake, saving remaining buttercream for decorating. Using your cake turntable and icing smoother, gently press the scraper against the side of the cake scrape around the sides to give it a smooth finish. Place excess buttercream back into the bowl. Fill in any holes with additional buttercream and repeat. Set cake in the refrigerator to chill for at least 15 minutes.
- Attach Wilton piping tip #3 to a piping bag and fill with buttercream. Strategically place snowflakes on the side of the cake by piping a small dollop of buttercream on the back, and gently attaching it to the cake.
- Pick a few of your favorite snowflakes to place on top and gently press into the top of the cake. Sprinkle some flaked coconut over the top and sprinkle with festive sprinkles and dragees on top.
- With tweezers, carefully place dragees on the sides of the cake between the snowflakes.
- Switch out piping tip #3 with tip #21 and decorate the top with a few more dollops of buttercream.
- Carefully transfer cake to a serving platter and serve.
Fondant Snowflakes
See blog post for instructions and tips on making fondant snowflakes.
Notes
CAKE STORAGE: Cake layers can be stored wrapped in plastic wrap in an airtight container for up to 5 days. Assembled cake can be stored in an airtight container at room temperature for up to 1 day, or stored in the refrigerator for up to 3 days. Bring to room temperature before serving.
Nutrition Information:
Yield: 12 Serving Size: 1Amount Per Serving: Calories: 588Total Fat: 37gSaturated Fat: 17gTrans Fat: 0gUnsaturated Fat: 18gCholesterol: 123mgSodium: 464mgCarbohydrates: 56gFiber: 3gSugar: 31gProtein: 10g
*Nutrition information is an estimate and will vary.*


Leave a Reply