
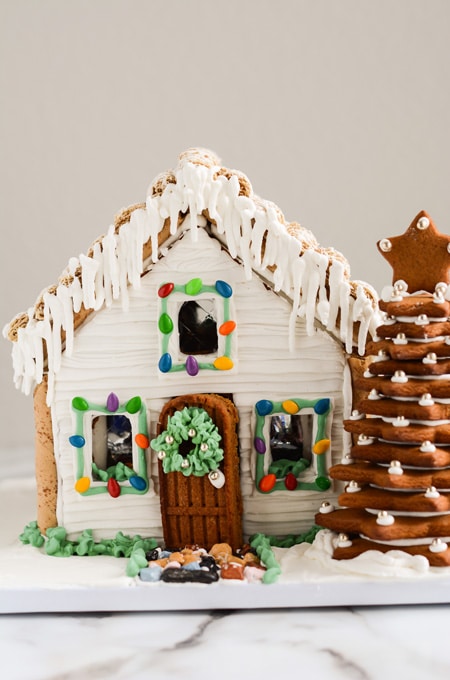
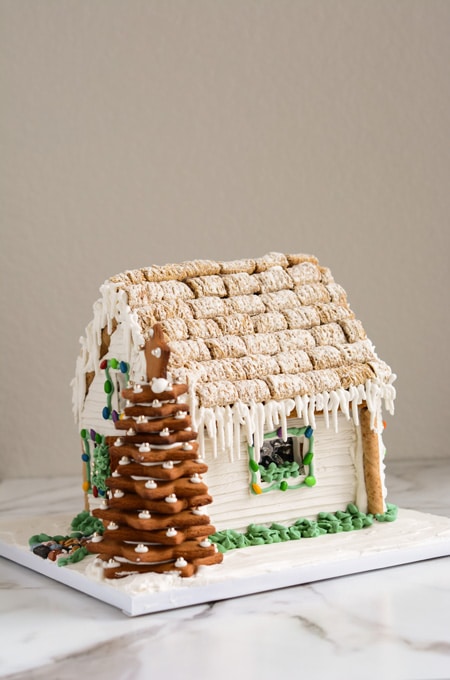
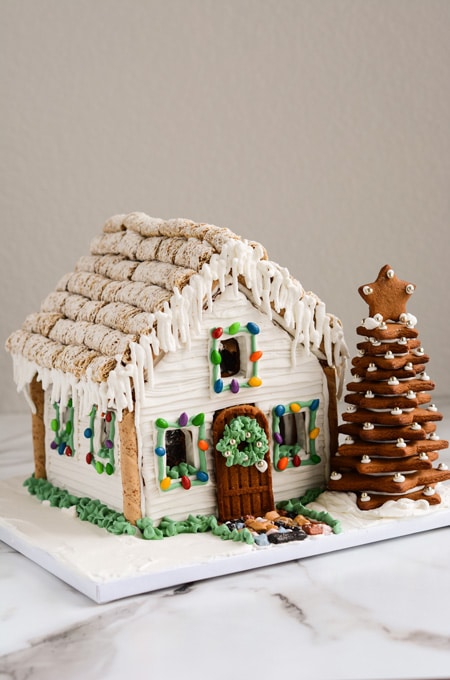
If you're looking for a fun and easier way to make a homemade gingerbread house, then this Gingerbread Cottage might be for you. This version uses a gingerbread house mold making it a little easier to make. Use your favorite gingerbread dough recipe or the recipe I used, which is at the bottom of this post.
Below, I've broken the process down in days to help you plan it out.

Plan It Out
Day 1:
- Make Gingerbread Dough
- Make gum paste glue
Day 2:
- Bake gingerbread house pieces
- Bake star Christmas tree pieces
Day 3:
- Make half recipe Royal Icing
- Attach gelatin sheets to windows
- Attach fondant siding to outside walls
- Set up walls
- Start star Christmas tree
- Make Christmas door wreath
Day 4:
- Make full recipe Royal Icing
- Pour candy inside Gingerbread Cottage (if using)
- Attach roof pieces
- Decorate Gingerbread Cottage
- Attach door Christmas wreath
- Attach star Christmas tree
Make Gingerbread Dough (Day 1)
Make 1 recipe Gingerbread Dough if you're making just the Gingerbread Cottage (no star Christmas tree). Add a half recipe Gingerbread Dough if you plan to make the star Christmas tree or if you want to bake additional pieces or want extra dough for incidentals.
Make gum paste glue (Day 1)
Take about a tablespoon sized piece of gum paste and place it in about 1 cup water in an air tight container. And let sit in the refrigerator for about 1 day. The gum paste will break down, creating gum paste glue for you to use to attach the fondant siding.
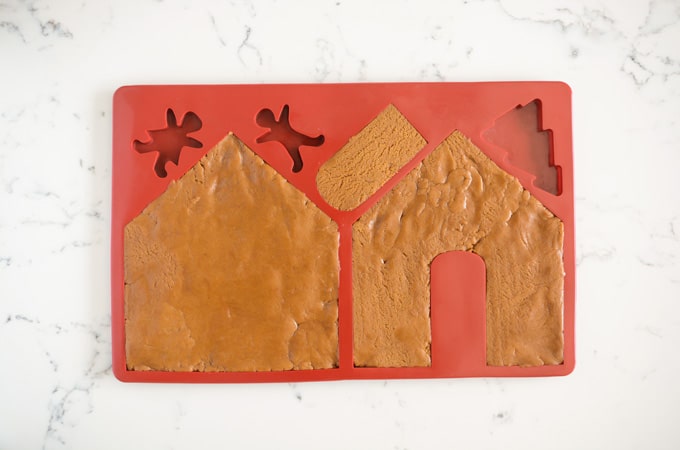
Bake gingerbread pieces (Day 2)
Adjust an oven rack to the center position and heat oven to 375 degrees. While the oven is heating, divide the dough into the gingerbread mold, pressing evenly.
Place molds on to a full sized baking sheet, or 2 half sized baking sheets, and bake for 10 minutes. Rotate and bake for another 3 to 5 minutes until the edges start to lightly brown. Remove molds from the oven and cool gingerbread pieces in their molds for about 10 minutes, and invert them onto cooling racks.
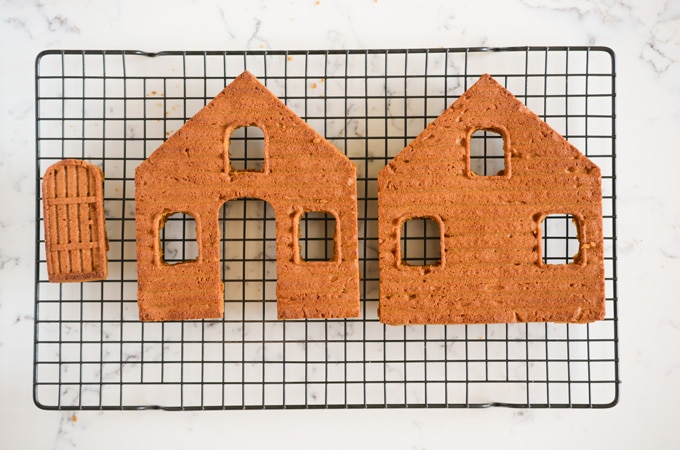
If you want windows, now is the time to use an Xacto knife or other small knife to cut the windows out while the pieces are still slightly warm. The dough expands as it bakes so it's also a good time to trim the edges of the pieces so they will fit together more easily when it comes time to put the pieces together.
Bake gingerbread star Christmas tree (Day 2)
Measure a piece of parchment paper to fit your baking sheet(s). Place dough on the parchment paper and with a little bit of flour, roll the dough out to about 1/4-inch thickness. Cut out 2 stars of each size, and 3 stars of the smallest size, leaving space between each star. (You're going to transfer the parchment paper with stars onto the back of your baking sheet(s). Pick out the excess dough and save. Transfer the parchment paper with the stars to the back of your baking sheet and bake for about 8 minutes, rotating the pan halfway through baking. Remove cookies from the oven and let sit 1 minute and then transfer cookie stars to a cooling rack.

Make half recipe Royal Icing (Day 3)
Fit a piping bag with Wilton piping tip #12 and fill with icing. Cover the left over icing with plastic wrap (touching the surface of the icing) and chill in the refrigerator.
Attach windows (Day 3)
Cut gelatin sheets according to the size of the windows. Pipe dots on the corners of each gelatin sheet and attach windows to the back side of the Gingerbread Cottage walls and let dry.
Decorate the outside walls (Day 3)
Take a few tablespoons of white fondant and rub lightly with shortening; this will help the fondant come out smooth from the clay extruder. Roll fondant between your hands creating a long tube of fondant and push into the clay extruder. Fit the extruder with the rectangle disc.
Turn out a long piece of fondant measuring the length of the wall and cut to size with a pastry cutter, pizza cutter, or small food only scissors. Rub wood impression mat over the top of the fondant strip, and with a small food only paint brush, dip the paint brush in gum paste glue and brush on the back side and adhere to the gingerbread wall, starting from the bottom. Repeat this process all the way up to the top of each wall piece.
Line the inside of the windows with a strip of fondant, pressing to adhere to the sides. Let walls dry at least a few hours or overnight before setting up.
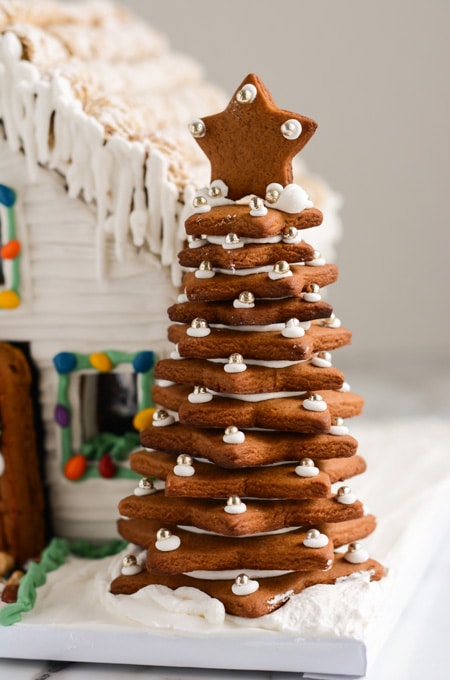
Decorate star Christmas tree (Day 3)
While the walls dry, make the gingerbread star Christmas tree. Pipe small dots with Wilton piping tip #5 on each point of each star and place silver dragees on each point, and let dry overnight.
Gingerbread Cottage wall set up (Day 3)
Once the wall pieces have dried, lay out the pieces on a cake drum. Pipe a line of icing on the bottom of the front wall and place on the cake drum. (Have a few handled coffee mugs ready to use in case you need help propping up the walls.) Pipe a line of icing on the inside edges of the wall to join your side walls.
Pipe a line of icing on the bottom of both of the side walls and put into place, lining up with the icing on the backside of the front wall. Let dry overnight.
Make full recipe Royal Icing (Day 4)
Fill a piping bag with royal icing fitted with a Wilton piping tip #12 and set aside.
Candy filling (Day 4)
Fill the Gingerbread Cottage with candy.
Attach roof (Day 4)
Pipe icing along the edges of the roof line on the house and press roof pieces into place. Let dry before decorating the roof, at least 2 to 3 hours.
Make Christmas wreath for door (Day 4)
While the roof is drying, set aside about 1 cup of icing for the Christmas wreath. You may need to water down your icing one teaspoon at a time. Add green food coloring to the icing. I used Wilton’s Willow Green. Fit a piping bag with Wilton tip #4 and create a small circle on a piece of parchment paper or wax paper. Then switch out the tip for Wilton tip #65 and pipe leaves around the circle creating a Christmas wreath. Place silver dragees on top for ornaments. Set aside to dry.
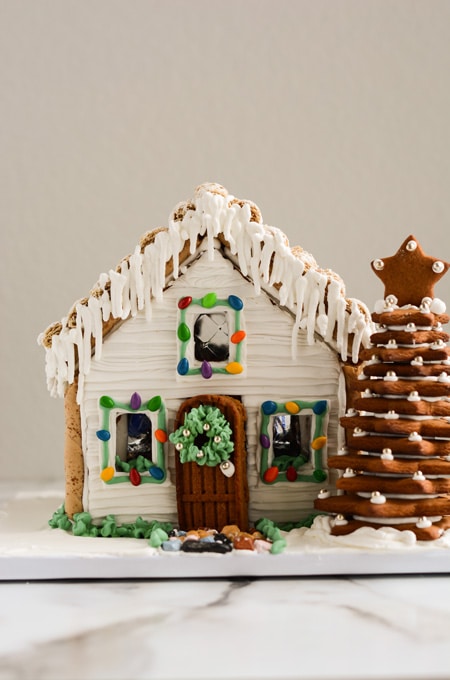
Assemble star Christmas tree (Day 4)
Create Christmas tree by piping white icing in the middle of each star, starting from the largest, all the way to the smallest star and stack on top of each other. With the remaining smallest star, pipe icing on the bottom points and stick on top for the Christmas tree topper.
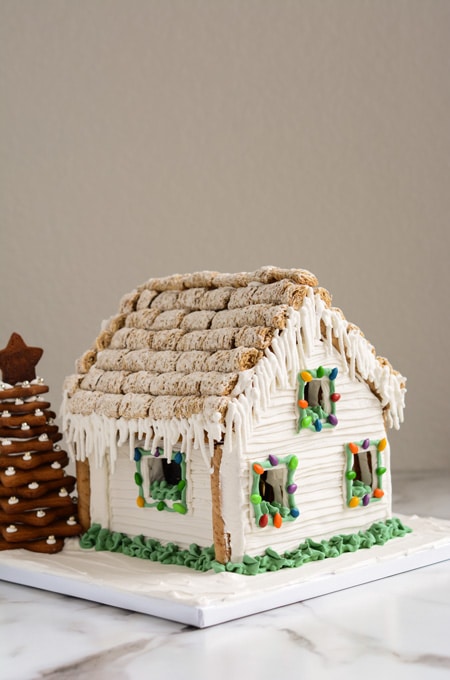
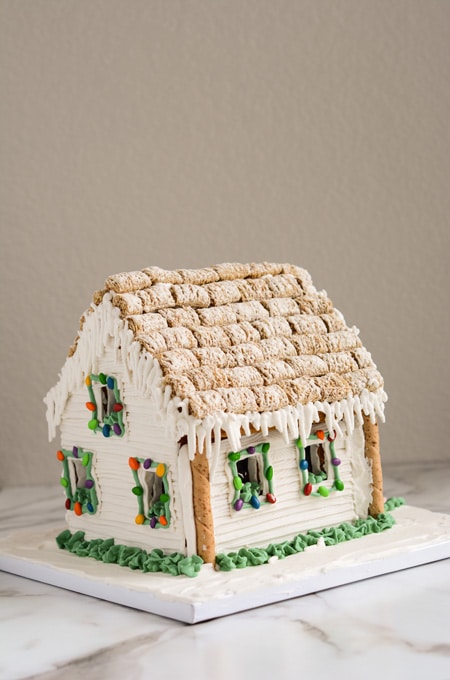
Decorate (Day 4)
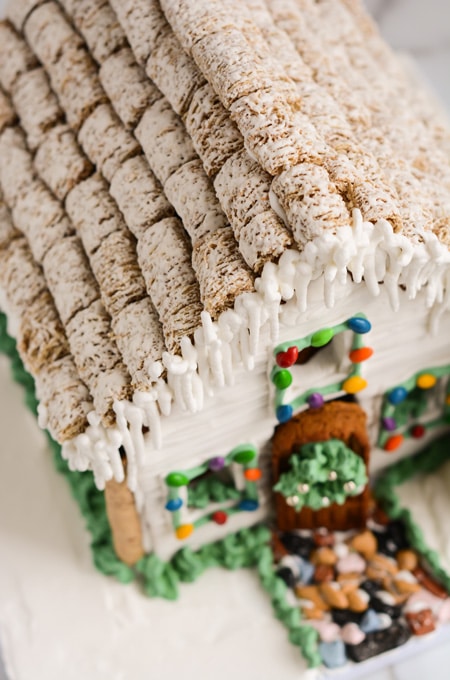
Place Pirouette crème filled wafer sticks on the very top of the roof at the peak, and place frosted mini wheat cereal in an offset pattern on the roof, starting at the bottom and working your way to the top.
Pipe icing on the corners of the Gingerbread Cottage and place Pirouette wafer sticks on the corners of the cottage to help hide the joints.
Icicles (Day 4)
Switch out tip #12 for tip #5 on your piping bag, and fill with more icing if needed. Going along the roof lines, frost the edges creating icicles by moving the piping bag up and down, and gently squeezing the icing out. Let dry.
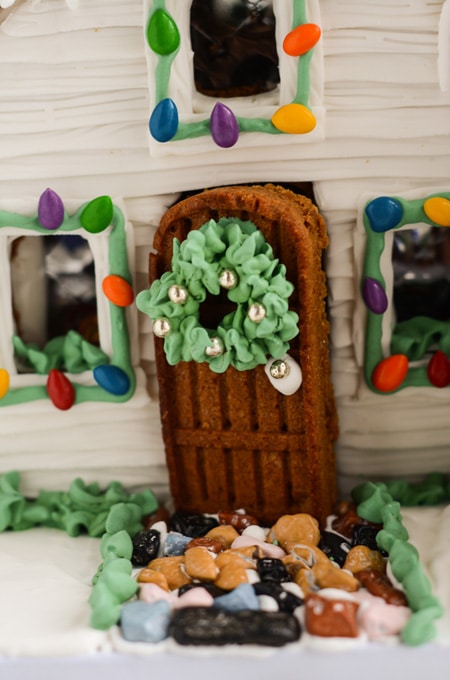
Install door (Day 4)
Pipe icing along the bottom of the door and place halfway open. Pipe a dot of icing for the door knob and place a silver ball on top.
Chocolate rock path (Day 4)
Pipe icing on each chocolate rock to form a path. Attach Wilton piping tip #4 to piping bag with green icing and pipe Christmas light string around the windows. Attach chocolate sunflower seeds around strings with tweezers or your fingers.
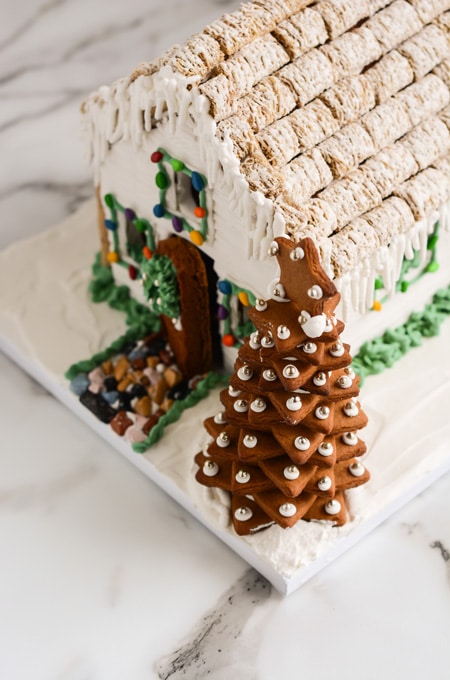
Decorate the base (Day 4)
With remaining white royal icing, smooth icing on top of the cake drum to create a snowy effect. If your icing has stiffened up add some water a teaspoon at a time until it’s a spreadable consistency. Add mounds of icing around the board and with a small offset cake spatula, smooth out.
Hang Christmas wreath (Day 4)
Use a bit of green icing and attach the Christmas wreath to the front door.
Hedges (Day 4)
Switch out the piping tip #4 on the green icing bag to a Wilton piping tip #66. Use remaining green frosting to pipe hedges around the cottage.
With a little bit of left-over white icing, pipe a dollop of icing on the area you want your Christmas tree and gently set into place.
You May Also Like:
Gingerbread Farmhouse
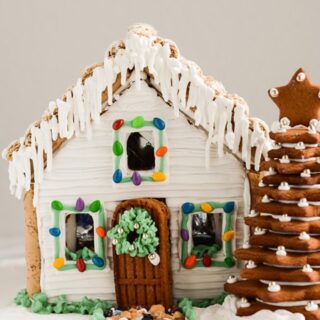
Gingerbread Cottage
Homemade gingerbread cookie dough is baked in a mold to create this cute Gingerbread Cottage. Then the cottage is decorated with royal icing and fondant and filled with candy!
Ingredients
SPECIAL TOOLS
- Stand mixer
- Full sized baking sheet or 2 half sized baking sheets
- Gum paste
- Gingerbread house mold
- Xacto knife
- Parchment paper
- Star cookie cutter set
- Piping bags
- Gelatin sheets
- Wilton piping tip #12
- 2 pounds white Satin Ice fondant
- Clay extruder
- Shortening
- Pizza cutter or pastry cutter
- Small scissors for food only
- Wood impression mat
- Small food only paint brush
- Wilton piping tip #5
- 12 inch square cake drum
- Candy for inside Gingerbread Cottage, if using
- Wilton’s Willow Green gel color
- Wilton piping tip #4
- Wilton piping tip #65
- Tweezers, used for food only
- Silver dragees
- Pirouette crème filled wafer sticks
- Frosted mini wheat cereal
- Chocolate rocks
- Chocolate covered sunflower seeds
- Small off set cake spatula
- Wilton piping tip #66
DOUGH
- (Makes about 3 ½ pounds)
- You must have a stand mixer for this recipe, if using a hand mixer reduce the recipe by half.
- 1 cup vegetable shortening
- 1 cup granulated sugar
- 2 teaspoons baking powder
- 2 teaspoons ground ginger
- 1 teaspoons baking soda
- 1 teaspoons salt
- 1 teaspoons ground cinnamon
- ½ teaspoons ground cloves
- 1 cup dark molasses (not light or blackstrap)
- 2 large eggs
- 2 tablespoons white vinegar
- 5 cups all-purpose flour
ROYAL ICING
- (Makes about 6 ½ cups)
- 3 tablespoons meringue powder
- ½ cup warm water
- 1 16-ounce package powdered sugar
- 1 teaspoons vanilla extract
Instructions
DOUGH
- In the bowl of a stand mixer fitted with the paddle attachment, beat shortening and sugar on medium-high speed until combined, about 2 minutes. Scrape down the sides of the bowl.
- Add baking powder, ginger, baking soda, salt, cinnamon and cloves and beat until incorporated, about 1 minute. Scrape down the sides of the bowl.
- Add molasses, eggs and vinegar and beat until smooth and combined, scraping down the sides of the mixer bowl as necessary.
- Add in the flour 1 cup at a time and mix on low speed until blended. Scrape the dough onto plastic wrap and press dough into a square. Wrap tightly with plastic wrap and refrigerate for at least 3 hours and up to 3 days.
ROYAL ICING
- In the bowl of a stand mixer fitted with the whisk attachment, whisk the meringue powder and water together until combined. Increase the mixer speed to high and beat until soft peaks form.
- Add the powdered sugar and vanilla extract and beat until the icing is shiny and smooth and has increased in volume, about 8 minutes. Adjust the consistency of the icing by mixing in 1 to 2 tablespoons of water at a time for your needs. Use immediately or cover the surface of the icing with plastic wrap and refrigerate. This icing will harden as it stands and can only be kept in the refrigerator for a maximum of 1 day.
Notes
***SEE BLOG POST FOR DETAILED INSTRUCTIONS***


Leave a Reply