
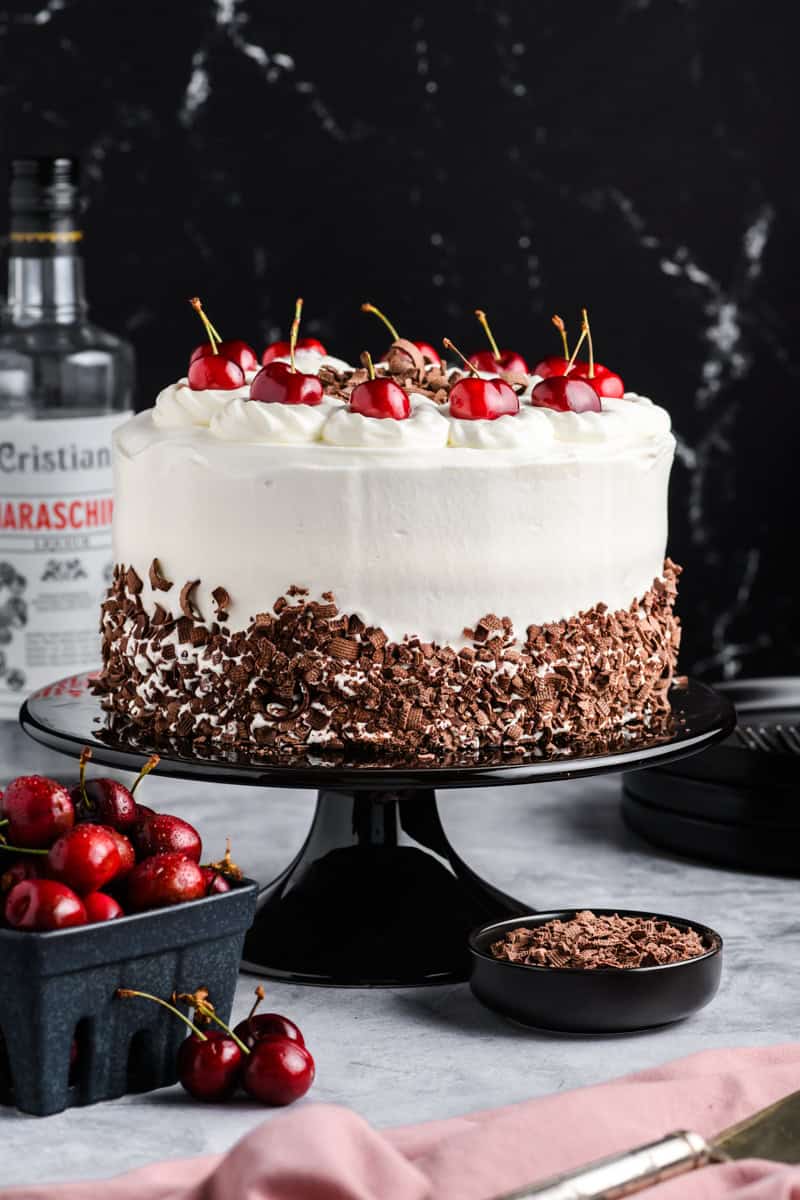
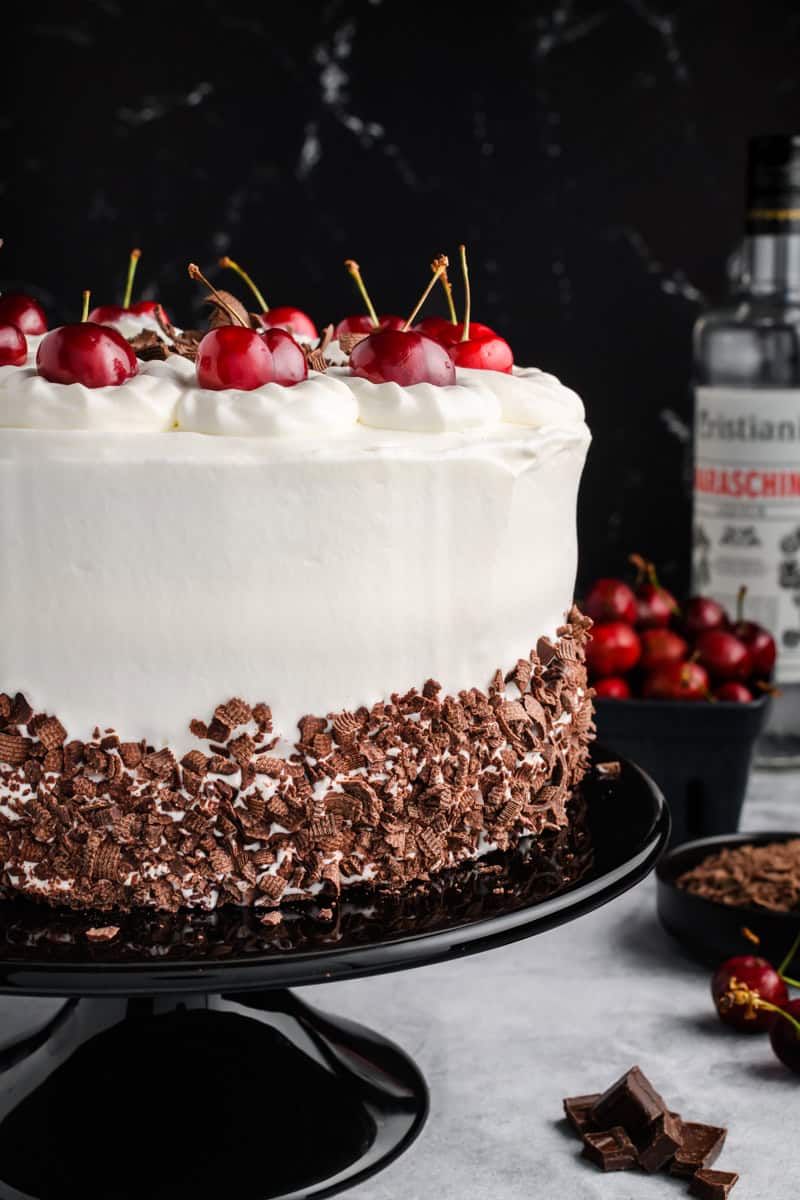
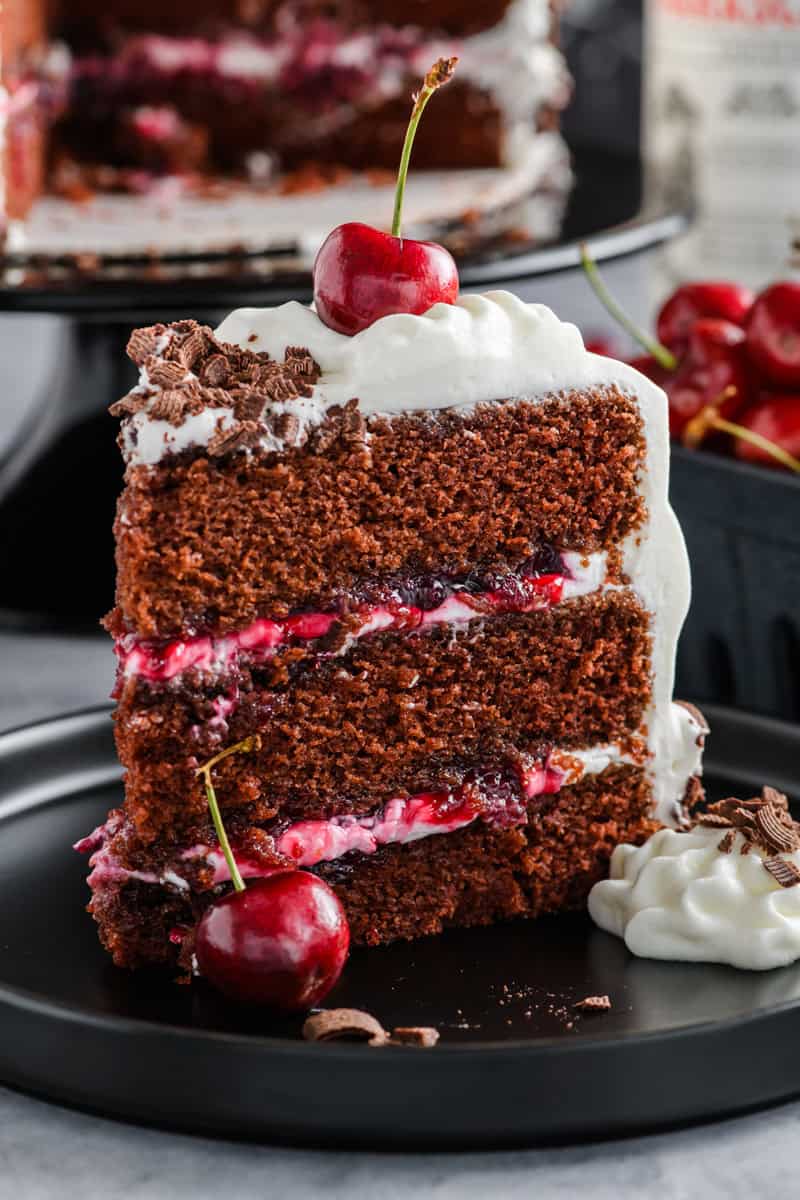
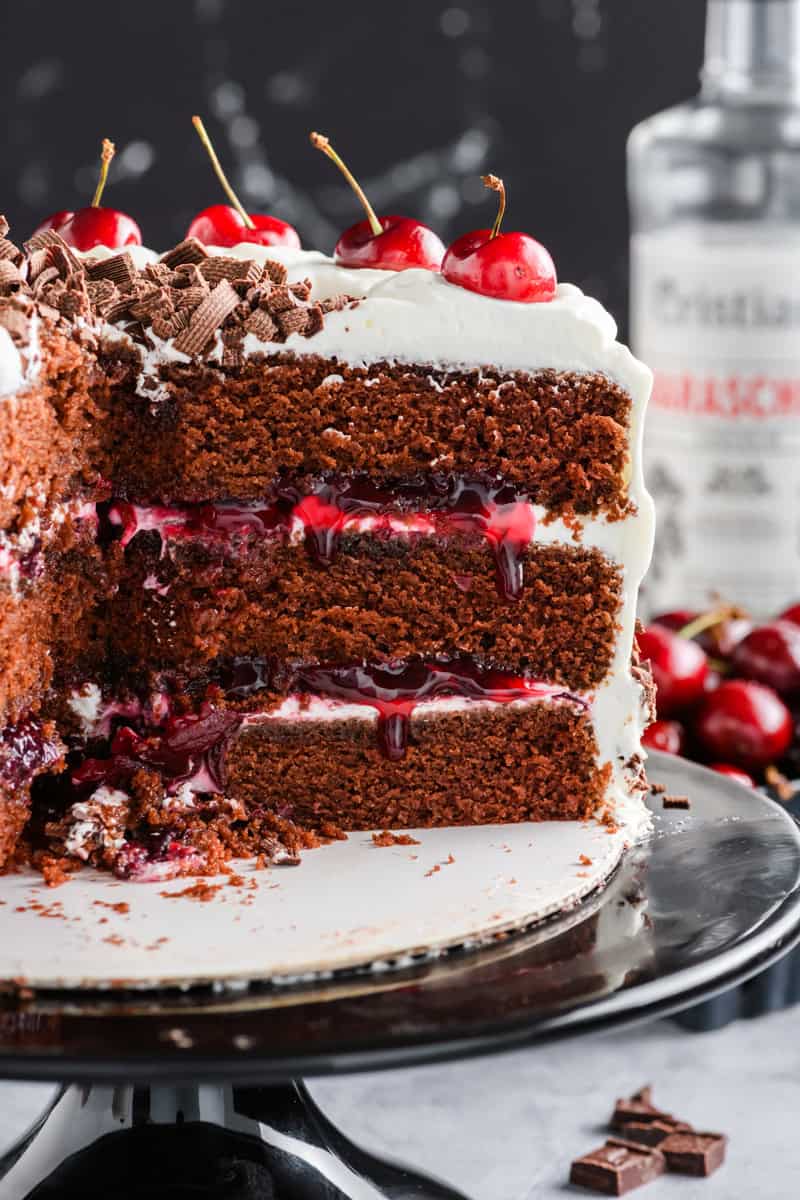
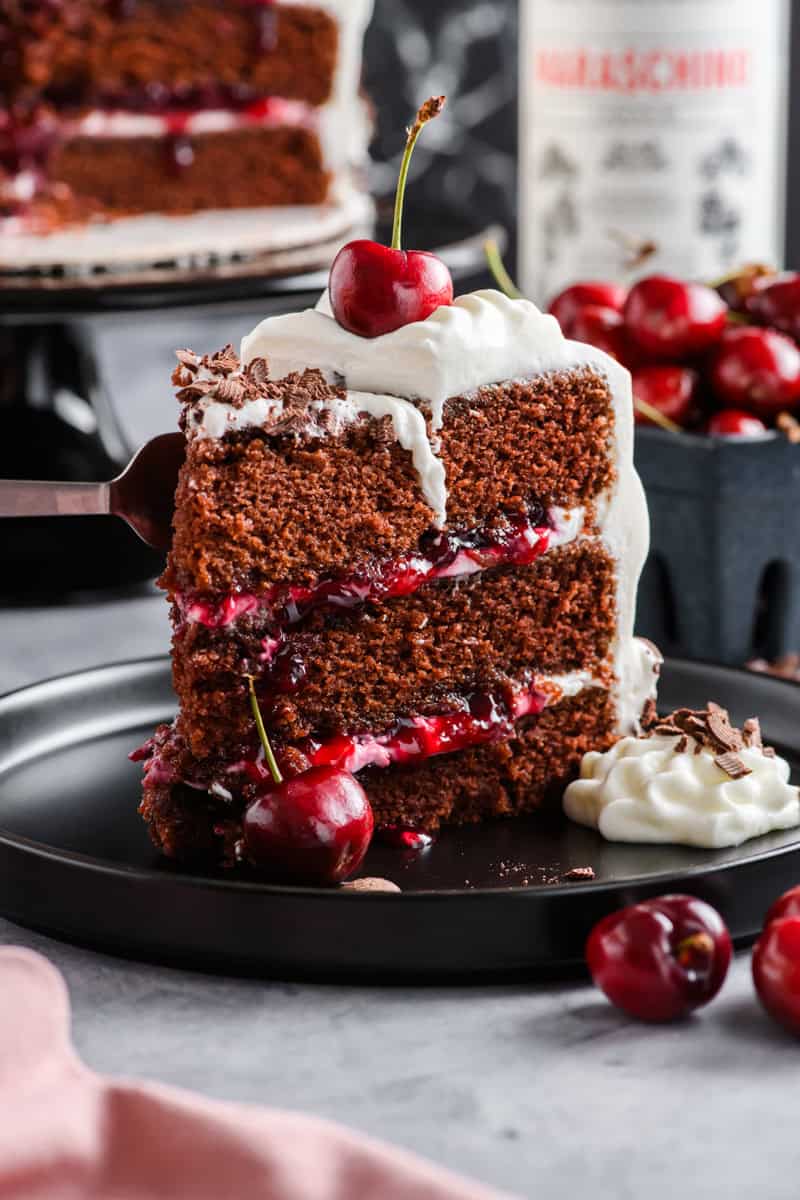
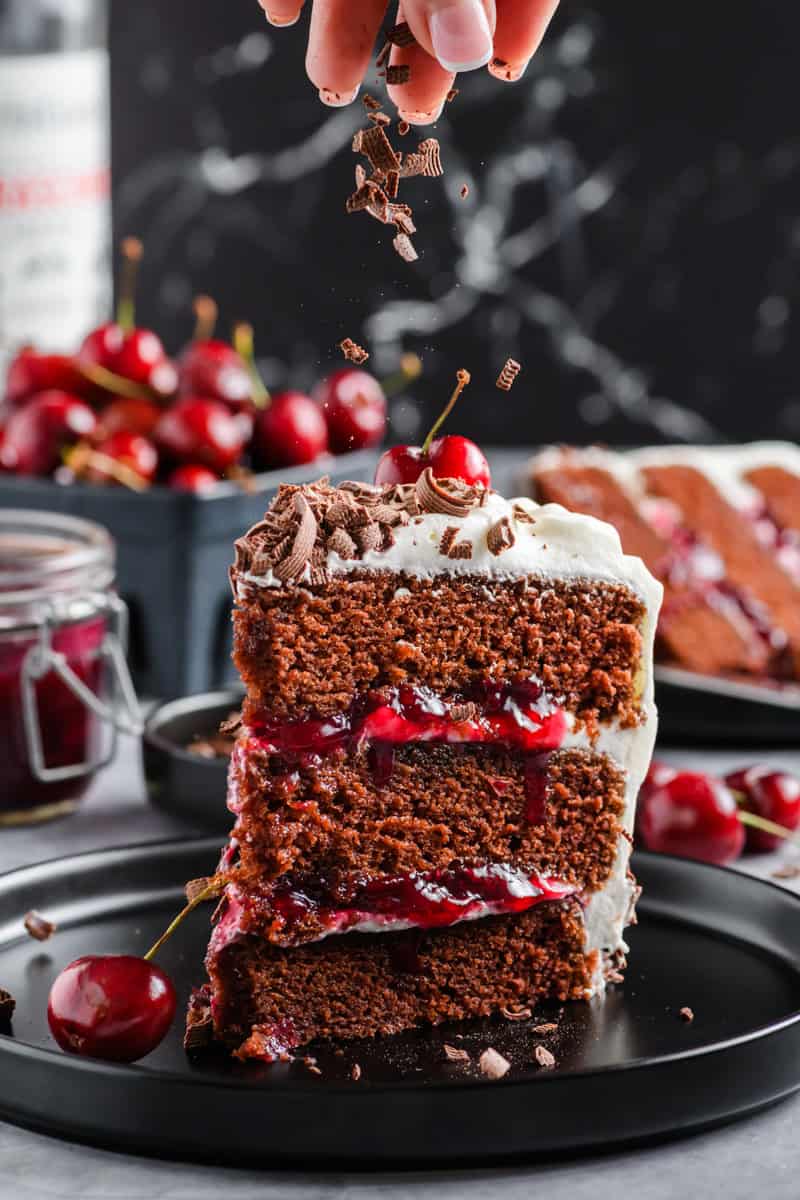
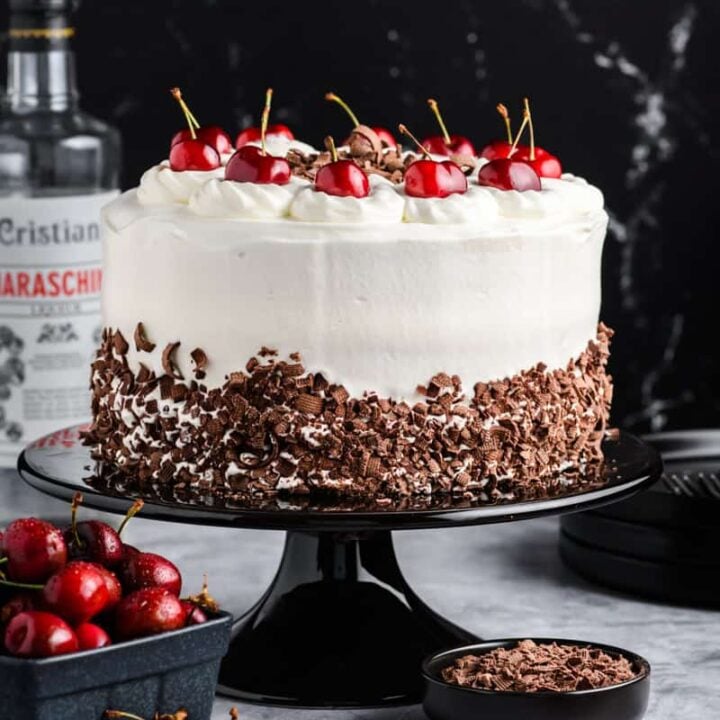
This Black Forest Cake features moist chocolate cake layers filled with homemade cherry filling and lightly sweetened cherry whipped cream. Finished with chocolate shavings, fresh cherries, and a warm cherry liqueur soaking syrup, this elegant layer cake is rich, balanced, and perfect for any special occasion.
Unlike overly sweet bakery versions, this homemade Black Forest Cake keeps the flavors balanced with deep chocolate flavor, tart cherries, and soft whipped cream that lets every layer shine.
Jump to:
Why You'll Love This Recipe
- Moist and tender chocolate cake layers
- Homemade cherry filling made with real cherries
- Light and fluffy cherry whipped cream
- Warm cherry soaking syrup for extra moisture
- Beautiful layer cake perfect for celebrations
Ingredient Notes
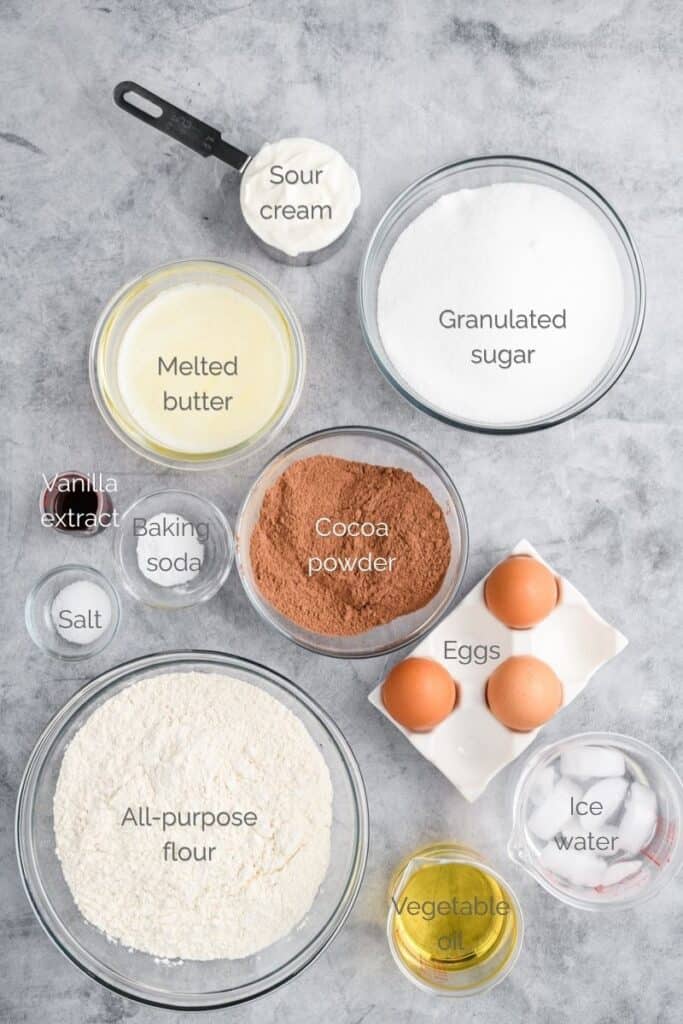
Chocolate Cake
Sour cream and melted butter help create a soft, rich cake crumb while ice-cold water keeps the texture light and moist.
Cherry Filling
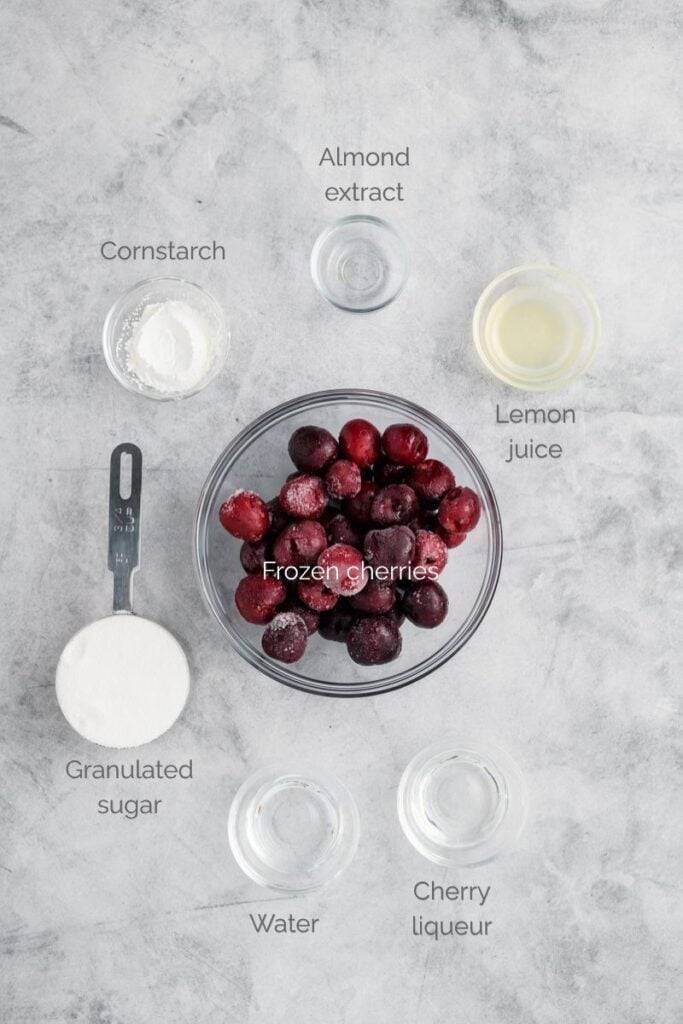
Fresh or frozen cherries both work well in this recipe. A touch of almond extract enhances the cherry flavor without overpowering it.
Cherry Whipped Cream
Cherry liqueur adds subtle flavor to the whipped cream while keeping it light and balanced against the rich chocolate cake.
Cherry Soaking Syrup
Brushing the cooled cake layers with warm soaking syrup adds moisture and enhances the cherry flavor throughout the cake.
How to Make Black Forest Cake
Make the Chocolate Cake
Prepare the chocolate cake batter and divide evenly between three 8-inch cake pans. Bake until a toothpick inserted into the center comes out with a few moist crumbs attached. Cool completely before assembling.
Prepare the Cherry Filling
Cook the cherries, sugar, cornstarch, lemon juice, and water until thickened. Stir in the cherry liqueur and almond extract and cool completely before using.
Make the Cherry Whipped Cream
Whip the heavy cream, sugar, salt, and cherry liqueur until firm peaks form.
Prepare the Soaking Syrup
Warm the cherry liqueur and sugar together just until the sugar dissolves.
Assemble the Cake
Brush each cooled cake layer lightly with warm soaking syrup before filling with whipped cream and cherry filling. Repeat with the remaining layers and frost the outside of the cake with whipped cream before decorating with chocolate shavings and fresh cherries.
Assembly Tips
- Use chilled cake layers for easier assembly
- Apply the soaking syrup lightly to avoid oversoaking the cake
- Pipe a whipped cream border around the filling to help keep the layers stable
- Chill the cake briefly if the whipped cream becomes too soft while decorating
Storage Tips
Store the assembled cake covered in the refrigerator for up to 1 day. For best texture and flavor, serve chilled.
FAQ's
Yes. Thaw and drain the cherries before using to prevent excess moisture in the filling.
Yes. The cake layers can be made up to 5 days wrapped in plastic and stored in the refrigerator. And cherry filling can be prepared up to 1 week in advance.
No. You can substitute cherry juice if preferred.
Make sure the heavy cream is cold before whipping and avoid overmixing once firm peaks form.
Apply the soaking syrup lightly. The cake should be moist, not saturated.
Let's Connect
Want more behind-the-scenes peeks, recipe drops, and food photography inspo? Come hang out with me on Instagram, Pinterest, Facebook and more. I’d love to connect with you there!
Final Thoughts
This Black Forest Cake combines rich chocolate cake, tart cherry filling, and soft whipped cream into a classic layered dessert that feels both elegant and approachable.
If you make this recipe, I’d love to hear what you think! Leave a comment below and let me know how it turned out, or tag me on social media so I can see your beautiful cakes.
Suggested Recipes


Black Forest Cake
Four layers of chocolate cake moistened with a soaking syrup and filled and frosted with whipped cream and decorated with grated chocolate and fresh cherries.
Ingredients
SPECIAL TOOLS
- 3 8-inch round cake pans
- Nonstick baking spray
- Stand or hand mixer
- 8-inch round cake board
- Cake turntable
- Small offset cake spatula
- Piping bags
CHOCOLATE CAKE
- 2 2/3 cups (11.3 ounces/322 grams) all-purpose flour
- 2 1/2 cups (17.5 ounces/500 grams) granulated sugar
- 1/2 cup (1.4 ounces/41 grams) unsweetened cocoa powder
- 1 1/2 teaspoons baking soda
- 1/2 teaspoon salt
- 3 large eggs, room temperature
- 2/3 cup (5.6 ounces/160 grams) sour cream, room temperature
- 1 tablespoon vanilla extract
- 10 tablespoons (5 ounces/142 grams) unsalted butter, melted and cooled
- 2/3 cup (5.3 ounces/150 ml) vegetable oil
- 1 1/4 cups (10 ounces/300 ml) ice-cold water
CHERRY FILLING
- 3/4 cup (5.25 ounces/150 grams) granulated sugar
- 2 tablespoons cornstarch
- 2 cups (11 ounces/310 grams) pitted fresh or frozen cherries, drained
- 2 tablespoons (1 ounce/30 ml) water
- 2 tablespoons (1 ounce/30 ml) fresh lemon juice
- 2 tablespoons (1 ounce/30 ml) cherry liqueur
- 1/4 teaspoon almond extract
CHERRY WHIPPED CREAM
- 1 cup (7 ounces/198 grams) granulated sugar
- 1/4 teaspoon salt
- 3 cups (24 ounces/720 ml) heavy cream, cold
- 2 tablespoons (1 ounce/30 ml) cherry liqueur
CHERRY SOAKING SYRUP
- 1/3 cup (2.7 ounces/80 ml) cherry liqueur
- 1/4 cup (1.75 ounces/50 grams) granulated sugar
- GARNISH
- Fresh cherries
- Chocolate curls
Instructions
CHOCOLATE CAKE
- Adjust an oven rack to the center position and heat oven to 350°F (175°C). Spray 3 8-inch round cake pans with nonstick baking spray and set aside.
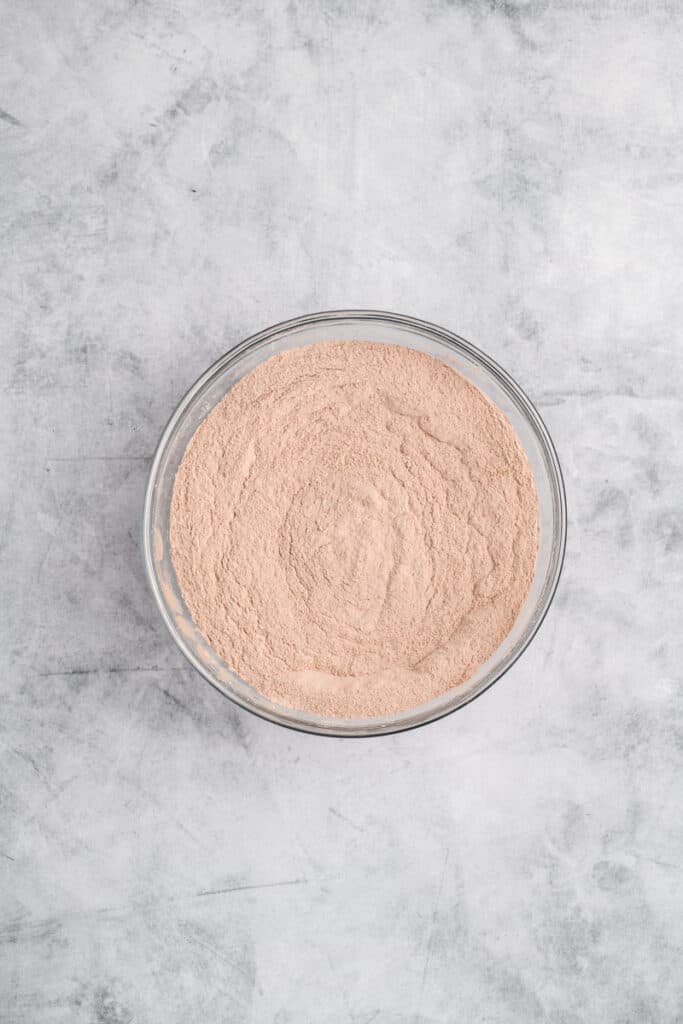
- In a medium bowl, whisk together the flour, sugar, cocoa powder, baking soda, and salt.
- In another medium bowl, whisk together the eggs, sour cream, and vanilla extract until combined.
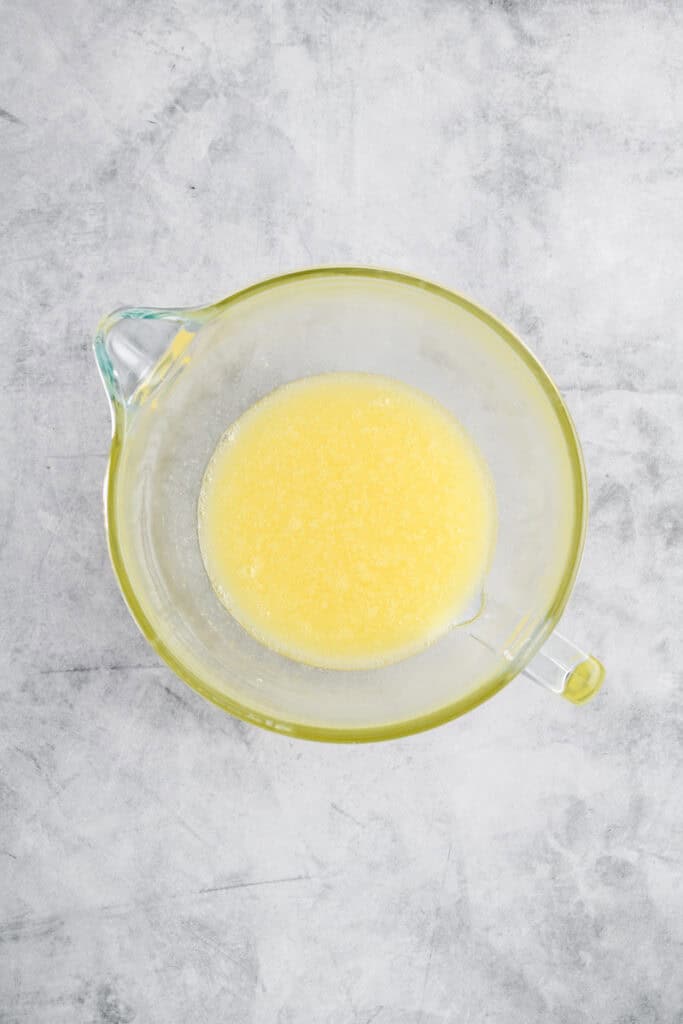
- In the bowl of a stand mixer with the paddle attachment attached, mix together the melted butter and oil on low speed. Add the cold water and mix to combine.
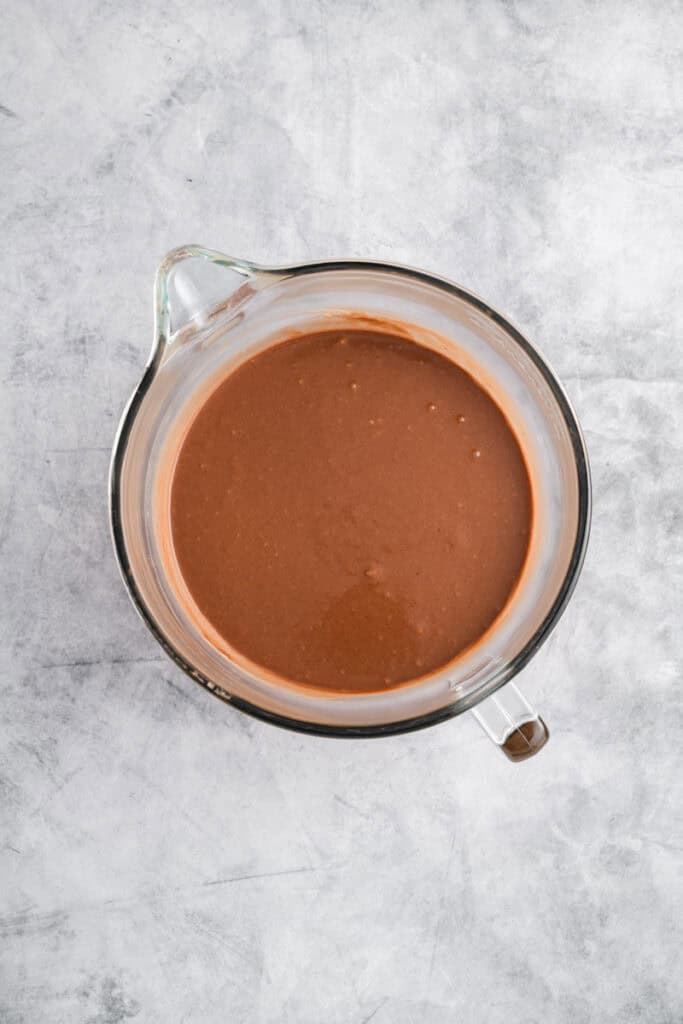
- Add the dry ingredients and mix on medium-low speed for 1 minute. Add the egg mixture and mix for another 1 minute, until well combined. Scrape down the sides of the mixer bowl as necessary.
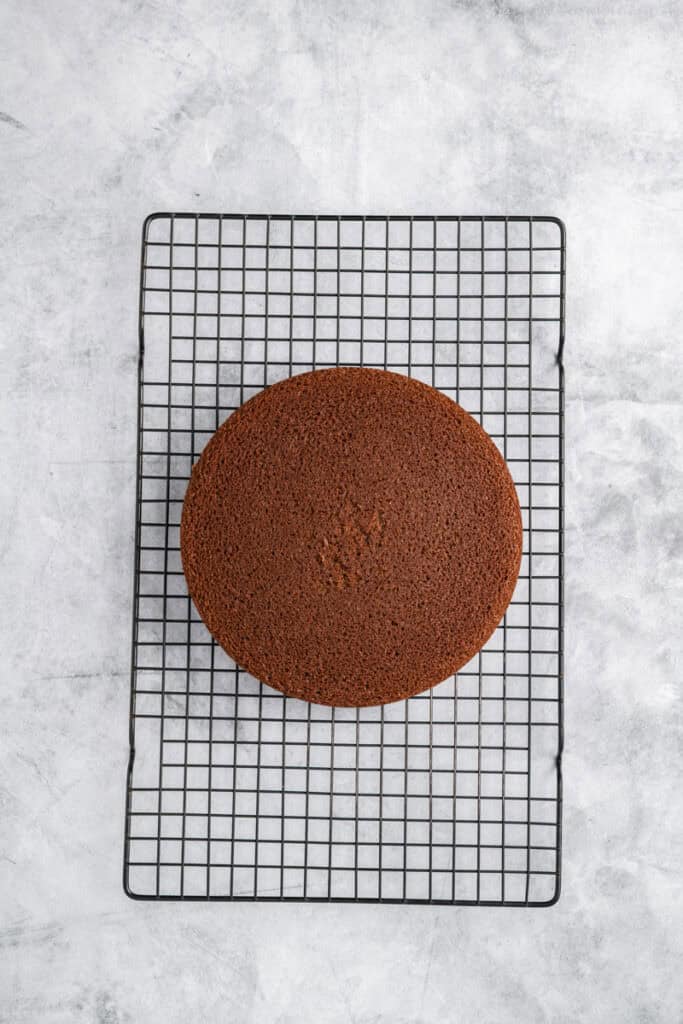
- Divide the batter evenly into prepared cake pans and bake for 35 to 40 minutes, or until a toothpick inserted in the center comes out with a few moist crumbs attached.
- Cool the cakes in the pans on wire racks for 15 minutes, then invert cakes onto cooling racks to cool completely. Once the cakes have cooled, wrap them in plastic wrap and store in the refrigerator until ready to assemble.
CHERRY FILLING
- In a small saucepan, combine the sugar and cornstarch.
- Add the cherries, water, and lemon juice and heat over medium heat, stirring constantly, until the mixture comes to a simmer.
- Reduce the heat to low and allow it to simmer for about 10 minutes, stirring occasionally, until thickened.
- Remove from the heat and stir in the cherry liqueur and almond extract.
- Let cool completely before using.
CHERRY WHIPPED CREAM
- In the bowl of a stand mixer with the whisk attachment attached, combine the sugar, salt, heavy cream, and cherry liqueur on medium-low speed for about 1 minute. Increase mixer speed to medium-high and whip until the cream is thick and holds firm peaks, about 2 minutes.
SOAKING SYRUP
- In a small saucepan, combine the cherry liqueur and sugar and bring to a gentle simmer over medium heat, stirring until the sugar has dissolved. Keep the syrup warm until ready to use.
ASSEMBLE
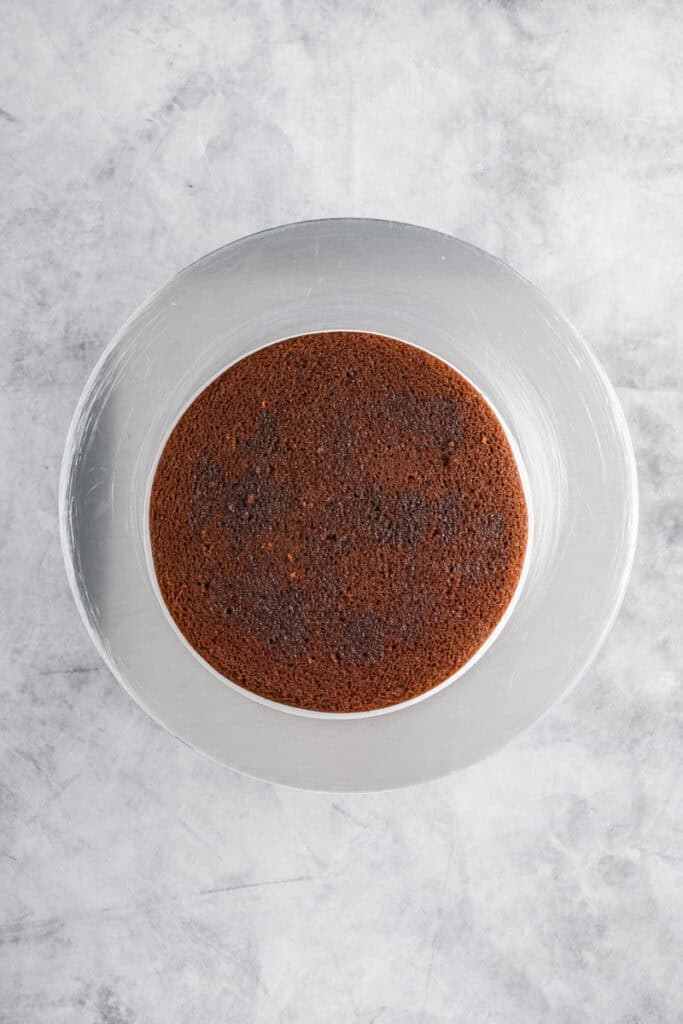
- Unwrap the cake layers. Trim off any domes that may have formed during baking to create 3 even cake layers. Place one cake layer on a cake board and place on a cake turntable.
- Brush a light layer of warm soaking syrup over the top of the cooled cake, being careful not to oversoak. The cake should be lightly moistened, not saturated.
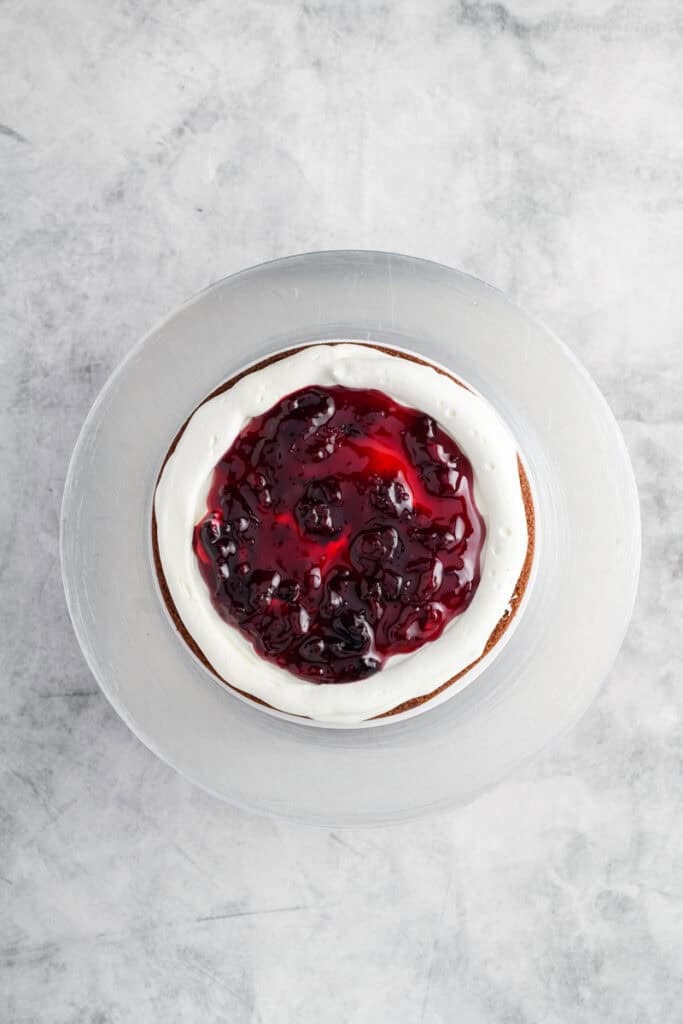
- Spread about 1/2 cup whipped cream on top of the cake with a small offset cake spatula all the way to the edge.
- Fill a piping bag fitted with a round tip with about 1 cup whipped cream and pipe a border around the edge.
- Add 1/2 cup of the cherry filling on top and spread until it reaches the whipped cream border.
- Place the second cake layer on top and gently press to adhere. Repeat the process. Place the third cake layer on top (bottom side up) and gently press to adhere.
- Cover the cake with a light layer of whipped cream, creating a crumb coat and freeze for 20 to 30 minutes, or place in the refrigerator for 40 minutes to 1 hour.
- Cover the top and sides of the cake with whipped cream. Place remaining whipped cream in a piping bag fitted with piping tip #827 and pipe swirls around the top edge.
- Over a large rimmed baking sheet, carefully hold the cake in one hand and, with the other hand, apply chocolate curls to the bottom edge of the cake, letting excess fall onto the baking sheet to reuse. Repeat until the bottom edge is covered.
- Place remaining chocolate curls on the top center of the cake. Place a cherry on top of each whipped cream swirl and serve.
Notes
- Cakes can be stored at room temperature for up to 2 days or in the refrigerator for up to 5 days, wrapped in plastic wrap.
- Cherry Filling store in an airtight container in the refrigerator for up to 1 week, or in the freezer for up to 3 months.
- Cherry Whipped Cream store in the refrigerator for up to 8 hours.
- Assembled cake is best served the day it is made but will keep in an airtight container in the refrigerator for up to 1 day.
Storage and Make-ahead:
Nutrition Information:
Yield: 12 Serving Size: 1Amount Per Serving: Calories: 1221Total Fat: 55gSaturated Fat: 24gUnsaturated Fat: 31gCholesterol: 163mgSodium: 422mgCarbohydrates: 166gFiber: 5gSugar: 111gProtein: 12g
*Nutrition information is an estimate and will vary.*


Mackenzie says
The stunning photos of this cake are making me drool just looking at them! They definitely made me slow down and look for a while! 🙂