
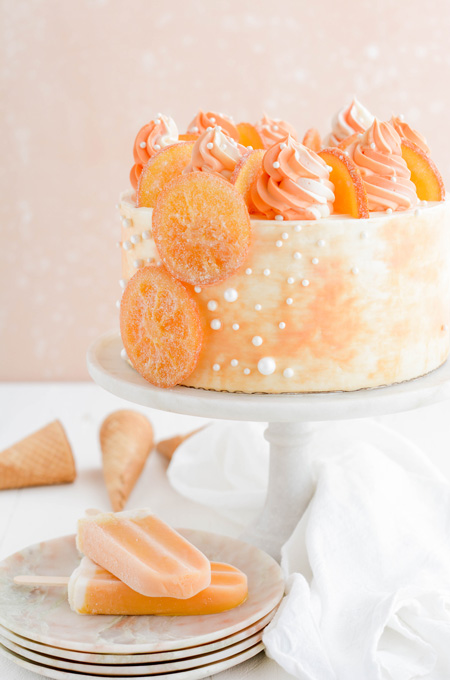
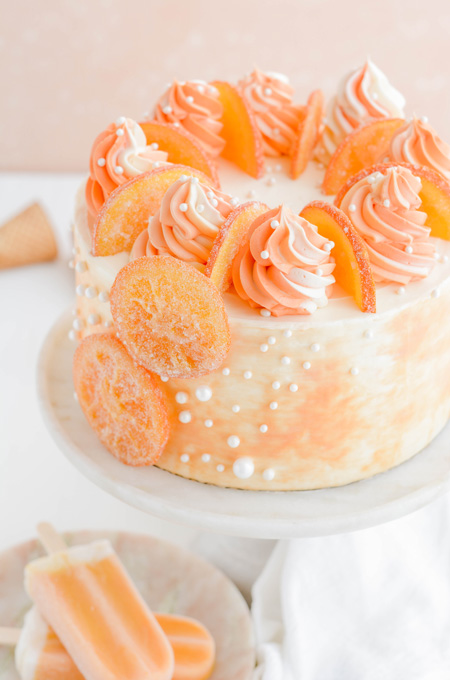
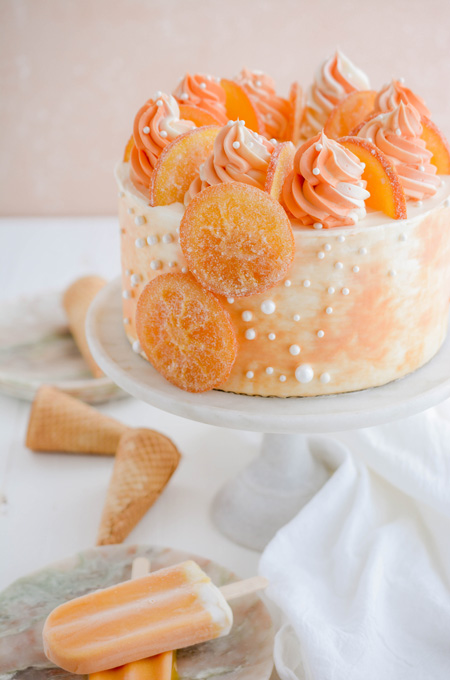
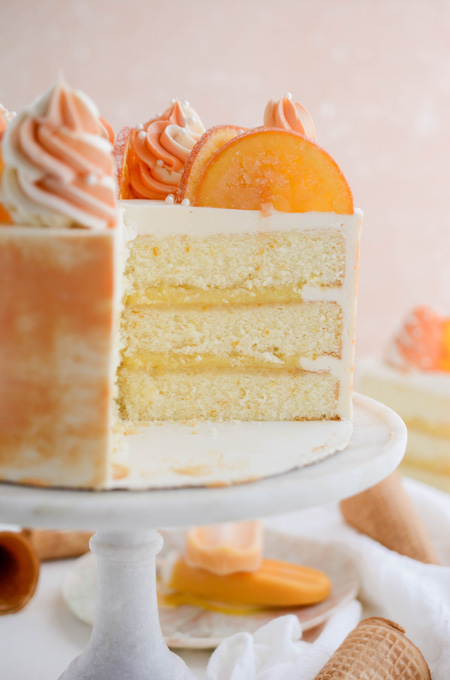
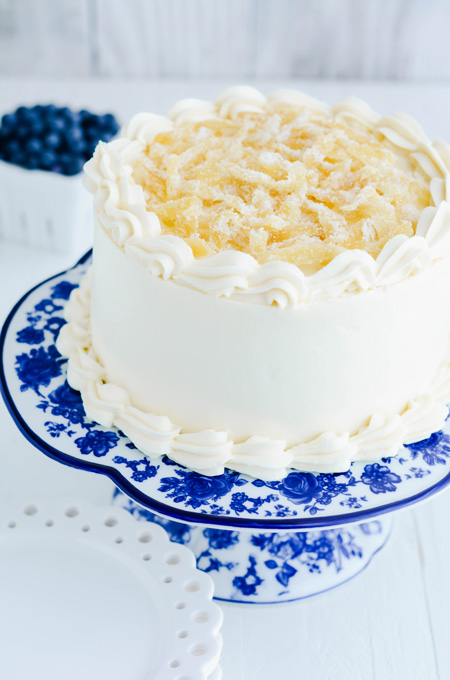
This Orange Creamsicle Layer Cake is about to take you back to your ice cream truck days. Let me tell you why!
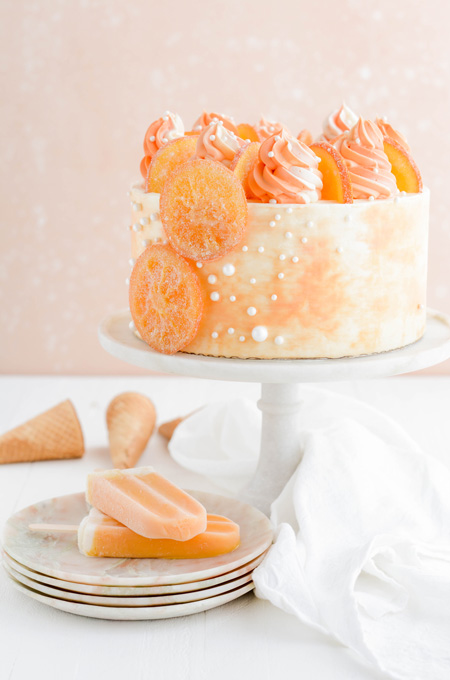
- First, you have 3 layers of homemade fluffy orange flavored cake.
- Second, I've filled it with orange curd made from scratch, oh yeah!
- Third, it's frosted with a vanilla ice cream frosting.
- Lastly, I made candied orange slices. You don't have to do this if you don't want to but I was feeling a little extra here. And it really elevates this cake from all the rest!
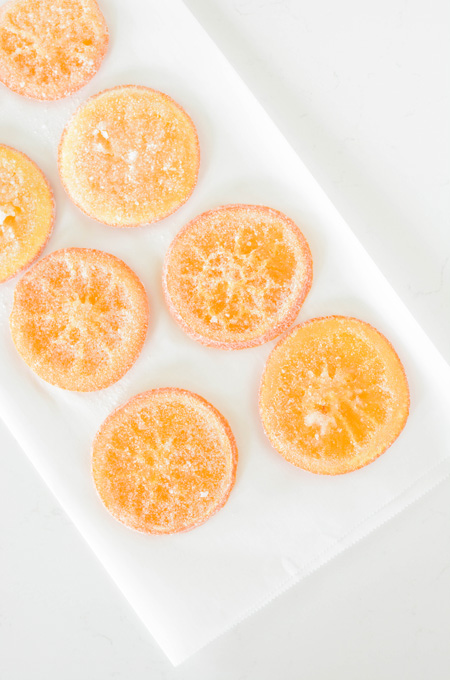
How To Make Candied Orange Slices
- In a 12 inch skillet, over medium heat, whisk together sugar and water. Bring to a simmer and continue to whisk until sugar has dissolved.
- Once sugar has dissolved lay orange slices into the skillet in a single layer and simmer for about 15 minutes, flipping halfway through, until rinds appear softened and slightly translucent.
- Carefully remove orange slices from the skillet and lay on parchment paper and set aside to dry. I typically let these dry overnight.
- Place 1/2 cup sugar on a plate and dip dried orange slices in the sugar to coat on the back and front. Set aside on parchment paper until ready to use. Cake Chica's Tip: If you have the time, keep dipping the orange slices in more sugar after each layer of sugar dries.
Orange Curd
I make my orange curd the same way that I make my lemon curd. Check out my Lavender Lemon Layer Cake for the lemon version. You can use curd for filling cakes, pies, tarts and cookies. And it's easy to change flavors by changing up the type of juice you use.
Orange Layer Cake
- Whole milk: The fat in whole milk helps to tenderize the cakes crumb. It also interacts with the flour to create just enough gluten to form the cakes structure.
- Egg whites: helps create structure.
- Orange emulsion: I prefer to use emulsions. The flavor doesn’t bake out like extracts can.
- Cake flour: has a lower protein content than all-purpose flour which helps create a delicate crumb.
- Granulated sugar: Sugar not only sweetens the cake but it also helps tenderize, leavens and browns.
- Baking powder: is a leavener that contains baking soda and cornstarch. Baking soda reacts twice. The first is when it comes into contact with liquid and then when it is heated. Baking soda can’t be used as a substitute for baking powder.
- Salt: helps bring out the sweetness in the cake.
- Orange zest: helps flavor the cake.
- Unsalted butter: tenderizes, moistens, leavens, browns, and flavors.

Vanilla Ice Cream Frosting
I love how easy this frosting is to prepare and how easy it is to substitute with your favorite flavor of ice cream to create your very own cake creation!
Cake Assembly
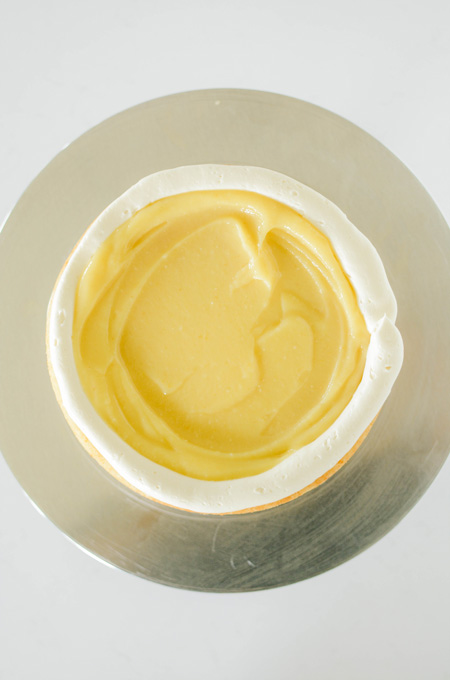
Fit a piping bag with a round piping tip or coupler and pipe a frosting dam around the edge of the cake. Fill the center of the cake with orange curd and spread out in an even layer until it reaches the frosting dam. The frosting dam will help keep your curd from spilling out of the sides of the cake.
Crumb Coating A Cake
A crumb coat helps lock in loose crumbs and seals the cake, while providing a base to decorate on.
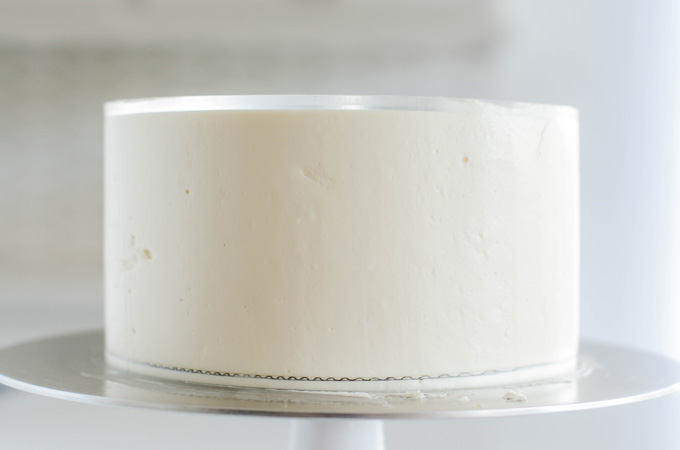
How To Ice A Cake Using An Acrylic Disc
- Line an 8 inch round acrylic cake disc with parchment paper by applying a small amount of buttercream to the disc.
- Place a large dollop of buttercream on top of the cake and smooth out evenly with an offset cake spatula. You should have excess buttercream hanging off the edges.
- Place the lined acrylic disc on top of the cake, (parchment side down) being sure that the disc lines up with the bottom cake board.
- Apply buttercream to the sides of the cake.
- With a cake scraper touching the bottom cake board and top acrylic disc, gently rotate the turntable to smooth out the buttercream. Apply more buttercream on spots that have gaps and smooth out.
Watercolor Design
What's great about this design is that you really can't go wrong with it. I love that it's very organic and each cake is original.
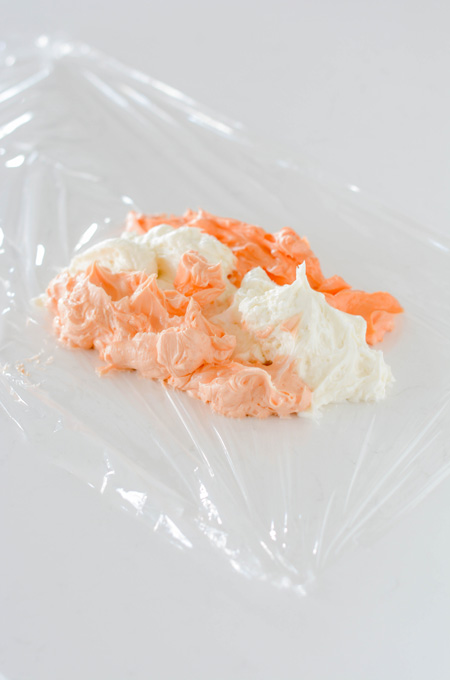
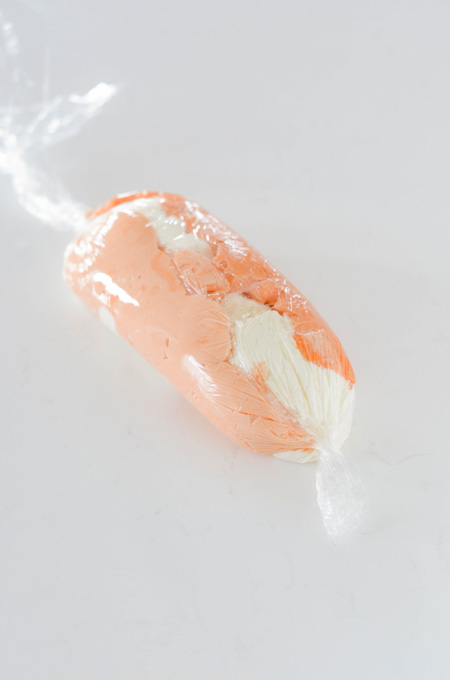
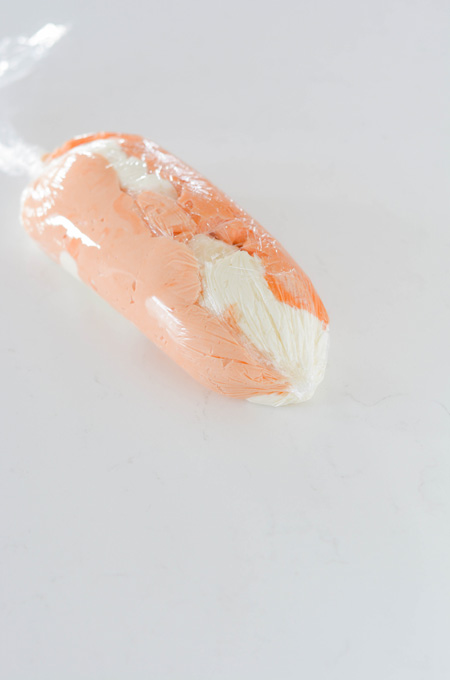
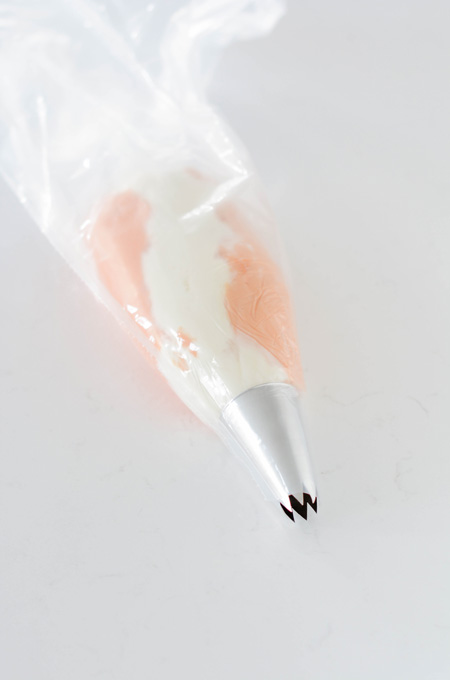
How To Fill A Piping Bag With Multiple Colored Frosting
An easy way to fill a piping bag with multiple colors of frosting is to add it to a sheet of plastic wrap first. Wrap up the plastic wrap and trim one side of the plastic off so that the frosting is ready to pipe. Place the frosting filled plastic wrap inside a prepared piping bag and you're all set!
Orange Creamsicle Layer Cake Baking Schedule
- Day 1: Prepare candied orange slices
- Day 2: Bake cake layers and prepare orange curd.
- Day 3: Make frosting, assemble and serve.
Cake Decorating Tools
- Nonslip mat
- Cake turntable
- 8-inch round cake board
- Piping bag
- Round piping tip or coupler
- Small offset cake spatula
- 8-inch round acrylic disc or 8-inch cake board
- Cake scraper
- Ateco piping tip #827
Make Ahead
- Candied orange slices can be made up to 1 week in advance, stored in an airtight container at room temperature.
- Orange curd can be prepared up to 1 week in advance, stored in an airtight container in the refrigerator.
- Cake layers can be baked up to 3 days in advance, wrapped in plastic and stored in an airtight container in the refrigerator.
- Frosting is best made the day of assembling the cake.
Let's Connect!
The Cake Chica is on the following social media platforms below. Click subscribe, like and follow! We would love to have you over!
Suggested Recipes

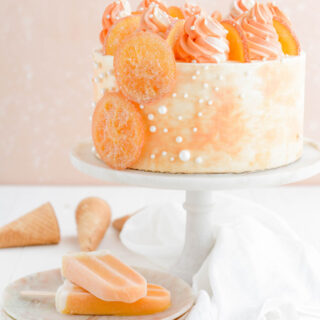
Orange Creamsicle Layer Cake
Three fluffy layers of orange cake filled with orange curd, frosted with vanilla ice cream frosting and garnished with candied orange slices.
Ingredients
SPECIAL TOOLS
- Parchment paper
- 3 8-inch round cake pans
- Nonstick baking spray
- 4 cup liquid measuring cup
- Stand mixer
- Rubber spatula
- Sieve
- Nonslip mat
- Cake turntable
- 8-inch round cake board
- Piping bag
- Round piping tip or coupler
- Small offset cake spatula
- 8-inch round acrylic disc or 8-inch cake board
- Cake scraper
- Ateco piping tip #827
CANDIED ORANGE SLICES
- 2 oranges, sliced 1/8-inch thick
- 2 cups granulated sugar
- 1 ½ cups water
- 1/2 cup granulated sugar for coating
ORANGE CAKE
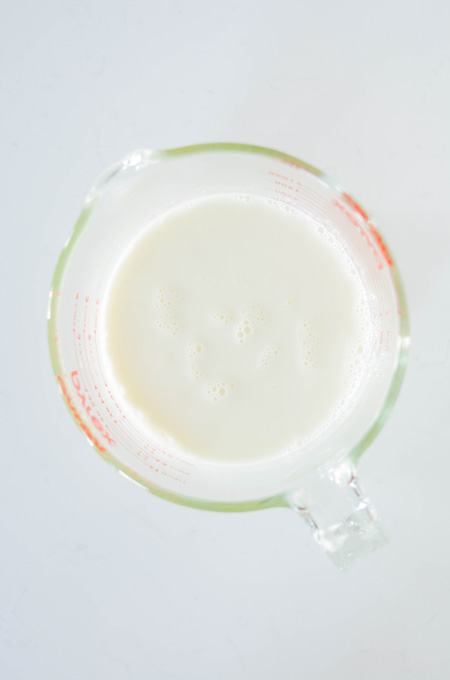
- 1 cup (8 ounces) whole milk, at room temperature
- 6 large egg whites, at room temperature
- 1 1/2 teaspoons orange emulsion
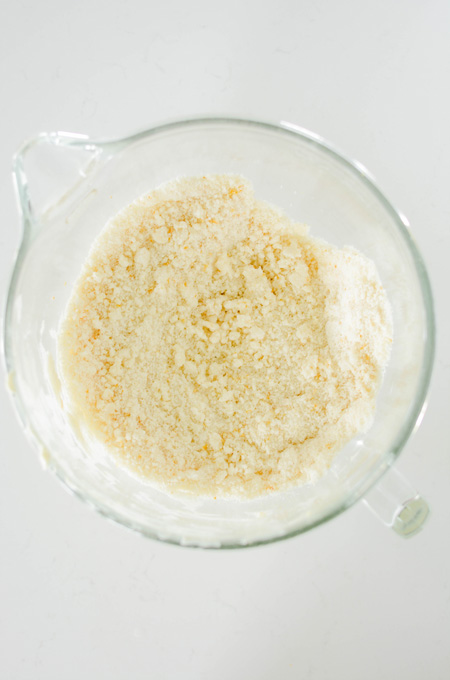
- 2 1/4 cups (9 ounces) cake flour
- 1 3/4 cup (12 1/4 ounces) granulated sugar
- 4 teaspoons baking powder
- 1 teaspoon salt
- 1 tablespoon fresh orange zest
- 12 tablespoons unsalted butter, cut into tablespoon sized pieces, at room temperature
ORANGE CURD
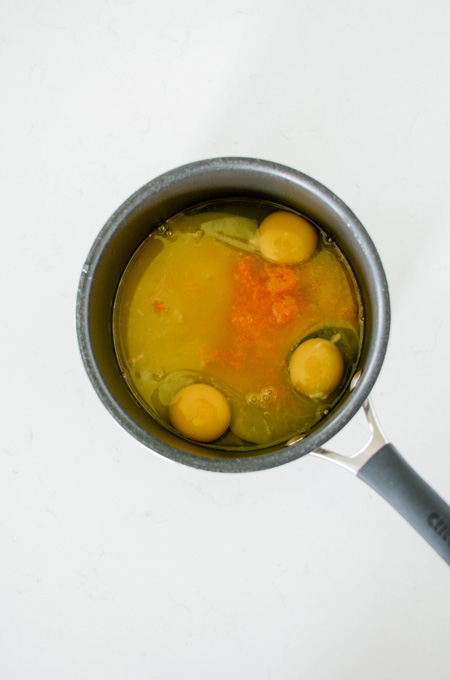
- 3 whole eggs
- 3/4 cup (5.25 ounces) granulated sugar
- Pinch of salt
- 1/2 cup freshly squeezed orange juice
- 1 tablespoon orange zest
- 4 tablespoons unsalted butter, cut into tablespoon sized pieces
VANILLA ICE CREAM FROSTING
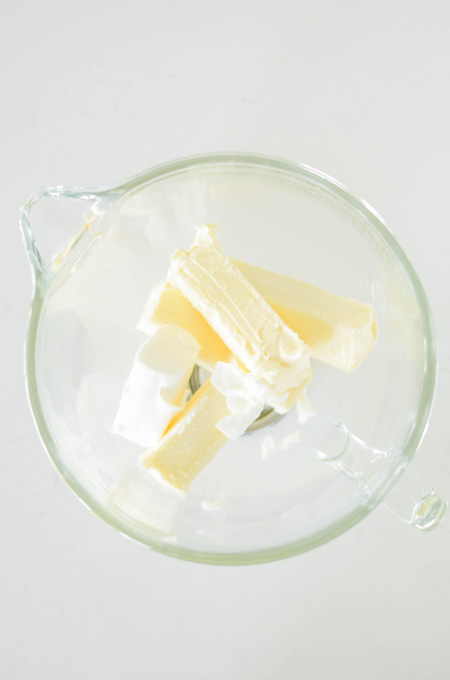
- 2 cups unsalted butter, at room temperature
- 1/2 cup shortening
- Pinch of salt
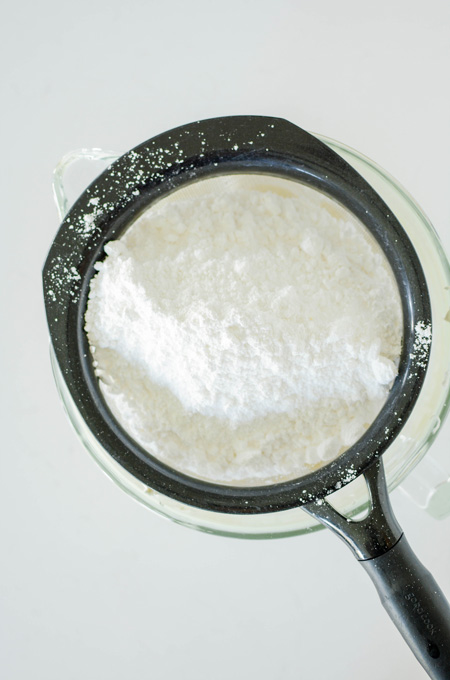
- 6 1/2 cups (26 ounces) powdered sugar, sifted
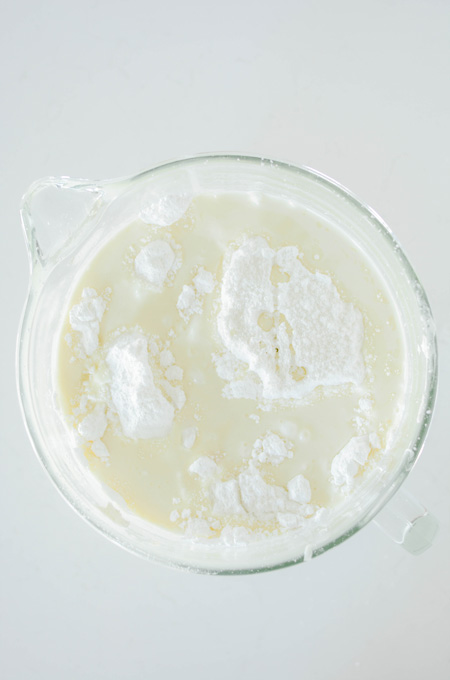
- 1 cup heavy cream
- 4 teaspoons vanilla extract
- 1 cup melted vanilla ice cream
Instructions
CANDIED ORANGE SLICES
- In a 12 inch skillet, over medium heat, whisk together sugar and water. Bring to a simmer and continue to whisk until sugar has dissolved. Once sugar has dissolved lay orange slices into the skillet in a single layer and simmer for about 15 minutes, flipping halfway through, until rinds appear softened and slightly translucent. Carefully remove orange slices from the skillet and lay on parchment paper and set aside to dry. I typically let these dry overnight.
- Place 1/2 cup sugar on a plate and dip dried orange slices in the sugar to coat on the back and front. Set aside on parchment paper until ready to use. Before using cut the slices in half. These can be stored at room temperature for 1 week.
ORANGE CAKE
- Adjust an oven rack to the center position and heat oven to 350 degrees. Spray 3 8-inch round cake pans with nonstick baking spray and set aside.
- In a bowl or a 4 cup liquid measuring cup, whisk together milk, egg whites and orange emulsion. In the bowl of a stand mixer, with the paddle attachment attached, mix the flour, sugar, baking powder, salt and orange zest on low speed until combined. Add butter one tablespoon at a time until the mixture forms pea-sized pieces, about 1 minute. Reserve ½ cup of the milk mixture and pour the remaining to the flour mixture and mix on medium-high speed until light and fluffy, about 1 minute. Reduce the mixer speed to medium-low and add the reserved ½ cup milk mixture to the batter and mix until combined, about 30 seconds. Do not over mix. The batter may look curdled. Give the batter a final stir by hand with a rubber spatula.
- Divide the batter evenly between the prepared cake pans and smooth tops with a rubber spatula. Gently tap cake pans on the counter to settle the batter and bake until a toothpick inserted in the centers comes out with a few moist crumbs attached, about 20 to 25 minutes, switching and rotating pans halfway through baking.
- Let cakes cook in their pans on wire racks for 10 minutes. Invert cakes on to wire racks to cool completely, about 2 hours.
ORANGE CURD
- In a medium sized saucepan, whisk together the eggs, sugar, salt, orange juice and zest.
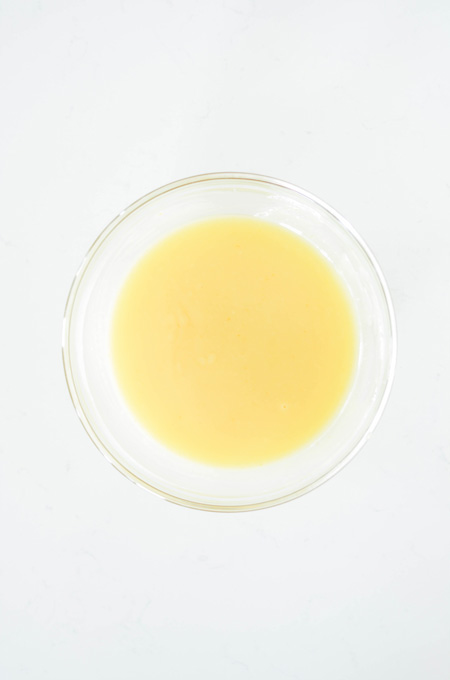
- Over low heat, whisk constantly for about 15 to 20 minutes or until the mixture starts to thicken. The curd should coat the back of a wooden spoon without being translucent.
- Remove the curd from the heat and stir in the butter. Strain the curd through a fine-mesh sieve into a bowl to remove any solids that may have formed while cooking. Place a piece of plastic wrap on the surface of the curd and chill in the refrigerator for at least 3 hours or overnight.
VANILLA ICE CREAM FROSTING
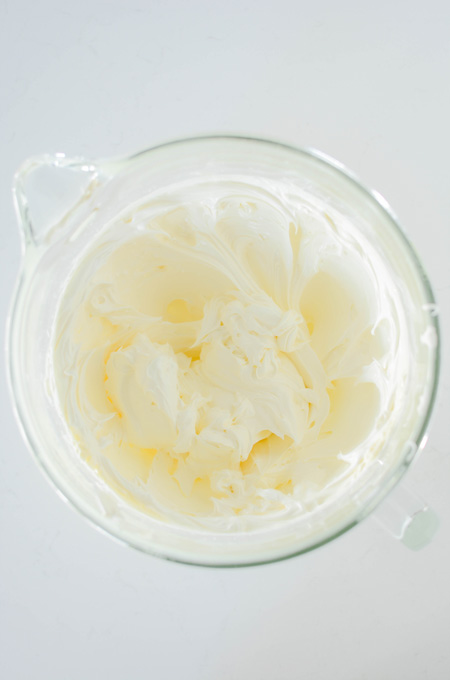
- In the bowl of a stand mixer fitted with the paddle attachment, beat the butter, shortening and salt on medium speed until light and creamy, about 8 minutes. Slowly add the powdered sugar, heavy cream, vanilla extract and melted ice cream.
- Reduce the speed to the lowest setting and beat for 1 minute. Increase the speed to medium-high and beat until very light and fluffy, about 6 minutes.
ASSEMBLE
- Place a nonslip mat on top of a cake turntable and place a cake board on top.
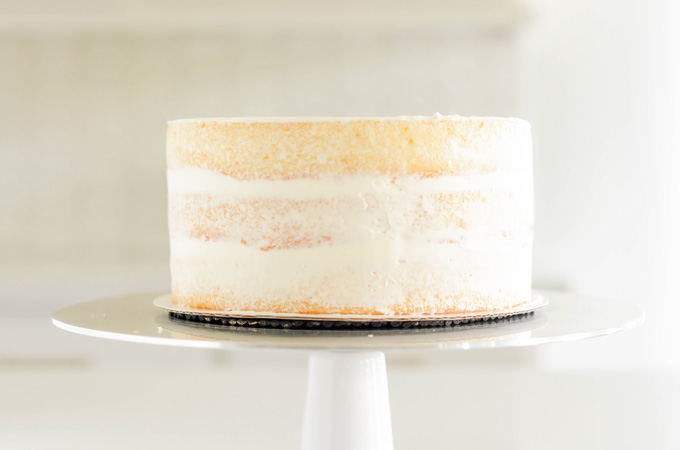
Center the first cake layer on top of the cake board, making sure there's even spacing from all around the edges. Fit a piping bag with a round piping tip or coupler and fill the piping bag with about 1 cup buttercream. Pipe a buttercream dam around the outer edge of the cake. Fill the center with half of the orange curd and spread out in an even layer with a small offset cake spatula. Place the second cake layer on top and gently press to adhere to the bottom cake layer. Pipe a buttercream dam around the outer edge and spread the remaining orange curd out in an even layer until it reaches the buttercream dam. Add the third and final cake layer (bottom side up) on top and gently press to adhere.
CRUMB COAT
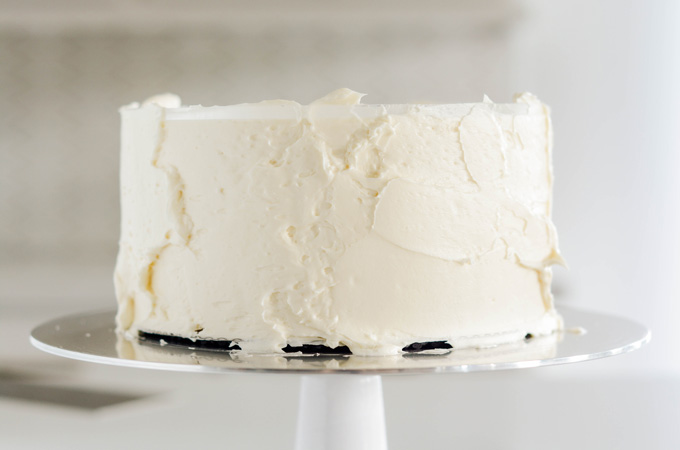
- Apply a thin layer of buttercream over the top and sides of the cake, creating a crumb coat. Chill the crumb coated cake in the refrigerator for 30 minutes.
CAKE DECORATING
- Line an 8 inch round acrylic cake disc with parchment paper by applying a small amount of buttercream to the disc.
- Place a large dollop of buttercream on top of the cake and smooth out evenly with an offset cake spatula. You should have excess buttercream hanging off the edges. Place the lined acrylic disc on top of the cake, (parchment side down) being sure that the disc lines up with the bottom cake board. Apply buttercream to the sides of the cake. With a cake scraper touching the bottom cake board and top acrylic disc, gently rotate the turntable to smooth out the buttercream. Apply more buttercream on spots that have gaps and smooth out. Place the cake in the refrigerator to chill while you color the buttercream.
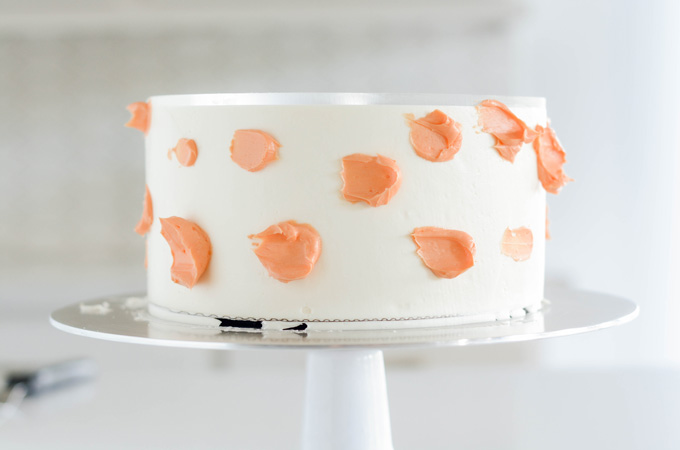
- Divide 2 cups of buttercream between two bowls and color one with orange and the other a lighter orange.
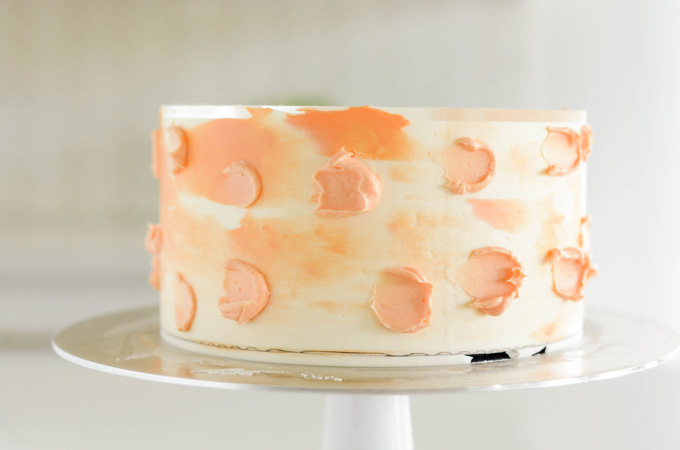
- With a small offset spatula, randomly add small dabs of one of the darker orange colored buttercream to the chilled cake around the sides. Gently press the cake scraper to the side of the cake and spin the cake turntable to smooth the buttercream. Place the cake in the refrigerator for about 15 minutes before adding the other lighter shade of orange buttercream to the cake.
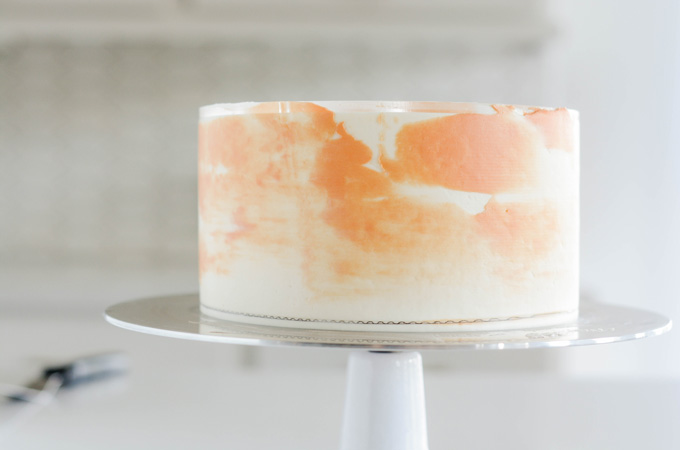
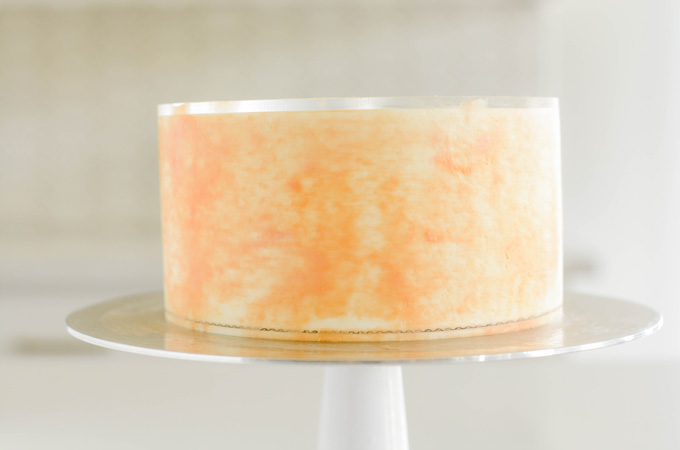
- Randomly add small dabs of the lighter orange buttercream around the sides of the cake. Gently press the cake scraper to the side of the cake and spin the turntable to smooth the buttercream. Apply more colored buttercreams in spots that you think need it and rotate one more time until you get the look you want.
- Insert a cake spatula under the acrylic disc and slowly rotate the turntable until the disc releases. Peel off the parchment paper and smooth out the top of the cake by gently dragging any raised edges towards the center of the cake.
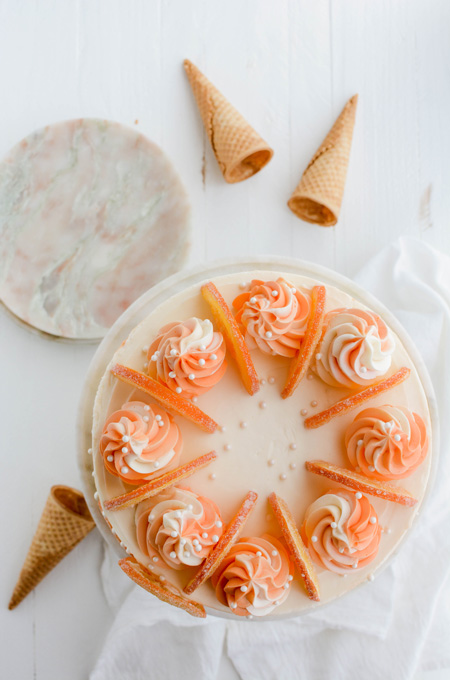
- Fit a piping bag with Ateco piping tip #827 and fill with all remaining colors of buttercream. Pipe 8 swirls on top of the cake. Place candied orange slices between each swirl. Carefully transfer the cake to a cake pedestal and serve.
Notes
Candied orange slices can be made up to 1 week in advance, stored in an airtight container at room temperature.
Orange curd can be prepared up to 1 week in advance, stored in an airtight container in the refrigerator.
Cake layers can be baked up to 3 days in advance, wrapped in plastic and stored in an airtight container in the refrigerator.
Frosting is best made the day of assembling the cake.
Nutrition Information:
Yield: 12 Serving Size: 1Amount Per Serving: Calories: 1160Total Fat: 74gSaturated Fat: 37gTrans Fat: 0gUnsaturated Fat: 33gCholesterol: 245mgSodium: 659mgCarbohydrates: 119gFiber: 2gSugar: 86gProtein: 10g
*Nutrition information is an estimate and will vary.*


Mercedes says
1 what with the heavy cream
Mary says
Thanks for catching that. That should be 1 cup heavy cream.
Mercedes says
@Mary, I wanna make this today for my nephew birthday. I wanna make sure I got the steps right so I do add one cup of ice cream and one cup of heavy cream will that make my icing runny
Mary says
No it will not make the icing runny. Thanks for double checking with me though!
Ellen says
Love this! Are those pearls or frosting dots decorating it?
Mary says
They're edible pearls.
Jessica says
I see heavy cream listed in the ingredients, but the recipe doesn't tell when to add that in.
Mary says
Thank you for catching that. You can add it in with the vanilla extract and melted ice cream.
Bre says
hi there. my cake turned out so pretty!!! I do have a question though, my cake has good flavor but it tough and a bit dry. Ideas on what I should do different? Yes, I followed directions 100%. All ingredients as listed and at room temp, I use cake pan wraps and cooked only 20 minutes and then tooth pick came out clean.
Thank You for any help you can give me!!
Mary says
Hi Bre. My first guess is it may have been over baked. Some ovens run hotter than others. I would suggest getting an oven thermometer just to be sure. I also like to take my cakes out when there are a few crumbs attached to the skewer/toothpick. In my experience when the tester comes out clean, the cake is probably over baked.
Jane says
This is a very beautiful and delicious looking cake. Since my husband is the only one eating it, how does it freeze so he could save some for later? Thanks
Mary says
You can wrap the cake in plastic wrap, and then wrap in foil and freeze. To thaw, place the cake in the refrigerator 24 hours before you plan to eat it. Once it has thawed you can let it sit on the counter at room temperature for an hour or 2 before consuming.