
This ain’t your momma’s pineapple upside-down cake. (At least not my momma’s.)
I remember when I was a kid my mom would make pineapple upside-down cake quite often, usually from a box or a basic homemade version. Believe it or not, when I was a child I didn’t like cake. But I loved pineapple upside-down cake. I think it was the tasty cake that lay underneath the candy-like topping, and the texture of the pineapple; that sweetness in my mouth as I chewed. That brought a smile to my face. And my favorite part, was the maraschino cherries!
This version does not have the cherries, but believe me, you won’t miss them. No offence to my mother, but this is a more sophisticated pineapple upside-down cake.
I found this recipe in the book In the Sweet Kitchen. And it’s absolutely perfect.
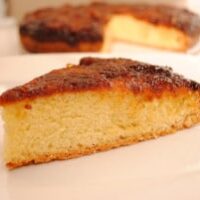
Caramelized Pineapple Upside-Down Cake
Yield:
12
No Ratings
Ingredients
TOPPING
- 1 large, sweet ripe pineapple
- 1/3 cup unsalted butter
- 1 cup plus 2 tablespoons granulated sugar
CAKE
- 1 ½ cups all purpose flour
- 1 ½ teaspoons baking powder
- ¼ teaspoon salt
- 3 large eggs
- 4 or 5 large egg yolks (if the yolks seem small for their size of the egg, use 5 rather than 4)
- 1 ½ cups granulated sugar
- 3 tablespoons brandy
- Seeds of ½ large vanilla bean, hull reserved for another use, or 2 teaspoons vanilla extract
- ¾ cup unsalted butter, melted and cooled
Instructions
- Preheat the oven to 350 F. Grease a 10-inch springform cake pan and line the bottom and about 2 inches up the sides with a single sheet of heavy duty aluminum foil. Press the foil into the inside of the pan, smooth out the wrinkles as best as possible. Grease the foil and line the bottom with a circle of parchment paper cut to fit neatly. Grease the paper and sprinkle the bottom of the pan with a little sugar, carefully tapping out the excess while keeping a finger on the linings to hold them in place.
- Cut the rind from the pineapple and cut away all the little eyes. Cut the fruit lengthwise into four quarters, then cut out and discard the core. Set aside one quarter for another use, and cut each of the remaining three quarters lengthwise into three pieces. Slice each of these into 1/3- to ½- inch slices. Place these in bowl just large enough to hold the fruit and set the bowl within easy arm’s reach of the stove-stop.
- Melt the 1/3 cup of butter in a large heavy pot over medium heat. As soon as the butter is liquid, add the 1 cup plus 2 tablespoons of sugar. Stir constantly over the heat with a wooden spoon until the sugar dissolves and the mixture begins to color. At first the mixture will be grainy and foamy, then after a few minutes of stirring, the oil will separate from the caramel and swirl around on top. Don’t worry about this; the caramel will become homogeneous again. Keep stirring slowly, covering the entire surface of the bottom. At this point, the mixture should look thick and creamy and be a light tawny brown. When the spoon uncovers trails of a darker gold color, watch closely. The caramel will darken quickly now, and you should have the bowl of pineapple ready to add, which will stop the cooking process.
- When the caramel is a glossy dark amber, carefully slip the pineapple slices into the pot all at once, standing back to avoid the splatter. This addition will produce a lot of hissing and sputtering from the pot, as the caramel is shocked with the cool wet fruit. Let the commotion subside a little, about 30 seconds, before using the wooden spoon to gently move the fruit around, coating it with the syrup. The caramel will most likely have seized into a few knobs of hardened toffee, making it awkward to stir, but, again don’t concerned. The lumps will eventually melt back into the caramel. When the contents have settled down to a steady boil, keep stirring slowly, for 6 to 8 minutes depending on the juiciness of the pineapple, until the slices are golden, their edges becoming glassy-looking and almost transparent. At this point, remove the pot from the heat to a heatproof pad or folded kitchen towel beside the prepared cake pan.
- Using a pair of tongs, remove the pineapple sliced from the caramel and arrange them decoratively in the bottom of the pan. Your design is up to you. Use a slotted spoon to remove any little bits of fruit from the syrup and return the pot to the heat. Continue boiling liquid in the pan, stirring slowly, until it is thick and syrup like. It will be very foamy, and you may need to tilt the pan from time to time, running your spoon across the bottom, to gauge the consistency. Watch closely, as the caramel can burn if left unattended. If you are unsure, take the pot off the heat and let the caramel sit for a minute or so. It should be about the consistency of a thick honey. Pour the hot caramel over the pineapple, and then set the pan aside.
- Into a small bowl, sift the flour, baking powder and salt. Set aside. In a larger bowl, lightly whisk the eggs and egg yolks to break them up. Whisk in the 1 ½ cups sugar, then blend in the brandy and vanilla seeds or extract. Add the dry ingredients to the egg mixture in two or three additions, stirring with the whisk until thoroughly incorporated. Gently stir in the cooled melted butter. The batter should be smooth and glossy and will be fairly runny. Pour the batter over the pineapple slices in the pan, taking care not to disturb the fruit layer of fruit.
- Place the pan on a baking sheet and set in the middle of the preheated oven. Bake for 1 hour and 10 minutes to 1 hour and 20 minutes. An evenly golden crust will have formed on the top of the cake, and the edges should be just beginning to pull away from the sides of the pan. To test for doneness, poke a wooden skewer through the center of the crust, making a larger hole than the skewer needs, so the crust doesn’t wipe it clean as you pull it out; it should come out clean or with a few moist crumbs clinging to it. Transfer the pan to a rack and cool for 7 to 8 minutes. Run a thin bladed knife around the cake and carefully release the sides of the pan. Invert the cake onto a serving platter and remove the bottom of the pan. Peel away the foil and the parchment paper, taking care not to tear the fragile hot cake. Cool completely before serving or covering and storing. This cake is really best the day it is made, but it can be stored for several days, well covered at room temperature.


Leave a Reply