
WOW! What can I say? I love how it turned out.
Our office had a Gingerbread Contest this year for the first time. I had never done one before, but was up for the challenge. I had it all planned out and had a sketch and measurements and everything. I thought I was set. Well come time to but this 18 inch long 1 foot tall gingerbread house up (which I have no experience in) things started falling apart. I had spent so much time on it once I realized this thing isn't going up. I said forget it. I told my husband I am done with this and said I'd try it again next year. That was this passed weekend. And he gave me a look and said are you sure? (He knows me all to well) I said yeah I think so. Well come Monday I had a change of heart. My creative thinking just wouldn't allow me to give up so quickly. So at last minute, just 3 days before the contest I got my creative juices flowing and this is what I came up with. I am really really happy with it. And I am so glad it's over and done with. However, I won't know who wins until tomorrow morning, but I am hoping I am the winner. I had planned a lot more details on this but time caught up with me and I could only do so much. Hands on time it took me about 15 hours. Time including drying times, 72 hours.
I found the templates online but unfortunately the site is down right now. I printed the templates out Monday and by Tuesday they just seemed to disappear.
The recipe I used for the gingerbread can be found here http://www.foodnetwork.com/recipes/gingerbread-house-recipe/index.html at Food Network. It's really a delicious recipe. This was not my plan to make homemade gingerbread. I wanted to make the box kind but I was not able to find any when I need it. And now after I don't need the box anymore I see them out in the stores now. But I am glad I did make the homemade gingerbread. This recipe is delicious.
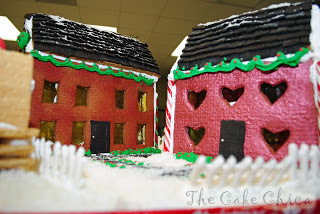
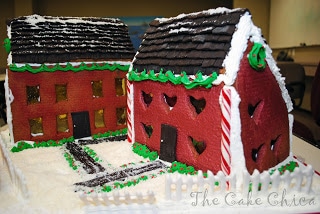
This only problem I came across was the house with the heart windows. I put the outside walls on the sides, outside of the back wall which made the house wider then the roof. So I stuck a candy cane in the inside and filled the gap with royal icing. Looks like it worked cause it didn't fall down. I also came across another problem with the template on that same house. The 2 sides of the house were printed exactly the same so I had to re bake one side of the house and flip it around. No biggie I baked it up real quick and got back on schedule. (Always good to have extra dough for times like this one.)
I ran a brick impression mat over the cookie dough before I baked it. It's now all that noticable but the spray color helped bring the texture out a little. The red spray is Wilton, which I picked up at Hobby Lobby, the red shimmery house is Luster Red by PME you can get that here. http://www.globalsugarart.com/product.php?id=20830&name=Red%20Lustre%20Spray%20by%20PME
Once the cookies were baked and cooled, on went the spray paint. Once that was dry I melted some butterscotch hard candies and jolly rancher candies in the oven on parchment paper to do the windows. Once those were dried I broke them and with the royal icing glued them on the back and let those dry.

Once the windows were done, I put the walls together with the royal icing the recipe is here http://allrecipes.com//Recipe/royal-icing-ii/Detail.aspx
Once the walls were up I decorated the yard with green royal icing bushes around the houses and some green garland. The doors and roofs were done with chocolate Satin Ice which can be found here http://www.globalsugarart.com/product.php?id=19931&name=Satin%20Ice%20Dark%20Chocolate%20Rolled%20Fondant%20Icing%20-5%20pounds
I love the roof tops on this. It took the most time but was worth it. I think it really makes the house(s). I also did the walkways in the chocolate Satin Ice, which tastes like Tootsie Rolls! I ate quite a bit making this lol.
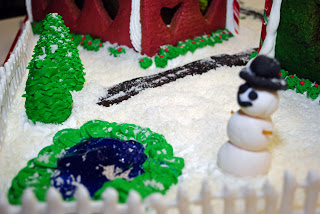
The snow I made with a mixture of coconut and a little sparkle from Wilton. I had my husband process it in the food processor to make it a little more fine. I was running out of time so I put him to work.
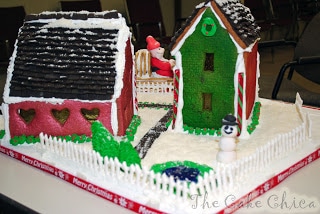
For the fence I used a CK mold and Satin Ice Gumpaste which you can find here http://www.globalsugarart.com/product.php?id=20110&name=Gumpaste%20%205%20pounds%20by%20Satin%20Fine%20Foods Most of them stood up fine with no help, some others I used some balled up wax paper to hold them up straight overnight to dry.
The pond was made with Wilton Piping Gel with Electric Blue color. Both you can find at Hobby Lobby.
My snow man I just came up with. I stick some pasta in for arms. (By the way everything on here is 100% edible.)

The trees I saw a You Tube tutorial which you can find here http://www.youtube.com/watch?v=lDvpQn3fUcg
I didn't have any Tylose powder so I just used fondant. They kind of droopy but that's why I needed the Tylose but it's ok. I was in a time crunch so I did the best I could with what I had.
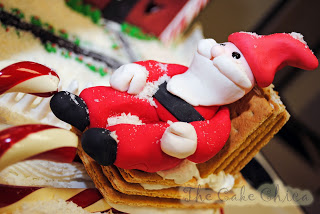


I love my santa clause. It's also my first time doing any sort of figure modeling. I learned how to do this very easily by watching this You Tube video http://www.youtube.com/watch?v=9upG-QF7G_c
I am very happy with it. Lots of "first time" things I did on here.
I had so much fun doing this. I can't wait to see what I can come up with next year. If you have any questions feel free to ask.
And I hope I am the winner tomorrow!!!!!


covnitkepr1 says
Great job...but...Brrrr, looks so cold outside.My first love is Jesus…then my wife of 45 years…then cooking. I really enjoyed looking over your blog. Feel free to look over my blog and become a follower if you wish.Your follow wedgit is not working(not showing up) so I can't follow you right now. Will put you on my "favorites" bar till or if you fix it.(could be on my end...maybe)