
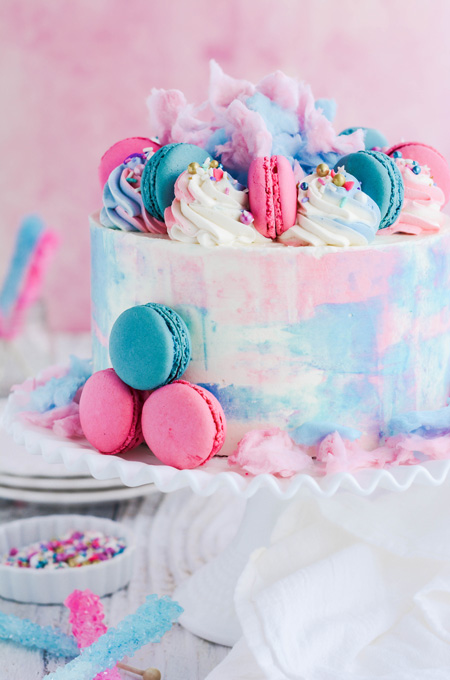
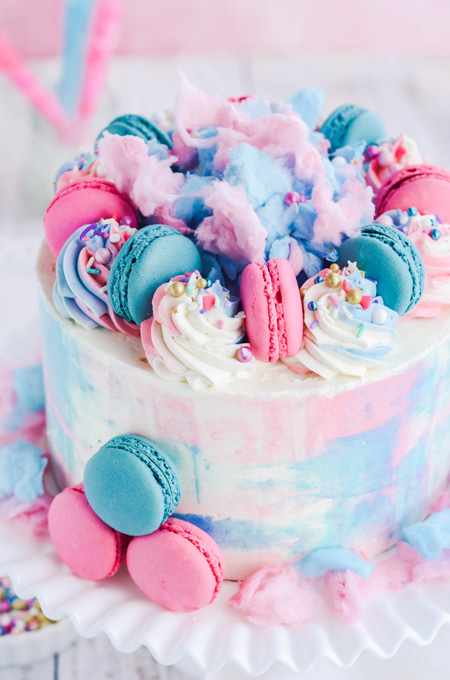
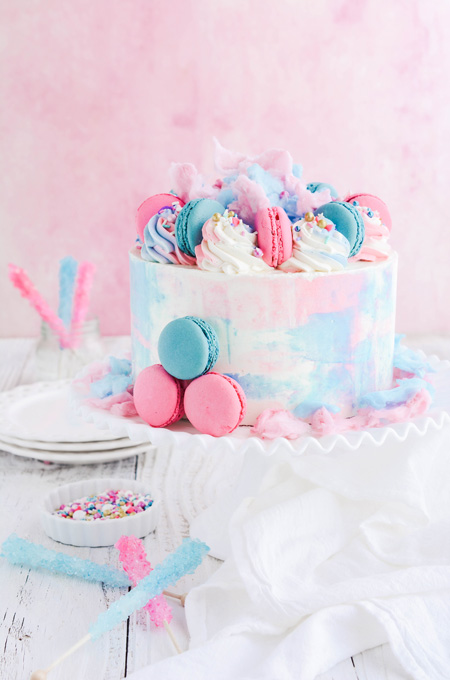
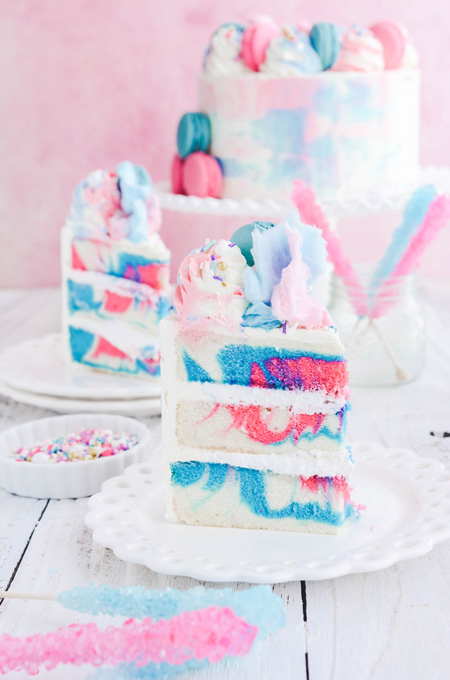
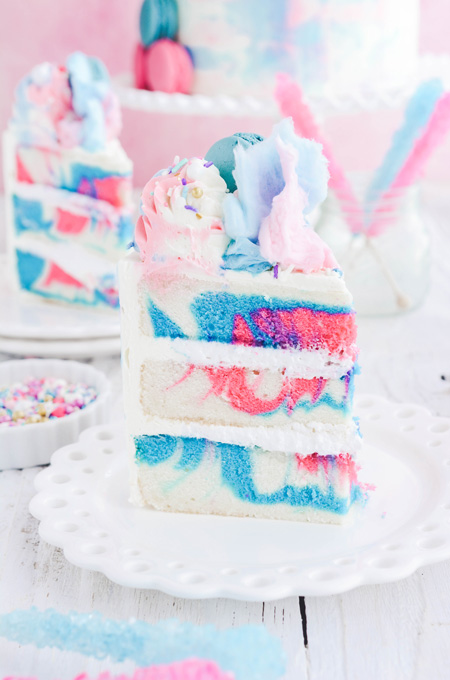
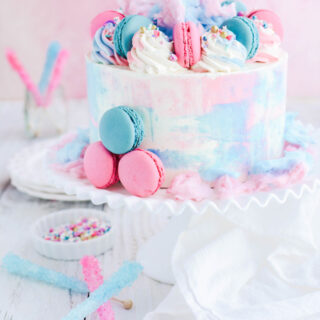
This Cotton Candy Layer Cake is perfect for many occasions! Birthdays, baby showers and more, this cake has got you covered.
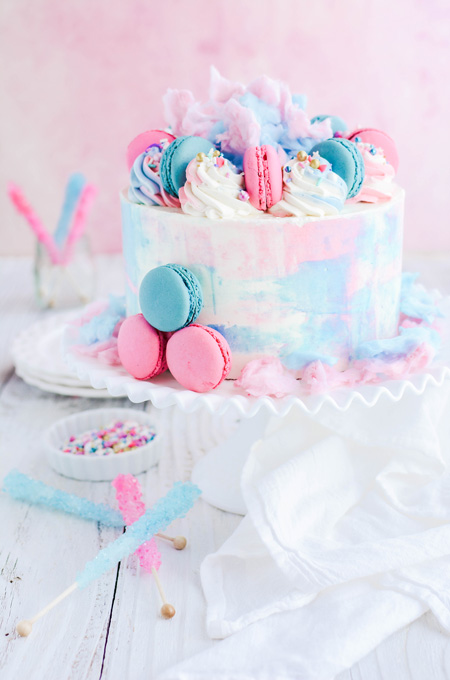
Not only is this cake beautiful but it's also pretty darn delicious too! It's three layers of cotton candy flavored cake with pink and blue swirls. Next, it's filled with homemade marshmallow filling and frosted with cotton candy flavored Swiss meringue buttercream. And guess what... I'm gonna show you how to make it right out of your home kitchen!
Simple Syrup
Using a simple syrup is an easy way to add extra moistness to your cake as well as giving the cake an extra shot of flavor by using flavored liquors or extracts.
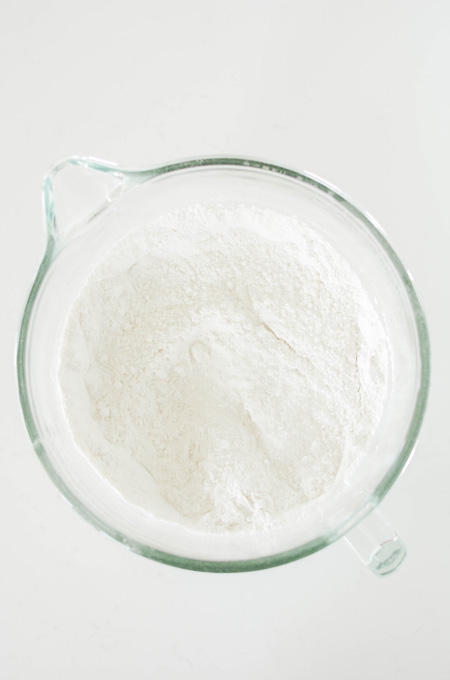
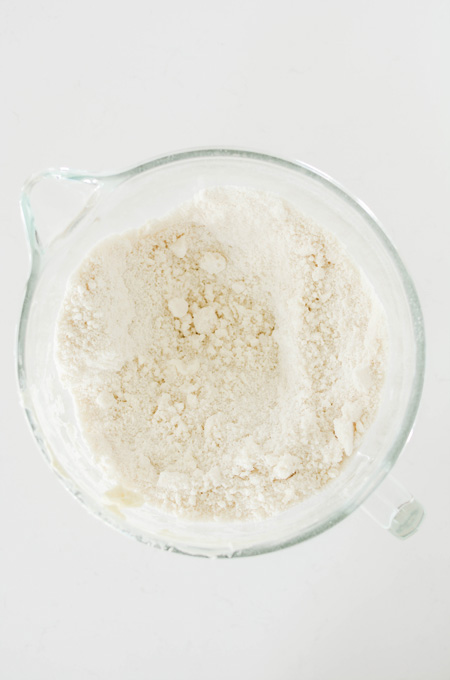
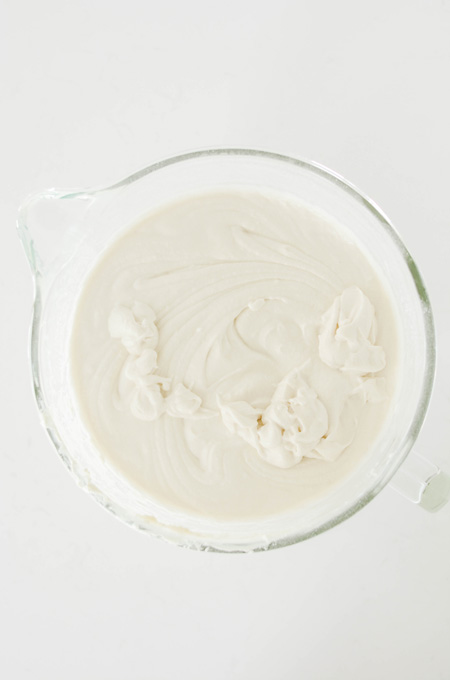
Cotton Candy Layer Cake Ingredients
- Whole milk: thins out the batter, generates steam during baking and helps gluten develop when it interacts with the flour.
- Egg whites: this cake uses egg whites instead of whipped egg whites to reduce the holes in the cake layers.
- Vanilla extract: enhances flavor.
- Cotton candy flavoring: gives the cake its flavor.
- Sour cream: lends a tangy flavor to the cake and creates a moist texture. Buttermilk or yogurt can be substituted for sour cream.
- Cake flour: also known as soft flour, contains less protein than all-purpose flour. And creates a delicate and fine crumbed cake.
- Granulated sugar: sweetens the cake and easily mixes in to cake batter.
- Baking powder: is a mixture of baking soda and cornstarch. Baking powder works twice by coming in contact with liquid and then again when it comes into contact with heat.
- Baking soda: is an alkali and must be used with an acidic ingredient such as sour cream.
- Salt: enhances the cakes flavor.
- Unsalted butter: adds a rich flavor and creates texture in the cake.
- Gel food coloring: pink and blue gel food coloring easily colors the cake batter without changing the consistency of the cake batter. I used Wilton's Pink and Sky Blue for this cake.
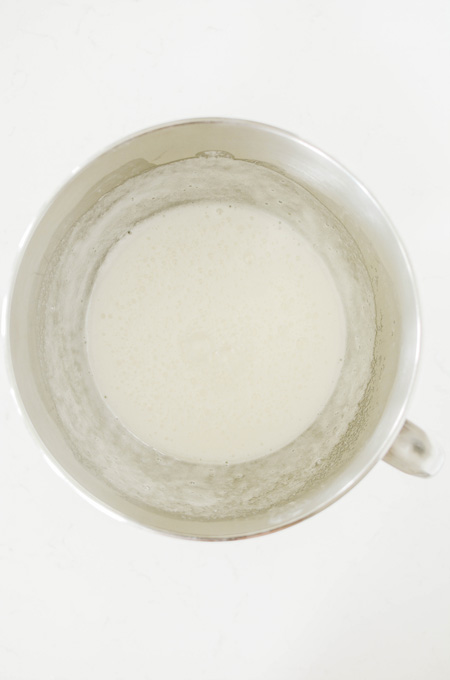
Marshmallow Filling
Some things to note when making this filling:
- You'll need a thermometer to make this recipe so be sure to have one on hand before you start.
- This filling needs to be used right away so don't try to make it ahead of time. And don't over fill. I've kept the filling to 2/3 cup between each layer. This filling likes to slip if you add too much so watch out.
- The picture below is of this filling; however, I decided to cut the recipe in half because the original recipe left me with too much left over filling. So just note that the image below shows twice as much filling.
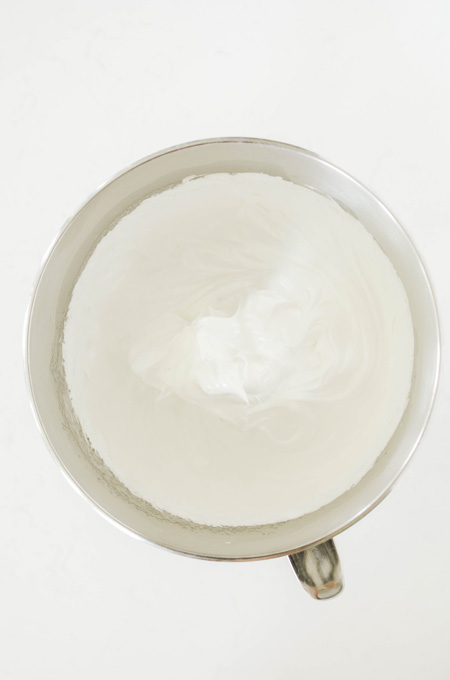
Cotton Candy Swiss Meringue Buttercream Tips
- Your mixer bowl should be completely dry and clean before use.
- There should be no grease residue on the bowl and your egg whites should be free of egg yolks.
- Whisk together the sugar and egg whites well, or the eggs may start to cook on their own.
- Make sure the double boiler stays at a simmer.
- Your butter should be room temperature before using.
- Add your butter by tablespoon to the meringue.
- The buttercream should be as smooth as possible.
- To help remove air bubbles, run the mixer on low speed for one minute.
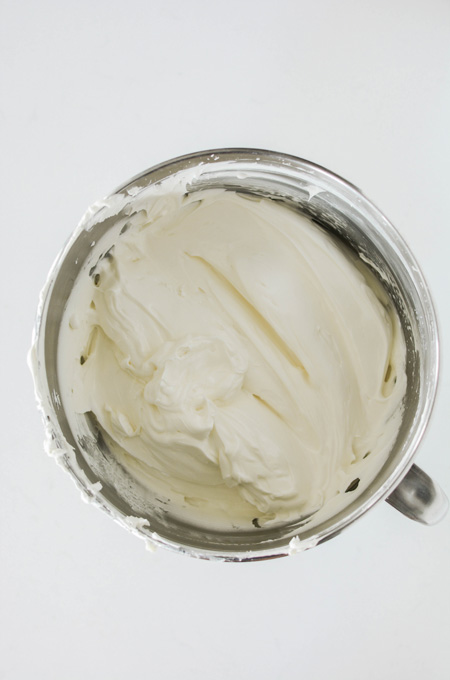
Swiss Meringue Buttercream Trouble Shooting
- If the buttercream looks curdled in the final stages then the butter was probably too cold when added to the meringue. Keep mixing longer until it comes together.
- If the buttercream looks soupy but not separated, then the meringue was probably too warm when the butter was added. Place the mixer bowl in the refrigerator for 15 to 20 minutes and beat until the buttercream comes together.
How To Assemble Cotton Candy Layer Cake
- Trim each cake layer so they are completely flat and even. With a pastry brush, gently brush simple syrup over the top of each cake.
- Place a nonslip mat on a cake turntable and place an 8-inch round cake board on top. Center the first cake layer on the cake board. Attach a plain round piping tip or coupler to a piping bag and fill with about 1 cup of buttercream.
- Pipe a buttercream dam around the edge. Spread about 2/3 cup (don’t over fill) of the marshmallow filling in the center in an even layer. Place the second cake layer on top and pipe a buttercream dam around the edge. Fill the center with another 2/3 cup of marshmallow filling. Place the third cake layer on top (bottom side up), pressing gently to adhere to the cake.

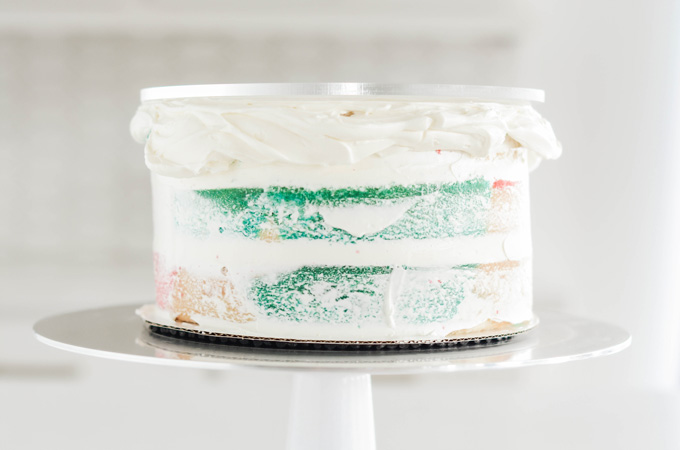
How To Crumb Coat A Cake
Apply a small amount of buttercream to the top and sides of the cake with an offset cake spatula to catch any loose crumbs and to seal the cake. Place in the refrigerator for 30 minutes. This ensures no cake crumbs will get into your final layer of buttercream and gives you a nicely chilled cake base to start with when decorating.
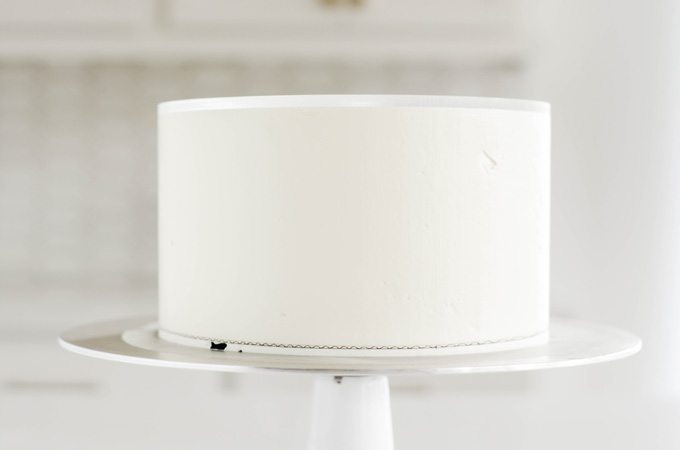
Frosting The Cake
- Line an 8 inch round acrylic cake disc with parchment paper by applying a small amount of buttercream to the disc.
- Place a large dollop of buttercream on top of the cake and smooth out evenly with an offset cake spatula. You should have excess buttercream hanging off the edges. Place the lined acrylic disc on top of the cake, (parchment side down) being sure that the disc lines up with the bottom cake board.
- Apply buttercream to the sides of the cake. With a cake scraper touching the bottom cake board and top acrylic disc, gently rotate the turntable to smooth out the buttercream. Apply more buttercream on spots that have gaps and smooth out. Place the cake in the refrigerator to chill while you color the buttercream.
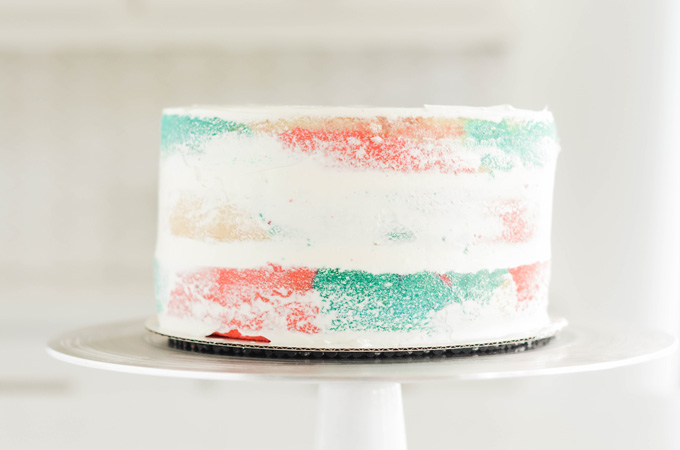
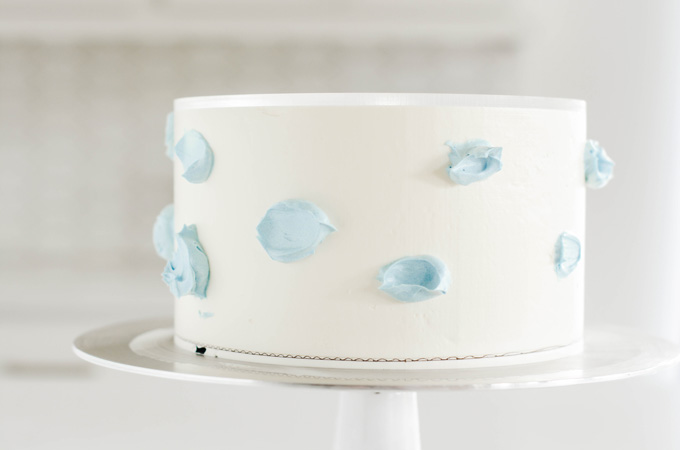
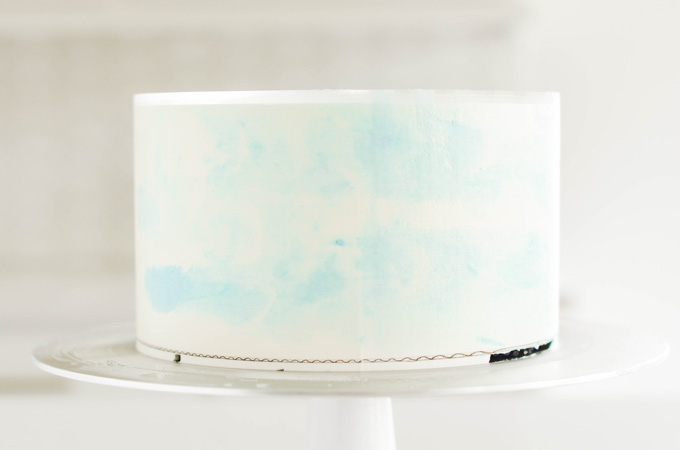
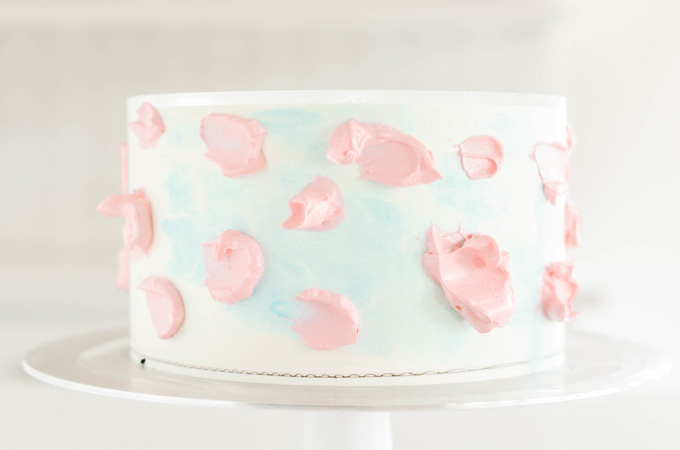
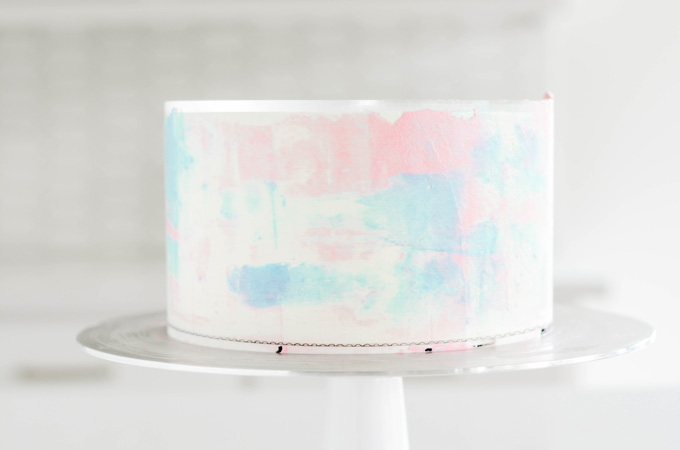
How To Create Textured Watercolor Buttercream
- With a small offset spatula, randomly add small dabs of the blue colored buttercream to the chilled cake around the sides. Gently press the cake scraper to the side of the cake and spin the cake turntable to smooth the buttercream. Place the cake in the refrigerator for about 15 minutes before adding the pink buttercream to the cake.
- Randomly add small dabs of the pink buttercream around the sides of the cake. Gently press the cake scraper to the side of the cake and spin the turntable to smooth the buttercream. Apply more blue and pink buttercream in spots that you think need it and rotate one more time to get the look you want.
Cake Decorating Tools
- Nonslip mat
- Cake turntable
- 8-inch round cake board
- Coupler or round piping tip
- Piping bags
- Offset cake spatula
- 8-inch round acrylic disc
- Parchment paper
- Cake scraper
- Ateco piping tip #827
- Cotton candy
- Sprinkles
- Macarons
Cotton Candy Layer Cake Baking Schedule
- Day 1: Make simple syrup.
- Day 2: Bake cake layers.
- Day 3: Prepare filling and buttercream and assemble, decorate and serve. ❗️Warning ❗️Add the cotton candy right before serving. The cotton candy will start to deflate as soon as it comes out of the packaging.
Make Ahead
Simple syrup can be made up to 1 week in advance stored in an airtight container in the refrigerator.
Cake layers can be made up to 3 days in advance, wrapped in plastic, stored in an airtight container in the refrigerator.
Filling and buttercream are best made the day of assembly and serving.
Let's Connect
The Cake Chica is on the social media platforms below Like, follow and subscribe! We would love to have you over!
Suggested Recipes

Cotton Candy Layer Cake
Three layers of cotton candy flavored cake layers with pink and blue swirls, filled with marshmallow filling and frosted with cotton candy Swiss meringue buttercream. Garnished with cotton candy, macarons and sprinkles.
Ingredients
SPECIAL TOOLS
- 3 8-inch round cake pans
- Nonstick baking spray
- 4 cup liquid measuring cup
- Stand mixer
- Candy thermometer
- Pastry brush
- Nonslip mat
- Cake turntable
- 8-inch round cake board
- Coupler or round piping tip
- Piping bags
- Offset cake spatula
- 8-inch round acrylic disc
- Parchment paper
- Cake scraper
- Ateco piping tip #827
- Cotton candy
- Sprinkles
- Macarons
COTTON CANDY CAKE
- 1 3/4 cups (420g/10.6 ounces) whole milk, at room temperature
- 6 large egg whites
- 1 tablespoon vanilla extract
- 1 tablespoon LorAnn cotton candy flavoring
- 2/3 cup(150g/5.3 ounces)sour cream, at room temperature
- 4 1/3 cups (498g/17.3 ounces) cake flour
- 2 1/2 cups (500g/17.7 ounces) granulated sugar
- 1 1/4 teaspoon baking powder
- 1/2 teaspoon baking soda
- 1/2 teaspoon salt
- 1 1/4 cups (282g/10 ounces) unsalted butter, cut into tablespoon sized pieces, at room temperature, about 65 degrees
- Wilton Pink gel coloring
- Wilton Sky Blue gel coloring
SIMPLE SYRUP
- 1/2 cup water
- 1/2 cup (3.5 ounces) granulated sugar
MARSHMALLOW FILLING
- 1/2 cup (3.5 ounces) granulated sugar
- 1/8 teaspoon cream of tartar
- 1/4 cup water
- 2 egg whites
- Pinch fine sea salt
- 1/2 teaspoon vanilla extract
COTTON CANDY BUTTERCREAM
- 1 cup egg whites (from about 8 eggs)
- 2 cups (14 ounces) granulated sugar
- 3 cups (6 sticks) unsalted butter, cut into tablespoon sized pieces, at room temperature
- 1 tablespoon cotton candy flavoring
Instructions
COTTON CANDY CAKE
- Adjust an oven rack to the center position and heat oven to 325 degrees. Spray 3 8-inch round cake pans with nonstick baking spray and set aside.
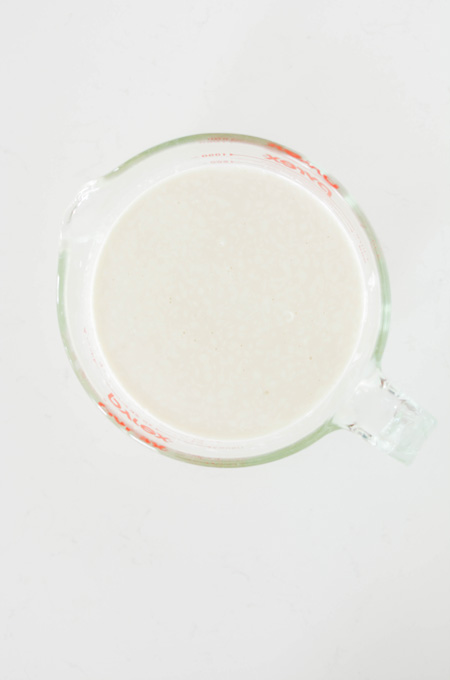
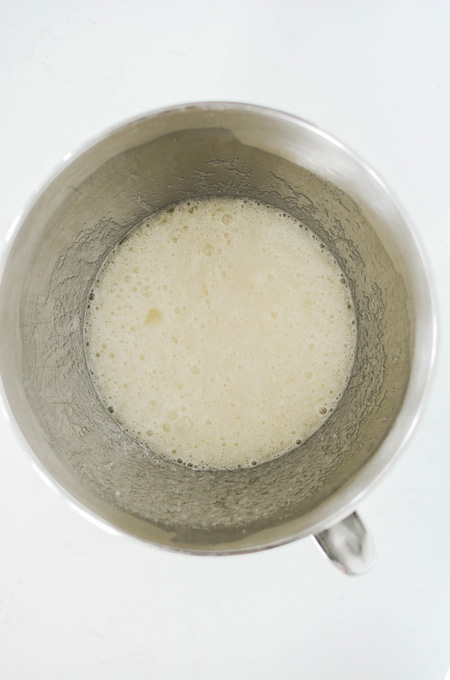
- In a 4 cup liquid measuring cup, whisk together the milk, egg whites, extract, flavoring and sour cream.
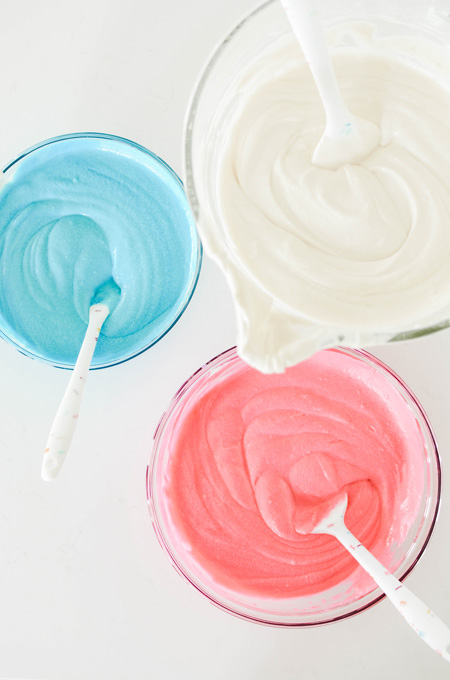
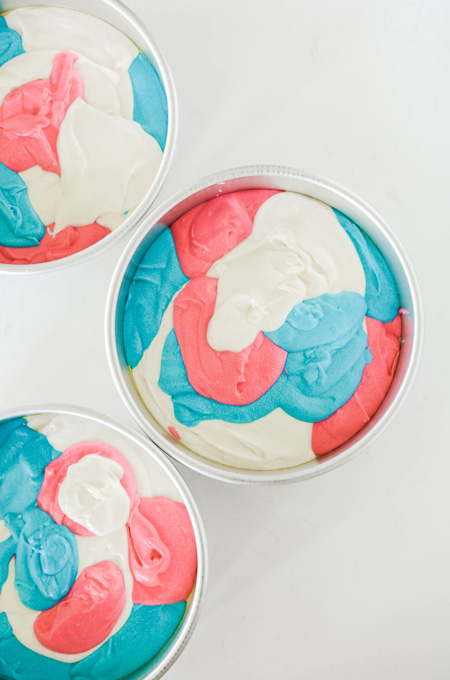
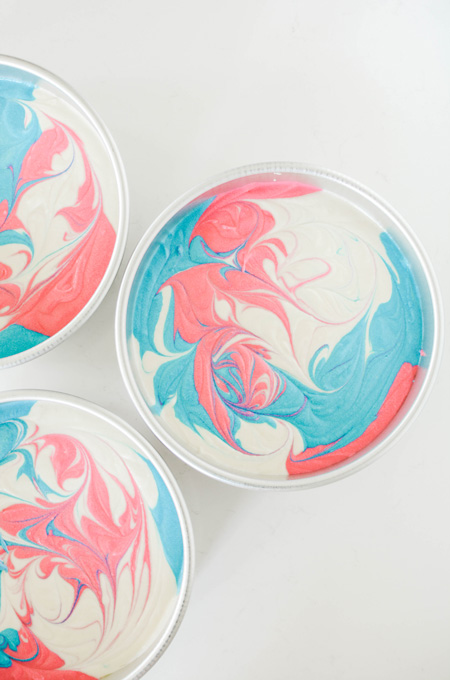
- In the bowl of a stand mixer, with the paddle attachment attached, mix the flour, sugar, baking powder, baking soda, and salt on low speed until combined. Add butter one tablespoon at a time until the mixture forms pea-sized pieces, about 1 minute. Reserve ½ cup of the milk mixture and pour the remaining to the flour mixture and mix on medium-high speed until light and fluffy, about 1 minute. Reduce the mixer speed to medium-low and add the reserved ½ cup milk mixture to the batter and mix until combined, about 30 seconds. Do not over mix. The batter may look curdled. Give the batter a final stir by hand with a rubber spatula. Remove half of the batter and divide between two bowls. Add the pink gel food coloring in one bowl to color the batter pink. And blue to the batter in the other bowl and stir to combine. Leave the batter in the mixer bowl uncolored. Using spoons or ice cream scoops, add in one scoop of uncolored batter to a cake pan, then one scoop of pink batter and then one scoop of blue and alternate until the batter has been divided between all 3 cake pans. With a wooden skewer or knife, slightly swirl the cake batter in a figure 8 pattern.
- Gently tap cake pans on the counter to settle the batter and bake until a toothpick inserted in the centers comes out with a few moist crumbs attached, about 30 to 35 minutes, switching and rotating pans halfway through baking.
- Let cakes cool in their pans for 30 minutes on cooling racks. Then invert on cooling racks to cool completely.
SIMPLE SYRUP
- Combine the water and sugar in a small saucepan and stir to combine. Cook over medium heat until the sugar has completely dissolved. Continue to cook for 3 minutes until the liquid has thickened slightly.
MARSHMALLOW FILLING
- Combine the sugar, cream of tartar and water in a small saucepan with a tight fitting lid. Heat saucepan over medium-high heat uncovered. Once the mixture comes to a boil, cover the saucepan and cook for 2 minutes. Uncover the saucepan and continue to boil until the sugar syrup reaches 242 degrees on a candy thermometer.
- While the syrup is heating up, combine the egg whites and salt in a clean bowl of a stand mixer fitted with the whisk attachment. Starting on low speed, beat egg whites, and gradually increase the speed to medium-high in the process. Beat until soft peaks form.
- If your sugar syrup is close to reaching 242 degrees, continue to whip the egg whites to firm peaks. If your sugar syrup is not close to reaching 242 degrees, let the egg whites wait at the soft peak stage before whipping them into firm peaks as the sugar syrup comes to temperature.
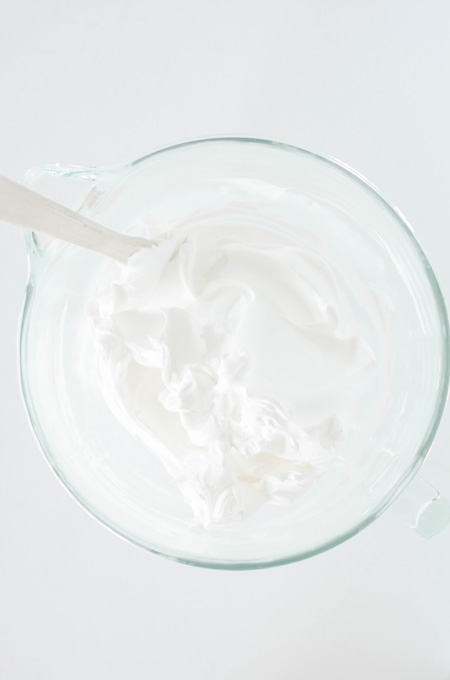
- Once the sugar syrup has come to 242 degrees and the egg whites are whipped to firm peaks, run the mixer on high speed and slowly pour the sugar syrup down the inside of the bowl and into the whipped egg whites. Continue whipping until the filling becomes thick and holds stiff peaks, about 5 minute. Add vanilla extract and whip to combine.
COTTON CANDY BUTTERCREAM
- In the bowl of a stand mixer fitted with the whisk attachment, pour in the egg whites and sugar and whisk by hand until combined. Fill a medium saucepan with about 2 inches of water and bring to a simmer. Place mixer bowl on top, being sure the bottom of the bowl does not touch the water and attach a candy thermometer.
- Whisking occasionally, heat the egg mixture until the temperature reaches 160 degrees. Once the mixture reaches 160 degrees, transfer to a stand mixer and beat the mixture on high speed for 10 minutes or until medium-stiff peaks form. At this point the outside of the mixer bowl should be room temperature. Switch out the whisk attachment with the paddle attachment and with the mixer on low speed, add the butter one tablespoon at a time, and then add the vanilla extract. Once combined, turn up the mixer speed to medium-high and beat until the buttercream is smooth about 5 minutes.
ASSEMBLE
- Trim each cake layer so they are completely flat and even. With a pastry brush, gently brush simple syrup over the top of each cake.
- Place a nonslip mat on a cake turntable and place an 8-inch round cake board on top. Center the first cake layer on the cake board. Attach a plain round piping tip or coupler to a piping bag and fill with about 1 cup of buttercream. Pipe a buttercream dam around the edge. Spread about 2/3 cup (don’t over fill) of the marshmallow filling in the center in an even layer. Place the second cake layer on top and pipe a buttercream dam around the edge. Fill the center with another 2/3 cup of marshmallow filling. Place the third cake layer on top (bottom side up), pressing gently to adhere to the cake.
CRUMB COAT
- Apply a small amount of buttercream to the top and sides of the cake with an offset cake spatula to catch any loose crumbs and to seal the cake. Place in the refrigerator for 30 minutes.
FROSTING THE CAKE
- Line an 8 inch round acrylic cake disc with parchment paper by applying a small amount of buttercream to the disc.
- Place a large dollop of buttercream on top of the cake and smooth out evenly with an offset cake spatula. You should have excess buttercream hanging off the edges. Place the lined acrylic disc on top of the cake, (parchment side down) being sure that the disc lines up with the bottom cake board. Apply buttercream to the sides of the cake. With a cake scraper touching the bottom cake board and top acrylic disc, gently rotate the turntable to smooth out the buttercream. Apply more buttercream on spots that have gaps and smooth out. Place the cake in the refrigerator to chill while you color the buttercream.
- Take about 1 cup of buttercream and color it with pink gel food coloring. Take another cup of buttercream and color it with blue gel food coloring.
- With a small offset spatula, randomly add small dabs of one of the blue colored buttercream to the chilled cake around the sides. Gently press the cake scraper to the side of the cake and spin the cake turntable to smooth the buttercream. Place the cake in the refrigerator for about 15 minutes before adding the pink buttercream to the cake.
- Randomly add small dabs of the pink buttercream around the sides of the cake. Gently press the cake scraper to the side of the cake and spin the turntable to smooth the buttercream. Apply more blue and pink buttercream in spots that you think need it and rotate one more time to get the look you want.
- Insert a cake spatula under the acrylic disc and slowly rotate the turntable until the disc releases. Peel off the parchment paper and smooth out the top of the cake by gently dragging any raised edges towards the center of the cake. Apply more uncolored buttercream to the top of the cake if need to fill in any gaps.
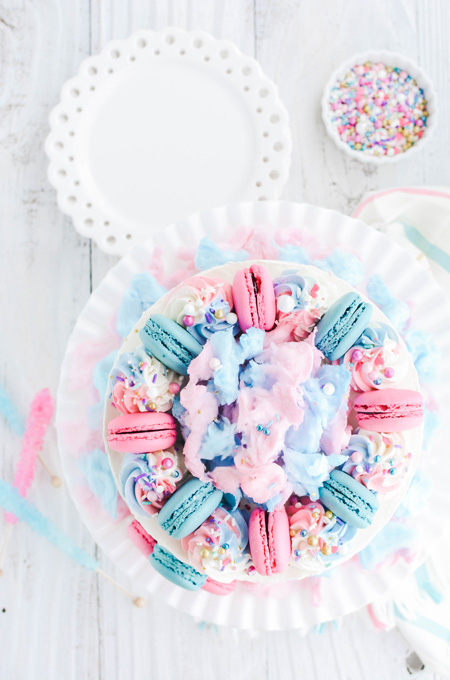
- Fit a piping bag with Ateco piping tip #827 and fill with remaining buttercreams. Pipe 8 swirls on top of the cake. Place macarons between each swirl if using and decorate the center of the cake with cotton candy and sprinkles. Carefully transfer the cake to a cake pedestal and serve. Cotton candy must be added right before serving. As soon as the cotton candy hits the air it starts to deflate.
Notes
Simple syrup can be made up to 1 week in advance stored in an airtight container in the refrigerator.
Cake layers can be made up to 3 days in advance, wrapped in plastic, stored in an airtight container in the refrigerator.
Filling and buttercream are best made the day of assembly and serving.
Assembled cake can be stored in an airtight cake container in the refrigerator for up to 1 day. Bring to room temperature before serving.
Nutrition Information:
Yield: 12 Serving Size: 1Amount Per Serving: Calories: 451Total Fat: 14gSaturated Fat: 5gTrans Fat: 0gUnsaturated Fat: 8gCholesterol: 48mgSodium: 454mgCarbohydrates: 67gFiber: 2gSugar: 25gProtein: 12g
*Nutrition information is an estimate and will vary.*


Mariah says
Can you freeze the cake a week in advance?
Mary says
Yes you can freeze the cake layers. Wrap the cake layers in plastic wrap and a layer of foil. Let the cake layers thaw over night at room temperature and then unwrap.
Kassandra says
Hi Mary- this cake looks delicious and perfect for the birthday cake I’m wanting to make. I have a question on the marshmallow filling. You mentioned making it the day of assembly. Does it hold up well over time? Once the cake is all made I’m assuming it needs to remain refrigerated? Thank you!
Mary says
@Kassandra, once the marshmallow filling is made it needs to be used right away because the texture will start to change as it sits. It'll be fine refrigerated once it is filled inside the cake for about a day. You can let the cake sit out for about 2 hours before serving to bring it to room temperature, but any leftovers should go back in the refrigerator. I hope this helps.